Qt调用C#动态库 Qt之调用C#的动态库的解决办法
Suifqwu 人气:0想了解Qt之调用C#的动态库的解决办法的相关内容吗,Suifqwu在本文为您仔细讲解Qt调用C#动态库的相关知识和一些Code实例,欢迎阅读和指正,我们先划重点:Qt调用C#动态库,C#动态库,下面大家一起来学习吧。
环境:VS2019+Qt5.12
1. CLR库安装
首先,如果你VS2019没有安装CLR库,那么操作步骤为:
- 打开 Visual Studio Installer
- 在已安装中点击修改
- 将使用C++的桌面开发的对V142(14.25)生成工具的C++/CLI支持
- 点击右下角的修改,安装完成后重启软件即可
2. 新建类库(.NET Framework)
注意:此处请确认选择用于创建C#类库(.dll)的项目
此时解决方案的视图为:

一个简单的测试直接在Class1.cs文件添加内容即可,此测试中只修改此文件内容
using System;
using System.Collections.Generic;
using System.Linq;
using System.Text;
using System.Threading.Tasks;

namespace ClassLibrary1
{
    public class Class1
    {
        public Class1() { }
        public int myAdd(int a, int b)
        {
            int c = a + b + 5;
            return c;
        }
        public void mySub(int a, int b, ref int c)
        {
            c = a - b - 5;
        }
        public void mySetText(string text)
        {
            Console.WriteLine("ClassLibrary1的类名Class1下的mySetText: {0}", text);
        }
        public void myGetText(ref string text)
        {
            text = "ClassLibrary1的类名Class1下的myGetText";
        }
    }
}
编写好了之后生成dll,将生成的dll复制到CLR的文件路径下
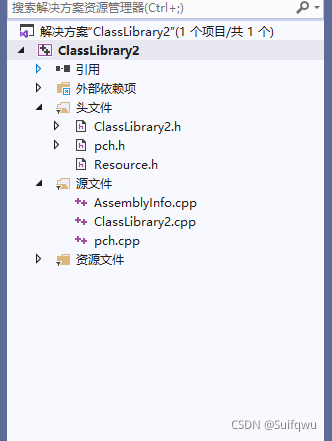
3. 新建CLR类库(.NET Framework)
此时解决方案的视图为:

一个简单的测试对应的头文件ClassLibrary2.h修改即可,此测试中只修改此文件内容
#pragma once

using namespace System;
using namespace System::Reflection;
using namespace System::Runtime::InteropServices;

#using "./ClassLibrary1.dll"

using namespace ClassLibrary1;

extern "C" __declspec(dllexport) int MyAdd(int a, int b)
{
	ClassLibrary1::Class1 obj;
	return obj.myAdd(a, b);
}
extern "C" __declspec(dllexport) void MySub(int a, int b,int *c)
{
	ClassLibrary1::Class1 obj;
	return obj.mySub(a, b, *c);
}

extern "C" __declspec(dllexport) void MySetText(char* text)
{
	ClassLibrary1::Class1 obj;
	String^ str = gcnew String(text);
	obj.mySetText(str);
}

extern "C" __declspec(dllexport) void MyGetText(char** text)
{
	ClassLibrary1::Class1 obj;
	String^ str = gcnew String("");
	obj.myGetText(str);
	*text = (char*)(void*)Marshal::StringToHGlobalAnsi(str);
}
这里编写完成后生成dll,然后非常重要的一步来了,将ClassLibrary1.dll、ClassLibrary2.dll、ClassLibrary2.lib准备复制到运行的Qt执行目录下,如果没有在同一个目录下,在ClassLibrary2调用ClassLibrary1时会找不到ClassLibrary1.dll文件而报错
4. Qt调用
4.1. 调用方法1
#include <QCoreApplication>
#include <windows.h>
#include <QDebug>
#include <QLibrary>
#include <QFile>


typedef int (*ADD)(int,int);
typedef void (*SUB)(int,int,int *);
typedef void (*SHOW)(QString);
int main(int argc, char *argv[])
{
    QLibrary mylib("ClassLibrary2.dll");  //声明dll文件
    if (mylib.load())  //判断加载是否成功
    {
        qDebug() << "DLL  loaded!";
        ADD add = (ADD)mylib.resolve("MyAdd"); //链接到add函数
        qDebug() << "add status: " << add;
        if (add){
            qDebug()<< "Link to add Function is OK!" << add(3,2) ;
        }
        SUB sub = (SUB)mylib.resolve("MySub");
        qDebug() << "sub status: " << sub;
        if (sub){
            int c = 10;
            sub(3,2,&c);
            qDebug()<< "Link to sub Function is OK!" << c;
        }
        SHOW show = (SHOW)mylib.resolve("MySetText");
        qDebug() << "show status: " << show;
        if (show){
            qDebug()<< "Link to show Function is OK!" ;
            const char *buf = "helloworld";
            show(buf);
        }
        qDebug()<< "DLL unload " << mylib.unload ();
    }

    else
    {
        qDebug()<< "DLL is not loaded!" ;
    }

    return 0;
}
4.2. 调用方法2
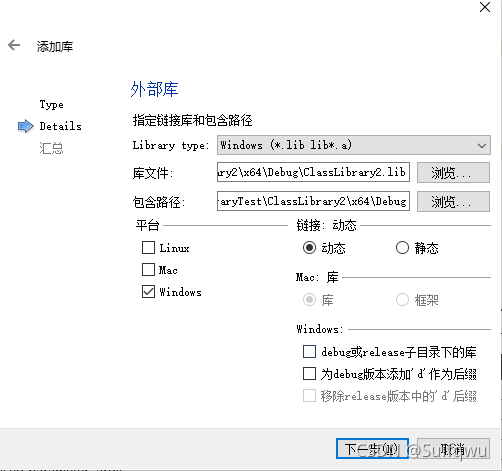
- 右键项目->选择添加库->选择外部库
- 在库文件中找到刚才生成的ClassLibrary2.lib
- 将平台下的linux、Mac取消勾选
- 将Windows下的所有都取消勾选
此时界面如下

extern "C" __declspec(dllexport) void MyGetText(char **p);
extern "C" __declspec(dllexport) void MySetText(char *p);

int main(int argc, char *argv[])
{
    MySetText(QString("helloworld").toUtf8().data());

    char* change_t=nullptr;
    MyGetText(&change_t);
    qDebug() << QString(change_t);
}
加载全部内容