BCEWithLogitsLoss样本不均衡 基于BCEWithLogitsLoss样本不均衡的处理方案
ucas_fhx 人气:0最近在做deepfake检测任务(可以将其视为二分类问题,label为1和0),遇到了正负样本不均衡的问题,正样本数目是负样本的5倍,这样会导致FP率较高。
尝试将正样本的loss权重增高,看BCEWithLogitsLoss的源码
Examples::

    >>> target = torch.ones([10, 64], dtype=torch.float32)  # 64 classes, batch size = 10
    >>> output = torch.full([10, 64], 0.999)  # A prediction (logit)
    >>> pos_weight = torch.ones([64])  # All weights are equal to 1
    >>> criterion = torch.nn.BCEWithLogitsLoss(pos_weight=pos_weight)
    >>> criterion(output, target)  # -log(sigmoid(0.999))
    tensor(0.3135)

Args:
    weight (Tensor, optional): a manual rescaling weight given to the loss
        of each batch element. If given, has to be a Tensor of size `nbatch`.
    size_average (bool, optional): Deprecated (see :attr:`reduction`). By default,
        the losses are averaged over each loss element in the batch. Note that for
        some losses, there are multiple elements per sample. If the field :attr:`size_average`
        is set to ``False``, the losses are instead summed for each minibatch. Ignored
        when reduce is ``False``. Default: ``True``
    reduce (bool, optional): Deprecated (see :attr:`reduction`). By default, the
        losses are averaged or summed over observations for each minibatch depending
        on :attr:`size_average`. When :attr:`reduce` is ``False``, returns a loss per
        batch element instead and ignores :attr:`size_average`. Default: ``True``
    reduction (string, optional): Specifies the reduction to apply to the output:
        ``'none'`` | ``'mean'`` | ``'sum'``. ``'none'``: no reduction will be applied,
        ``'mean'``: the sum of the output will be divided by the number of
        elements in the output, ``'sum'``: the output will be summed. Note: :attr:`size_average`
        and :attr:`reduce` are in the process of being deprecated, and in the meantime,
        specifying either of those two args will override :attr:`reduction`. Default: ``'mean'``
    pos_weight (Tensor, optional): a weight of positive examples.
            Must be a vector with length equal to the number of classes.
对其中的参数pos_weight的使用存在疑惑,BCEloss里的例子pos_weight = torch.ones([64]) # All weights are equal to 1,不懂为什么会有64个class,因为BCEloss是针对二分类问题的loss,后经过检索,得知还有多标签分类,

多标签分类就是多个标签,每个标签有两个label(0和1),这类任务同样可以使用BCEloss。

现在讲一下BCEWithLogitsLoss里的pos_weight使用方法
比如我们有正负两类样本,正样本数量为100个,负样本为400个,我们想要对正负样本的loss进行加权处理,将正样本的loss权重放大4倍,通过这样的方式缓解样本不均衡问题。
criterion = nn.BCEWithLogitsLoss(pos_weight=torch.tensor([4]))

# pos_weight (Tensor, optional): a weight of positive examples.
#            Must be a vector with length equal to the number of classes.
pos_weight里是一个tensor列表,需要和标签个数相同,比如我们现在是二分类,只需要将正样本loss的权重写上即可。
如果是多标签分类,有64个标签,则
Examples::

    >>> target = torch.ones([10, 64], dtype=torch.float32)  # 64 classes, batch size = 10
    >>> output = torch.full([10, 64], 0.999)  # A prediction (logit)
    >>> pos_weight = torch.ones([64])  # All weights are equal to 1
    >>> criterion = torch.nn.BCEWithLogitsLoss(pos_weight=pos_weight)
    >>> criterion(output, target)  # -log(sigmoid(0.999))
    tensor(0.3135)
补充:Pytorch —— BCEWithLogitsLoss()的一些问题
一、等价表达
1、pytorch:
torch.sigmoid() + torch.nn.BCELoss()
2、自己编写
def ce_loss(y_pred, y_train, alpha=1):

    p = torch.sigmoid(y_pred)
    # p = torch.clamp(p, min=1e-9, max=0.99)
    loss = torch.sum(- alpha * torch.log(p) * y_train \
           - torch.log(1 - p) * (1 - y_train))/len(y_train)
    return loss~
3、验证
import torch
import torch.nn as nn
torch.cuda.manual_seed(300)       # 为当前GPU设置随机种子
torch.manual_seed(300)            # 为CPU设置随机种子
def ce_loss(y_pred, y_train, alpha=1):
   # 计算loss
   p = torch.sigmoid(y_pred)
   # p = torch.clamp(p, min=1e-9, max=0.99)
   loss = torch.sum(- alpha * torch.log(p) * y_train \
          - torch.log(1 - p) * (1 - y_train))/len(y_train)
   return loss
py_lossFun = nn.BCEWithLogitsLoss()
input = torch.randn((10000,1), requires_grad=True)
target = torch.ones((10000,1))
target.requires_grad_(True)
py_loss = py_lossFun(input, target)
py_loss.backward()
print("*********BCEWithLogitsLoss***********")
print("loss: ")
print(py_loss.item())
print("梯度: ")
print(input.grad)
input = input.detach()
input.requires_grad_(True)
self_loss = ce_loss(input, target)
self_loss.backward()
print("*********SelfCELoss***********")
print("loss: ")
print(self_loss.item())
print("梯度: ")
print(input.grad)
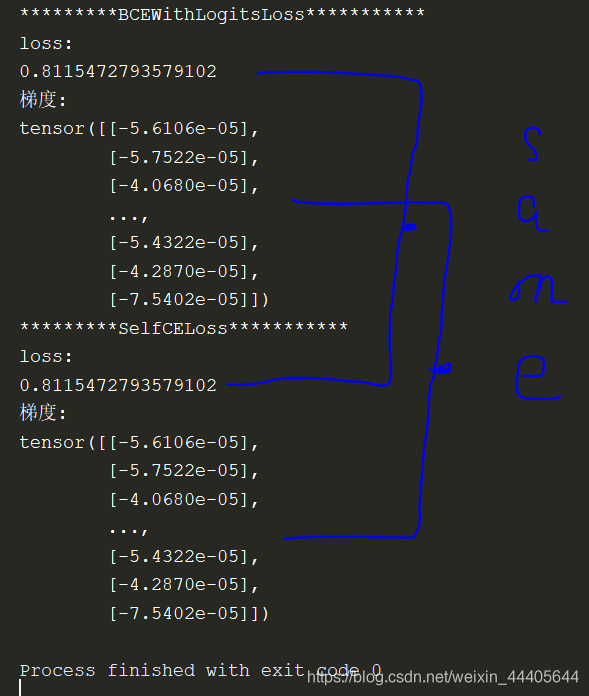
测试结果:

– 由上结果可知,我编写的loss和pytorch中提供的j基本一致。
– 但是仅仅这样就可以了吗?NO! 下面介绍BCEWithLogitsLoss()的强大之处:
– BCEWithLogitsLoss()具有很好的对nan的处理能力,对于我写的代码(四层神经网络,层之间的激活函数采用的是ReLU,输出层激活函数采用sigmoid(),由于数据处理的问题,所以会导致我们编写的CE的loss出现nan:原因如下:
–首先神经网络输出的pre_target较大,就会导致sigmoid之后的p为1,则torch.log(1 - p)为nan;
– 使用clamp(函数虽然会解除这个nan,但是由于在迭代过程中,网络输出可能越来越大(层之间使用的是ReLU),则导致我们写的loss陷入到某一个数值而无法进行优化。但是BCEWithLogitsLoss()对这种情况下出现的nan有很好的处理,从而得到更好的结果。
– 我此实验的目的是为了比较CE和FL的区别,自己编写FL,则必须也要自己编写CE,不能使用BCEWithLogitsLoss()。
二、使用场景
二分类 + sigmoid()
使用sigmoid作为输出层非线性表达的分类问题(虽然可以处理多分类问题,但是一般用于二分类,并且最后一层只放一个节点)
三、注意事项
输入格式
要求输入的input和target均为float类型
以上为个人经验,希望能给大家一个参考,也希望大家多多支持。
加载全部内容