golang删除切片元素去除切片零值 golang 删除切片的某个元素及剔除切片内的零值方式
fwhezfwhez 人气:0想了解golang 删除切片的某个元素及剔除切片内的零值方式的相关内容吗,fwhezfwhez在本文为您仔细讲解golang删除切片元素去除切片零值的相关知识和一些Code实例,欢迎阅读和指正,我们先划重点:golang,删除切片元素,剔除切片零值,下面大家一起来学习吧。
看代码吧~
func remove(slice []interface{}, elem interface{}) []interface{}{
    if len(slice) == 0 {
        return slice
    }
    for i, v := range slice {
        if v == elem {
            slice = append(slice[:i], slice[i+1:]...)
            return remove(slice,elem)
            break
        }
    }
    return slice
}
func removeZero(slice []interface{}) []interface{}{
    if len(slice) == 0 {
        return slice
    }
    for i, v := range slice {
        if ifZero(v) {
            slice = append(slice[:i], slice[i+1:]...)
            return removeZero(slice)
            break
        }
    }
    return slice
}
//判断一个值是否为零值,只支持string,float,int,time 以及其各自的指针,"%"和"%%"也属于零值范畴,场景是like语句
func IfZero(arg interface{}) bool {
    if arg == nil {
        return true
    }
    switch v := arg.(type) {
    case int, int32, int16, int64:
        if v == 0 {
            return true
        }
    case float32:
        r:=float64(v)
        return math.Abs(r-0)<0.0000001
    case float64:
        return math.Abs(v-0)<0.0000001
    case string:
        if v == "" || v == "%%" || v == "%" {
            return true
        }
    case *string, *int, *int64, *int32, *int16, *int8, *float32, *float64, *time.Time:
        if v == nil {
            return true
        }
    case time.Time:
        return v.IsZero()
    default:
        return false
    }
    return false
}
补充:golang删除slice中特定条件的元素,优化版
写了两种对一个slice中删除特定元素的方法,并做了性能对比,在这里记录一下。
假设我们的切片有0和1,我们要删除所有的0,此处有三种方法:
第一种方法:
func DeleteSlice(a []int) []int{
 for i := 0; i < len(a); i++ {
  if a[i] == 0 {
   a = append(a[:i], a[i+1:]...)
   i--
  }
 }
 return a
}
解释:这里利用常见的方法对slice中的元素进行删除,注意删除时,后面的元素前移,i应该后移一位。
第二种方法:
func DeleteSlice1(a []int) []int {
 ret := make([]int, 0, len(a))
 for _, val := range a {
  if val == 1 {
   ret = append(ret, val)
  }
 }
 return ret
}
解释:这种方法最容易理解,重新使用一个slice,将不合理的过滤掉。缺点是需要开辟另一个slice的空间,优点是容易理解,而且不对原来的slice进行操作。
第三种方法:
func DeleteSlice2(a []int) []int{
 j := 0
 for _, val := range a {
  if val == 1 {
   a[j] = val
   j++
  }
 }
 return a[:j]
}
解释:这里利用一个index,记录应该下一个有效元素应该在的位置,遍历所有元素,当遇到有效元素,index加一,否则不加,最终index的位置就是所有有效元素的下一个位置。最后做一个截取就行了。这种方法会对原来的slice进行修改。
这里对三种方法做了性能测试,测试代码如下:
package main
import (
 "testing"
)

func handle(data []int) {
 return
}
const N = 100

func getSlice()[]int {
 a := []int{}
 for i := 0; i < N; i++ {
  if i % 2 == 0 {
   a = append(a, 0)
  } else {
   a = append(a, 1)
  }
 }
 return a
}

func BenchmarkDeleteSlice(b *testing.B) {
 for i := 0; i < b.N; i++ {
   data := DeleteSlice(getSlice())
   handle(data)
 }
}

func BenchmarkDeleteSlice1(b *testing.B) {
 for i := 0; i < b.N; i++ {
  data := DeleteSlice1(getSlice())
  handle(data)
 }
}

func BenchmarkDeleteSlice2(b *testing.B) {
 for i := 0; i < b.N; i++ {
  data := DeleteSlice2(getSlice())
  handle(data)
 }
}
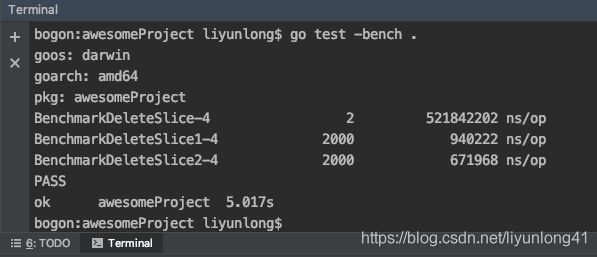
测试结果如下(slice大小为100):

加大slice大小进行测试(slice大小为10000):

继续加大(slice大小为100000)

slice大小为10^6:

可以看出:
第一种方法在slice大小比较小时,比第2、3种方法慢一倍左右。但是slice大小变大时,性能显著下降。
第2种方法和第3种方法差距基本处于同一量级,但是第3种方法稍快一些。但是当slice大小增加到10^6级别时,第三种方法的优势就显现出来。
以上为个人经验,希望能给大家一个参考,也希望大家多多支持。如有错误或未考虑完全的地方,望不吝赐教。
加载全部内容