Python系数矩阵热力图 Python数据相关系数矩阵和热力图轻松实现教程
肥宅_Sean 人气:0对其中的参数进行解释
plt.subplots(figsize=(9, 9))设置画面大小,会使得整个画面等比例放大的
sns.heapmap()这个当然是用来生成热力图的啦
df是DataFrame, pandas的这个类还是很常用的啦~
df.corr()就是得到这个dataframe的相关系数矩阵
把这个矩阵直接丢给sns.heapmap中做参数就好啦
sns.heapmap中annot=True,意思是显式热力图上的数值大小。
sns.heapmap中square=True,意思是将图变成一个正方形,默认是一个矩形
sns.heapmap中cmap="Blues"是一种模式,就是图颜色配置方案啦,我很喜欢这一款的。
sns.heapmap中vmax是显示最大值
import seaborn as sns
import matplotlib.pyplot as plt
def test(df):
 dfData = df.corr()
 plt.subplots(figsize=(9, 9)) # 设置画面大小
 sns.heatmap(dfData, annot=True, vmax=1, square=True, cmap="Blues")
 plt.savefig('./BluesStateRelation.png')
 plt.show()
补充知识:python混淆矩阵(confusion_matrix)FP、FN、TP、TN、ROC,精确率(Precision),召回率(Recall),准确率(Accuracy)详述与实现
一、FP、FN、TP、TN
你这蠢货,是不是又把酸葡萄和葡萄酸弄“混淆“”啦!!!
上面日常情况中的混淆就是:是否把某两件东西或者多件东西给弄混了,迷糊了。
在机器学习中, 混淆矩阵是一个误差矩阵, 常用来可视化地评估监督学习算法的性能.。混淆矩阵大小为 (n_classes, n_classes) 的方阵, 其中 n_classes 表示类的数量。
其中,这个矩阵的一行表示预测类中的实例(可以理解为模型预测输出,predict),另一列表示对该预测结果与标签(Ground Truth)进行判定模型的预测结果是否正确,正确为True,反之为False。
在机器学习中ground truth表示有监督学习的训练集的分类准确性,用于证明或者推翻某个假设。有监督的机器学习会对训练数据打标记,试想一下如果训练标记错误,那么将会对测试数据的预测产生影响,因此这里将那些正确打标记的数据成为ground truth。
此时,就引入FP、FN、TP、TN与精确率(Precision),召回率(Recall),准确率(Accuracy)。
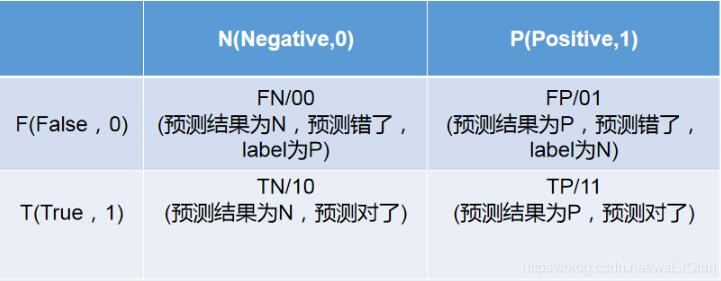
以猫狗二分类为例,假定cat为正例-Positive,dog为负例-Negative;预测正确为True,反之为False。我们就可以得到下面这样一个表示FP、FN、TP、TN的表:

此时如下代码所示,其中scikit-learn 混淆矩阵函数 sklearn.metrics.confusion_matrix API 接口,可以用于绘制混淆矩阵
skearn.metrics.confusion_matrix(
 y_true, # array, Gound true (correct) target values
 y_pred, # array, Estimated targets as returned by a classifier
 labels=None, # array, List of labels to index the matrix.
 sample_weight=None # array-like of shape = [n_samples], Optional sample weights
)
完整示例代码如下:
__author__ = "lingjun"
# welcome to attention:小白CV

import seaborn as sns
from sklearn.metrics import confusion_matrix
import matplotlib.pyplot as plt
sns.set()

f, (ax1,ax2) = plt.subplots(figsize = (10, 8),nrows=2)
y_true = ["dog", "dog", "dog", "cat", "cat", "cat", "cat"]
y_pred = ["cat", "cat", "dog", "cat", "cat", "cat", "cat"]
C2= confusion_matrix(y_true, y_pred, labels=["dog", "cat"])
print(C2)
print(C2.ravel())
sns.heatmap(C2,annot=True)

ax2.set_title('sns_heatmap_confusion_matrix')
ax2.set_xlabel('Pred')
ax2.set_ylabel('True')
f.savefig('sns_heatmap_confusion_matrix.jpg', bbox_inches='tight')
保存的图像如下所示:

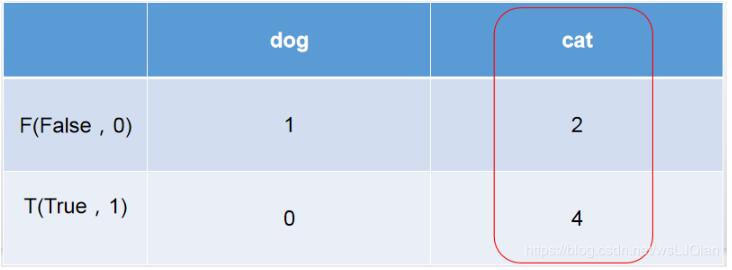
这个时候我们还是不知道skearn.metrics.confusion_matrix做了些什么,这个时候print(C2),打印看下C2究竟里面包含着什么。最终的打印结果如下所示:
[[1 2]
 [0 4]]
[1 2 0 4]
解释下上面这几个数字的意思:
C2= confusion_matrix(y_true, y_pred, labels=["dog", "cat"])中的labels的顺序就分布是0、1,negative和positive
注:labels=[]可加可不加,不加情况下会自动识别,自己定义
cat为1-positive,其中真实值中cat有4个,4个被预测为cat,预测正确T,0个被预测为dog,预测错误F;
dog为0-negative,其中真实值中dog有3个,1个被预测为dog,预测正确T,2个被预测为cat,预测错误F。
所以:TN=1、 FP=2 、FN=0、TP=4。
TN=1:预测为negative狗中1个被预测正确了
FP=2 :预测为positive猫中2个被预测错误了
FN=0:预测为negative狗中0个被预测错误了
TP=4:预测为positive猫中4个被预测正确了

这时候再把上面猫狗预测结果拿来看看,6个被预测为cat,但是只有4个的true是cat,此时就和右侧的红圈对应上了。
y_pred = ["cat", "cat", "dog", "cat", "cat", "cat", "cat"]
y_true = ["dog", "dog", "dog", "cat", "cat", "cat", "cat"]
二、精确率(Precision),召回率(Recall),准确率(Accuracy)
有了上面的这些数值,就可以进行如下的计算工作了
准确率(Accuracy):这三个指标里最直观的就是准确率: 模型判断正确的数据(TP+TN)占总数据的比例
"Accuracy: "+str(round((tp+tn)/(tp+fp+fn+tn), 3))
召回率(Recall): 针对数据集中的所有正例label(TP+FN)而言,模型正确判断出的正例(TP)占数据集中所有正例的比例;FN表示被模型误认为是负例但实际是正例的数据;召回率也叫查全率,以物体检测为例,我们往往把图片中的物体作为正例,此时召回率高代表着模型可以找出图片中更多的物体!
"Recall: "+str(round((tp)/(tp+fn), 3))
精确率(Precision):针对模型判断出的所有正例(TP+FP)而言,其中真正例(TP)占的比例。精确率也叫查准率,还是以物体检测为例,精确率高表示模型检测出的物体中大部分确实是物体,只有少量不是物体的对象被当成物体。
"Precision: "+str(round((tp)/(tp+fp), 3))
还有:
("Sensitivity: "+str(round(tp/(tp+fn+0.01), 3)))
("Specificity: "+str(round(1-(fp/(fp+tn+0.01)), 3)))
("False positive rate: "+str(round(fp/(fp+tn+0.01), 3)))
("Positive predictive value: "+str(round(tp/(tp+fp+0.01), 3)))
("Negative predictive value: "+str(round(tn/(fn+tn+0.01), 3)))
三.绘制ROC曲线,及计算以上评价参数
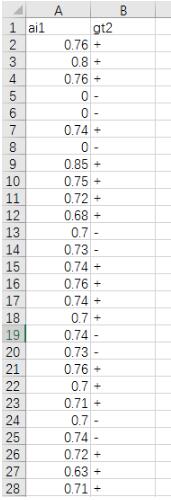
如下为统计数据:

__author__ = "lingjun"
# E-mail: 1763469890@qq.com

from sklearn.metrics import roc_auc_score, confusion_matrix, roc_curve, auc
from matplotlib import pyplot as plt
import numpy as np
import torch
import csv

def confusion_matrix_roc(GT, PD, experiment, n_class):
 GT = GT.numpy()
 PD = PD.numpy()

 y_gt = np.argmax(GT, 1)
 y_gt = np.reshape(y_gt, [-1])
 y_pd = np.argmax(PD, 1)
 y_pd = np.reshape(y_pd, [-1])

 # ---- Confusion Matrix and Other Statistic Information ----
 if n_class > 2:
  c_matrix = confusion_matrix(y_gt, y_pd)
  # print("Confussion Matrix:\n", c_matrix)
  list_cfs_mtrx = c_matrix.tolist()
  # print("List", type(list_cfs_mtrx[0]))

  path_confusion = r"./records/" + experiment + "/confusion_matrix.txt"
  # np.savetxt(path_confusion, (c_matrix))
  np.savetxt(path_confusion, np.reshape(list_cfs_mtrx, -1), delimiter=',', fmt='%5s')

 if n_class == 2:
  list_cfs_mtrx = []
  tn, fp, fn, tp = confusion_matrix(y_gt, y_pd).ravel()

  list_cfs_mtrx.append("TN: " + str(tn))
  list_cfs_mtrx.append("FP: " + str(fp))
  list_cfs_mtrx.append("FN: " + str(fn))
  list_cfs_mtrx.append("TP: " + str(tp))
  list_cfs_mtrx.append(" ")
  list_cfs_mtrx.append("Accuracy: " + str(round((tp + tn) / (tp + fp + fn + tn), 3)))
  list_cfs_mtrx.append("Sensitivity: " + str(round(tp / (tp + fn + 0.01), 3)))
  list_cfs_mtrx.append("Specificity: " + str(round(1 - (fp / (fp + tn + 0.01)), 3)))
  list_cfs_mtrx.append("False positive rate: " + str(round(fp / (fp + tn + 0.01), 3)))
  list_cfs_mtrx.append("Positive predictive value: " + str(round(tp / (tp + fp + 0.01), 3)))
  list_cfs_mtrx.append("Negative predictive value: " + str(round(tn / (fn + tn + 0.01), 3)))

  path_confusion = r"./records/" + experiment + "/confusion_matrix.txt"
  np.savetxt(path_confusion, np.reshape(list_cfs_mtrx, -1), delimiter=',', fmt='%5s')

 # ---- ROC ----
 plt.figure(1)
 plt.figure(figsize=(6, 6))

 fpr, tpr, thresholds = roc_curve(GT[:, 1], PD[:, 1])
 roc_auc = auc(fpr, tpr)

 plt.plot(fpr, tpr, lw=1, label="ATB vs NotTB, area=%0.3f)" % (roc_auc))
 # plt.plot(thresholds, tpr, lw=1, label='Thr%d area=%0.2f)' % (1, roc_auc))
 # plt.plot([0, 1], [0, 1], '--', color=(0.6, 0.6, 0.6), label='Luck')

 plt.xlim([0.00, 1.0])
 plt.ylim([0.00, 1.0])
 plt.xlabel("False Positive Rate")
 plt.ylabel("True Positive Rate")
 plt.title("ROC")
 plt.legend(loc="lower right")
 plt.savefig(r"./records/" + experiment + "/ROC.png")
 print("ok")

def inference():
 GT = torch.FloatTensor()
 PD = torch.FloatTensor()
 file = r"Sensitive_rename_inform.csv"
 with open(file, 'r', encoding='UTF-8') as f:
  reader = csv.DictReader(f)
  for row in reader:
   # TODO
   max_patient_score = float(row['ai1'])
   doctor_gt = row['gt2']

   print(max_patient_score,doctor_gt)

   pd = [[max_patient_score, 1-max_patient_score]]
   output_pd = torch.FloatTensor(pd).to(device)

   if doctor_gt == "+":
    target = [[1.0, 0.0]]
   else:
    target = [[0.0, 1.0]]
   target = torch.FloatTensor(target) # 类型转换, 将list转化为tensor, torch.FloatTensor([1,2])
   Target = torch.autograd.Variable(target).long().to(device)

   GT = torch.cat((GT, Target.float().cpu()), 0) # 在行上进行堆叠
   PD = torch.cat((PD, output_pd.float().cpu()), 0)

 confusion_matrix_roc(GT, PD, "ROC", 2)

if __name__ == "__main__":
 inference()
若是表格里面有中文,则记得这里进行修改,否则报错
with open(file, 'r') as f:
以上这篇Python数据相关系数矩阵和热力图轻松实现教程就是小编分享给大家的全部内容了,希望能给大家一个参考,也希望大家多多支持。
加载全部内容