android studio JNI 语义分割enet 基于Android studio3.6的JNI教程之ncnn之语义分割ENet
watersink 人气:0代码链接:
https://github.com/watersink/enet-as-linux
本代码可以在模拟器下进行跑。
环境:
Android studio 3.6
Sdk:android10 api 29
Ndk:r15c
Ncnn:20200226
Opencv:Opencv3.4.1 android sdk
Linux下的代码测试:
mkdir build
cd build
cmake ..
make
./enet
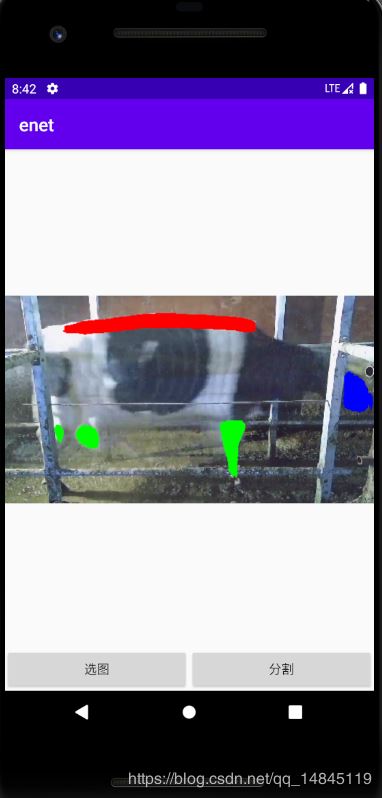
运行效果,

Android开始:
(1)新建工程,
New->New Project->选择Native c++ ->工程名enet->c++11
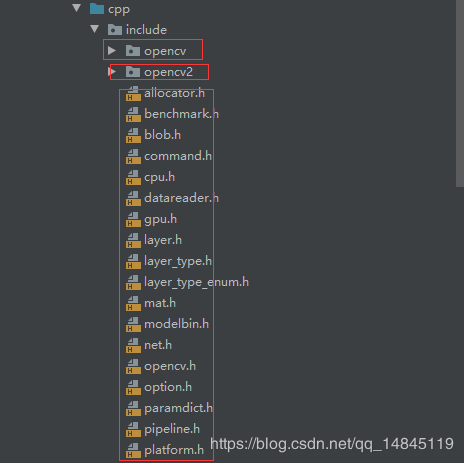
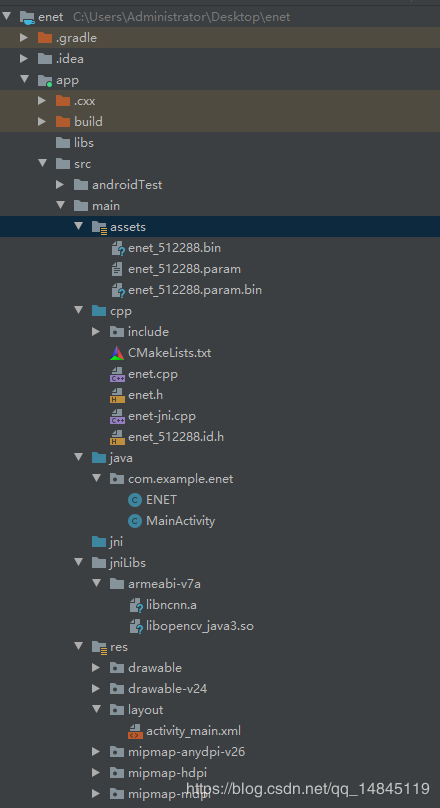
(2)app/src/cpp下面增加opencv和ncnn的头文件,include

(3)app/src/main下面增加ncnn 和opencv的静态库文件和动态库文件,

(4)app/src/main下面增加模型文件assets

(5)修改布局文件,app/src/main/res/layout/ activity_main.xml
<?xml version="1.0" encoding="utf-8"?>
<RelativeLayout xmlns:android="http://schemas.android.com/apk/res/android"
 xmlns:app="http://schemas.android.com/apk/res-auto"
 xmlns:tools="http://schemas.android.com/tools"
 android:layout_width="match_parent"
 android:layout_height="match_parent"
 tools:context=".MainActivity">
 <LinearLayout
  android:id="@+id/btn_ll"
  android:layout_alignParentBottom="true"
  android:layout_width="match_parent"
  android:layout_height="wrap_content"
  android:orientation="horizontal">
  <Button
   android:id="@+id/use_photo"
   android:layout_weight="1"
   android:layout_width="0dp"
   android:layout_height="wrap_content"
   android:text="选图"/>
  <Button
   android:id="@+id/detect_photo"
   android:layout_weight="1"
   android:layout_width="0dp"
   android:layout_height="wrap_content"
   android:text="分割"/>
 </LinearLayout>

 <ImageView
  android:id="@+id/show_image"
  android:layout_width="match_parent"
  android:layout_height="match_parent"
  android:layout_above="@id/btn_ll"
  android:layout_alignParentTop="true"
  android:layout_marginTop="1dp"
  android:layout_marginBottom="-1dp" />
</RelativeLayout>
(6) app/src/main/java/com/example/enet增加ENET类,
public class ENET {
 public native boolean Init(byte[] param, byte[] bin);
 public native float[] Process(Bitmap bitmap);
 // Used to load the 'native-lib' library on application startup.

 static {
  System.loadLibrary("ENET");
 }
}
(7) app/src/main/cpp/enet-jni.cpp实现其jni方法,
extern "C"
JNIEXPORT jboolean JNICALL
Java_com_example_enet_ENET_Init(JNIEnv *env, jobject thiz, jbyteArray param, jbyteArray bin) {
 // TODO: implement Init()
 ncnn::Mat ncnn_param;
 ncnn::Mat ncnn_bin;
 // init param
 {
  int len = env->GetArrayLength(param);
  ncnn_param.create(len, (size_t) 1u);
  env->GetByteArrayRegion(param, 0, len, (jbyte *) ncnn_param);
 }
 // init bin
 {
  int len = env->GetArrayLength(bin);
  ncnn_bin.create(len, (size_t) 1u);
  env->GetByteArrayRegion(bin, 0, len, (jbyte *) ncnn_bin);
 }
 ncnn_net = new ENET(ncnn_param,ncnn_bin);
 return JNI_TRUE;
}
extern "C"
JNIEXPORT jfloatArray JNICALL
Java_com_example_enet_ENET_Process(JNIEnv *env, jobject thiz, jobject bitmap) {
 // TODO: implement Process()
 // ncnn from bitmap
 ncnn::Mat in;
 {
  AndroidBitmapInfo info;
  AndroidBitmap_getInfo(env, bitmap, &info);
  int width = info.width;
  int height = info.height;
  if (info.format != ANDROID_BITMAP_FORMAT_RGBA_8888)
   return NULL;
  void* indata;
  AndroidBitmap_lockPixels(env, bitmap, &indata);
  // 把像素转换成data,并指定通道顺序
  // 因为图像预处理每个网络层输入的数据格式不一样一般为300*300 128*128等等所以这类需要一个resize的操作可以在cpp中写,也可以是java读入图片时有个resize操作
  //in = ncnn::Mat::from_pixels_resize((const unsigned char*)indata, ncnn::Mat::PIXEL_RGBA2RGB, width, height,300,300);
  in = ncnn::Mat::from_pixels(static_cast<const unsigned char *>(indata), ncnn::Mat::PIXEL_RGBA2BGR, width, height);
  // 下面一行为debug代码
  __android_log_print(ANDROID_LOG_DEBUG, "ENetJniIn", "enet_process_has_input1, in.w: %d; in.h: %d in.c:%d ", in.w, in.h,in.c);
  //AndroidBitmap_unlockPixels(env, bitmap);
 }
 {
  ncnn::Mat out = ncnn_net->process(in);
  __android_log_print(ANDROID_LOG_DEBUG, "ENetJniIn", "enet_process_has_output, in.w: %d; in.h: %d in.c:%d ", out.w, out.h,out.c);
  int output_wsize = out.w;
  int output_hsize = out.h;
  //输出整理
  float *output[output_wsize * output_hsize]; // float类型
  for(int i = 0; i< out.h; i++) {
   for (int j = 0; j < out.w; j++) {
    output[i*output_wsize + j] = &out.row(
      i)[j];
   }
  }
  //建立float数组 长度为 output_wsize * output_hsize,如果只是ouput_size相当于只有一行的out的数据那就是一个object检测数据
  jfloatArray jOutputData = env->NewFloatArray(output_wsize * output_hsize);
  if (jOutputData == nullptr) return nullptr;
  env->SetFloatArrayRegion(jOutputData, 0, output_wsize * output_hsize,
        reinterpret_cast<const jfloat *>(*output));
  return jOutputData;
 }
}
(8) app/src/main/java/com/example/enet中MainActivity做具体的调用实现,
public class MainActivity extends AppCompatActivity {
 private ENET enet = new ENET(); //java接口实例化 下面直接利用java函数调用NDK c++函数
 private Bitmap yourSelectedImage = null;
 private static final int SELECT_IMAGE = 1;
 private static final String TAG = MainActivity.class.getName();
 private ImageView show_image;
 private boolean load_result = false;
 private int[] ddims = {1, 3, 512, 288}; //这里的维度的值要和train model的input 一一对应
 @Override
 protected void onCreate(Bundle savedInstanceState) {
  super.onCreate(savedInstanceState);
  setContentView(R.layout.activity_main);
  try
  {
   initENet();//初始化模型
   Log.e("MainActivity", "initENet ok");
  } catch (IOException e) {
   Log.e("MainActivity", "initENet error");
  }
  init_view();//检测+view画图
 }
 // initialize view
 private void init_view() {
  show_image = (ImageView) findViewById(R.id.show_image);
  Button use_photo = (Button) findViewById(R.id.use_photo);
  use_photo.setOnClickListener(new View.OnClickListener() {
   @Override
   public void onClick(View arg0) {
    Intent i = new Intent(Intent.ACTION_PICK);
    i.setType("image/*");
    startActivityForResult(i, SELECT_IMAGE);
   }
  });
  Button detect_photo = (Button) findViewById(R.id.detect_photo);
  detect_photo.setOnClickListener(new View.OnClickListener() {
   @Override
   public void onClick(View arg0) {
    if (yourSelectedImage == null)
     return;
    predict_image(yourSelectedImage);
   }
  });
 }
 private void initENet() throws IOException {
  byte[] param = null;
  byte[] bin = null;
  {
   //用io流读取二进制文件,最后存入到byte[]数组中
   InputStream assetsInputStream = getAssets().open("enet_512288.param.bin");// param: 网络结构文件
   int available = assetsInputStream.available();
   param = new byte[available];
   int byteCode = assetsInputStream.read(param);
   assetsInputStream.close();
  }
  {
   //用io流读取二进制文件,最后存入到byte上,转换为int型
   InputStream assetsInputStream = getAssets().open("enet_512288.bin");//bin: model文件
   int available = assetsInputStream.available();
   bin = new byte[available];
   int byteCode = assetsInputStream.read(bin);
   assetsInputStream.close();
  }
  load_result = enet.Init(param, bin);// 再将文件传入java的NDK接口(c++ 代码中的init接口 )
  Log.d("load model", "ENet_load_model_result:" + load_result);
 }
 @Override
 protected void onActivityResult(int requestCode, int resultCode, Intent data)
 {
  super.onActivityResult(requestCode, resultCode, data);
  if (resultCode == RESULT_OK && null != data) {
   Uri selectedImage = data.getData();
   try
   {
    if (requestCode == SELECT_IMAGE) {
     Bitmap bitmap = decodeUri(selectedImage);
     Bitmap rgba = bitmap.copy(Bitmap.Config.ARGB_8888, true);
     // resize to 512x288
     yourSelectedImage = Bitmap.createScaledBitmap(rgba, ddims[2], ddims[3], false);
     show_image.setImageBitmap(yourSelectedImage);
    }
   }
   catch (FileNotFoundException e)
   {
    Log.e("MainActivity", "FileNotFoundException");
    return;
   }
  }
 }
 private Bitmap decodeUri(Uri selectedImage) throws FileNotFoundException
 {
  // Decode image size
  BitmapFactory.Options o = new BitmapFactory.Options();
  o.inJustDecodeBounds = true;
  BitmapFactory.decodeStream(getContentResolver().openInputStream(selectedImage), null, o);
  // The new size we want to scale to
  final int REQUIRED_SIZE = 600;
  // Find the correct scale value. It should be the power of 2.
  int width_tmp = o.outWidth, height_tmp = o.outHeight;
  int scale = 1;
  while (true) {
   if (width_tmp / 2 < REQUIRED_SIZE
     || height_tmp / 2 < REQUIRED_SIZE) {
    break;
   }
   width_tmp /= 2;
   height_tmp /= 2;
   scale *= 2;
  }
  // Decode with inSampleSize
  BitmapFactory.Options o2 = new BitmapFactory.Options();
  o2.inSampleSize = scale;
  return BitmapFactory.decodeStream(getContentResolver().openInputStream(selectedImage), null, o2);
 }
 // predict image
 private void predict_image(Bitmap bmp) {
  // picture to float array
  Bitmap rgba = bmp.copy(Bitmap.Config.ARGB_8888, true);
  // resize
  Bitmap input_bmp = Bitmap.createScaledBitmap(rgba, ddims[2], ddims[3], false);
  try {
   // Data format conversion takes too long
   // Log.d("inputData", Arrays.toString(inputData));
   long start = System.currentTimeMillis();
   // get predict result
   float[] result = enet.Process(input_bmp);
   // time end
   long end = System.currentTimeMillis();
   Log.d(TAG, "origin predict result:" + Arrays.toString(result));
   long time = end - start;
   Log.d("result length", "length of result: " + String.valueOf(result.length));
   // 画布配置
   Canvas canvas = new Canvas(input_bmp);
   //图像上画矩形
   Paint paint = new Paint();
   //continue to draw rect
   Log.d(TAG, "result :" + result.length);
   Log.d(TAG, "result :" + Arrays.toString(result));
   for(int num = 0; num < result.length; num++){
    // 画框
    int row =num%ddims[2];
    int col = num/ddims[2];
    if (result[num]==1){
     paint.setColor(Color.RED);
     paint.setStyle(Paint.Style.STROKE);//不填充
     canvas.drawCircle(row, col, 1, paint);
    }
    if (result[num]==2){
     paint.setColor(Color.BLUE);
     paint.setStyle(Paint.Style.STROKE);//不填充
     canvas.drawCircle(row, col, 1, paint);
    }
    if (result[num]==3){
     paint.setColor(Color.GREEN);
     paint.setStyle(Paint.Style.STROKE);//不填充
     canvas.drawCircle(row, col, 1, paint);
    }
   }
   show_image.setImageBitmap(input_bmp);
  } catch (Exception e) {
   e.printStackTrace();
  }
 }
}
(9) app/src/main/cpp下面修改CMakeLists
cmake_minimum_required(VERSION 3.4.1)
include_directories(include)
file(GLOB ENET_SRC *.h
  *.cpp)
set(ENET_COMPILE_CODE ${ENET_SRC})
add_library(libopencv_java3 SHARED IMPORTED)
set_target_properties(libopencv_java3 PROPERTIES IMPORTED_LOCATION
  ${CMAKE_SOURCE_DIR}/../jniLibs/${ANDROID_ABI}/libopencv_java3.so)

add_library(libncnn STATIC IMPORTED )
set_target_properties(libncnn
  PROPERTIES IMPORTED_LOCATION
  ${CMAKE_SOURCE_DIR}/../jniLibs/${ANDROID_ABI}/libncnn.a)
add_library( # Sets the name of the library.
  ENET ## 为生成.so的文字最好直接和.c名字一样,需要更改
  # Sets the library as a shared library.
  SHARED
  # Provides a relative path to your source file(s).
  ${ENET_COMPILE_CODE})##cpp文件的name
find_library( # Sets the name of the path variable.
    log-lib

    # Specifies the name of the NDK library that
    # you want CMake to locate.
    log )
target_link_libraries( # Specifies the target library.
      ENET
      libncnn
      libopencv_java3
      jnigraphics
      android
      # Links the target library to the log library
      # included in the NDK.
      ${log-lib} )
(10) app/src/下面修改build.gradle,增加下面的设置,
externalNativeBuild {
   cmake {
    arguments "-DANDROID_TOOLCHAIN=clang"
    cFlags "-fopenmp -O2 -fvisibility=hidden -fomit-frame-pointer -fstrict-aliasing -ffunction-sections -fdata-sections -ffast-math "
    cppFlags "-fopenmp -O2 -fvisibility=hidden -fvisibility-inlines-hidden -fomit-frame-pointer -fstrict-aliasing -ffunction-sections -fdata-sections -ffast-math "
    arguments "-DANDROID_STL=c++_shared", "-DANDROID_CPP_FEATURES=rtti exceptions"
    cppFlags ""
    cppFlags "-std=c++11"
    cppFlags "-frtti"
    cppFlags "-fexceptions"
   }
  }
  ndk {
   abiFilters 'armeabi-v7a'// , 'arm64-v8a' //,'x86', 'x86_64', 'armeabi'
   stl "gnustl_static"
  }
整体目录结构:

最终效果:

总结
加载全部内容