MLSQL Stack怎样让流调试更加简单详解
人气:0前言
有一位同学正在调研MLSQL Stack对流的支持。然后说了流调试其实挺困难的。经过实践,希望实现如下三点:
- 能随时查看最新固定条数的Kafka数据
- 调试结果(sink)能打印在web控制台
- 流程序能自动推测json schema(现在spark是不行的)
实现这三个点之后,我发现调试确实就变得简单很多了。
流程
首先我新建了一个kaf_write.mlsql,里面方便我往Kafka里写数据:
set abc='''
{ "x": 100, "y": 200, "z": 200 ,"dataType":"A group"}
{ "x": 120, "y": 100, "z": 260 ,"dataType":"B group"}
{ "x": 120, "y": 100, "z": 260 ,"dataType":"B group"}
{ "x": 120, "y": 100, "z": 260 ,"dataType":"B group"}
{ "x": 120, "y": 100, "z": 260 ,"dataType":"B group"}
{ "x": 120, "y": 100, "z": 260 ,"dataType":"B group"}
{ "x": 120, "y": 100, "z": 260 ,"dataType":"B group"}
{ "x": 120, "y": 100, "z": 260 ,"dataType":"B group"}
{ "x": 120, "y": 100, "z": 260 ,"dataType":"B group"}
{ "x": 120, "y": 100, "z": 260 ,"dataType":"B group"}
{ "x": 120, "y": 100, "z": 260 ,"dataType":"B group"}
''';
load jsonStr.`abc` as table1;

select to_json(struct(*)) as value from table1 as table2;
save append table2 as kafka.`wow` where
kafka.bootstrap.servers="127.0.0.1:9092";
这样我每次运行,数据就能写入到Kafka.
接着,我写完后,需要看看数据是不是真的都写进去了,写成了什么样子:
!kafkaTool sampleData 10 records from "127.0.0.1:9092" wow;
这句话表示,我要采样Kafka 10条Kafka数据,该Kafka的地址为127.0.0.1:9092,主题为wow.运行结果如下:

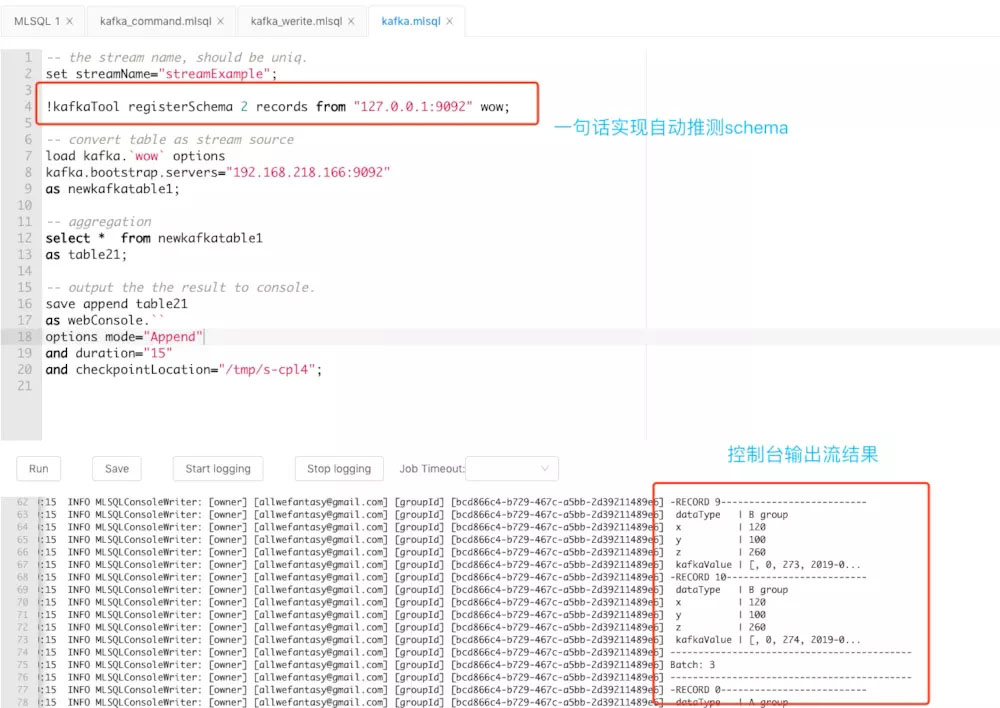
没有什么问题。接着我写一个非常简单的流式程序:
-- the stream name, should be uniq.
set streamName="streamExample";

-- use kafkaTool to infer schema from kafka
!kafkaTool registerSchema 2 records from "127.0.0.1:9092" wow;


load kafka.`wow` options
kafka.bootstrap.servers="127.0.0.1:9092"
as newkafkatable1;


select * from newkafkatable1
as table21;


-- print in webConsole instead of terminal console.
save append table21
as webConsole.``
options mode="Append"
and duration="15"
and checkpointLocation="/tmp/s-cpl4";
运行结果如下:

在终端我们也可以看到实时效果了。
补充
当然,MLSQL Stack 还有对流还有两个特别好地方,第一个是你可以对流的事件设置http协议的callback,以及对流的处理结果再使用批SQL进行处理,最后入库。参看如下脚本:
-- the stream name, should be uniq.
set streamName="streamExample";


-- mock some data.
set data='''
{"key":"yes","value":"no","topic":"test","partition":0,"offset":0,"timestamp":"2008-01-24 18:01:01.001","timestampType":0}
{"key":"yes","value":"no","topic":"test","partition":0,"offset":1,"timestamp":"2008-01-24 18:01:01.002","timestampType":0}
{"key":"yes","value":"no","topic":"test","partition":0,"offset":2,"timestamp":"2008-01-24 18:01:01.003","timestampType":0}
{"key":"yes","value":"no","topic":"test","partition":0,"offset":3,"timestamp":"2008-01-24 18:01:01.003","timestampType":0}
{"key":"yes","value":"no","topic":"test","partition":0,"offset":4,"timestamp":"2008-01-24 18:01:01.003","timestampType":0}
{"key":"yes","value":"no","topic":"test","partition":0,"offset":5,"timestamp":"2008-01-24 18:01:01.003","timestampType":0}
''';

-- load data as table
load jsonStr.`data` as datasource;

-- convert table as stream source
load mockStream.`datasource` options
stepSizeRange="0-3"
as newkafkatable1;

-- aggregation
select cast(value as string) as k from newkafkatable1
as table21;


!callback post "http://127.0.0.1:9002/api_v1/test" when "started,progress,terminated";
-- output the the result to console.


save append table21
as custom.``
options mode="append"
and duration="15"
and sourceTable="jack"
and code='''
select count(*) as c from jack as newjack;
save append newjack as parquet.`/tmp/jack`;
'''
and checkpointLocation="/tmp/cpl15";
总结
以上就是这篇文章的全部内容了,希望本文的内容对大家的学习或者工作具有一定的参考学习价值,谢谢大家对的支持。
您可能感兴趣的文章:
加载全部内容