使用ThinkJs搭建微信中控服务的实现方法
人气:0本人前端渣渣一枚,这篇文章是第一次写,如果有硬核bug,请大佬们轻喷、指出... 另外,本文不涉及任何接口安全、参数校验之类的东西,默认对调用方无脑级的信任:joy: 目前自用的接口包括但不限于以下这些
|--- 微信相关
| |--- 0. 处理微信推过来的一些消息
| |--- 1. 获取微信SDK配置参数
| |--- 2. 微信鉴权登陆
| |--- 3. 获取微信用户信息
| |--- 4. 获取AccessToken
| |--- 5. 批量发送模版消息
| |--- 6. 获取模版消息列表
| |--- 7. 批量发送客服消息
背景
- 【需求】小项目很多很杂,而且大部分需求都是基于微信开发的,每次都查微信文档的话就会很郁闷:unamused:...
- 【号多】公众号超级多,项目中偶尔会涉及借权获取用户信息(在不绑定微信开放平台的前提下,需要临时自建各个公众号的openid关联关系),类似这样同时需要不止一个公众号配合来完成一件事的需求,就容易把人整懵逼...
- 【支付】微信支付的商户号也很多,而且有时候支付需要用的商户号,还不能用关联的公众号取出来的openid去支付...
- 【官方】微信官方文档建议!把获取AccessToken等微信API抽离成单独的服务... 等等等等........所以...:joy:
创建ThinkJS项目
官网
简介
ThinkJS 是一款面向未来开发的 Node.js 框架,整合了大量的项目最佳实践,让企业级开发变得如此简单、高效。从 3.0 开始,框架底层基于 Koa 2.x 实现,兼容 Koa 的所有功能。
安装脚手架
$ npm install -g think-cli
创建及启动项目
$ thinkjs new demo;
$ cd demo;
$ npm install;
$ npm start;
目录结构
|--- development.js  //开发环境下的入口文件
|--- nginx.conf //nginx 配置文件
|--- package.json
|--- pm2.json //pm2 配置文件
|--- production.js //生产环境下的入口文件
|--- README.md
|--- src
| |--- bootstrap //启动自动执行目录
| | |--- master.js //Master 进程下自动执行
| | |--- worker.js //Worker 进程下自动执行
| |--- config //配置文件目录
| | |--- adapter.js // adapter 配置文件
| | |--- config.js // 默认配置文件
| | |--- config.production.js //生产环境下的默认配置文件,和 config.js 合并
| | |--- extend.js //extend 配置文件
| | |--- middleware.js //middleware 配置文件
| | |--- router.js //自定义路由配置文件
| |--- controller //控制器目录
| | |--- base.js
| | |--- index.js
| |--- logic //logic 目录
| | |--- index.js
| |--- model //模型目录
| | |--- index.js
|--- view //模板目录
| |--- index_index.html
安装think-wechat插件
介绍
微信中间件,基于 node-webot/wechat,支持 thinkJS 3.0
安装
$ npm install think-wechat --save
或
$ cnpm install think-wechat --save
配置
文件:/src/config/middleware.js
const wechat = require('think-wechat')
module.exports = [
  ...
   {
    handle: wechat,
    match: '/index',
    options: {
      token: '', // 令牌,和公众号/基本配置/服务器配置里面写一样的即可
      appid: '', // 这里貌似可以随便填,因为我们后面要用数据库配置多个公众号
      encodingAESKey: '',
      checkSignature: false
    }
  }, {
    handle: 'payload', // think-wechat 必须要在 payload 中间件前面加载,它会代替 payload 处理微信发过来的 post 请求中的数据。
    options: {
      keepExtensions: true,
      limit: '5mb'
    }
  },
]
注:match下我这里写的是 /index ,对应的项目文件是 /src/controller/index.js ,对应的公众号后台所需配置的服务器地址就是 http(https)://域名:端口/index
创建数据库和相关表
我这里创建了三个微信的相关表。
配置表:wx_config
| 字段 | 类型 | 说明 |
|---|---|---|
| id | int | 主键 |
| name | varchar | 名称 |
| appid | varchar | appid |
| secret | varchar | secret |
| 字段 | 类型 | 注释 |
|---|---|---|
| id | int | 主键 |
| subscribe | int | 用户是否订阅该公众号标识,值为0时,代表此用户没有关注该公众号,拉取不到其余信息。 |
| nickname | varchar | 用户的昵称 |
| sex | int | 用户的性别,值为1时是男性,值为2时是女性,值为0时是未知 |
| language | varchar | 用户所在省份 |
| city | varchar | 用户所在城市 |
| province | varchar | 用户所在省份 |
| country | varchar | 用户所在国家 |
| headimgurl | longtext | 用户头像,最后一个数值代表正方形头像大小(有0、46、64、96、132数值可选,0代表640*640正方形头像),用户没有头像时该项为空。若用户更换头像,原有头像URL将失效。 |
| subscribe_time | double | 用户关注时间,为时间戳。如果用户曾多次关注,则取最后关注时间 |
| unionid | varchar | 只有在用户将公众号绑定到微信开放平台帐号后,才会出现该字段。 |
| openid | varchar | 用户的标识,对当前公众号唯一 |
| wx_config_id | int | 对应配置的微信号id |
模版消息日志表:wx_template_log
| 字段 | 类型 | 注释 |
|---|---|---|
| id | int | 主键 |
| template_id | varchar | 模版id |
| openid | varchar | 用户的标识,对当前公众号唯一 |
| url | varchar | 跳转url |
| miniprogram | varchar | 跳转小程序 |
| data | varchar | 发送内容json字符串 |
| add_time | double | 添加时间戳 |
| send_time | double | 发送时间戳 |
| send_status | varchar | 发送结果 |
| wx_config_id | double | 对应配置的微信号id |
| uuid | varchar | 本次发送的uuid,业务系统可通过uuid查询模版消息推送结果 |
处理微信推送消息
文件目录
/src/controller/index.js
文件内容
module.exports = class extends think.Controller {
  /*
  * 入口:验证开发者服务器
  * 验证开发者服务器,这里只是演示,所以没做签名校验,实际上应该要根据微信要求进行签名校验
  */
  async indexAction() {
    let that = this;
    if (that.method != 'REPLY') {
      return that.json({code: 1, msg: '非法请求', data: null})
    }
    const {echostr} = that.get();
    return that.end(echostr);
  }

  /*
  * 文字
  * 用于处理微信推过来的文字消息
  */
  async textAction() {
    let that = this;
    let {id, signature, timestamp, nonce, openid} = that.get();
    let {ToUserName, FromUserName, CreateTime, MsgType, Content, MsgId} = that.post();
    .....
    that.success('')
  }

  /*
  * 事件
  * 用于处理微信推过来的事件消息,例如点击菜单等
  */
  async eventAction() {
    let that = this;
    let {id, signature, timestamp, nonce, openid} = that.get();
    let {ToUserName, FromUserName, CreateTime, MsgType, Event, EventKey, Ticket, Latitude, Longitude, Precision} = that.post();
    switch (Event) {
      case 'subscribe': // 关注公众号
        ...
        break;
      case 'unsubscribe': // 取消关注公众号
        ...
        break;
      case 'SCAN': // 已关注扫码
        ...
        break;
      case 'LOCATION': // 地理位置
        ...
        break;
      case 'CLICK': // 自定义菜菜单
        ...
        break;
      case 'VIEW': // 跳转
        ...
        break;
      case 'TEMPLATESENDJOBFINISH':// 模版消息发送完毕
        ...
        break;
    }
    that.success('')
  }
}
注:支持的action包括: textAction 、 imageAction 、 voiceAction 、 videoAction 、 shortvideoAction 、 locationAction 、 linkAction 、 eventAction 、 deviceTextAction 、 deviceEventAction 。
公众号后台配置
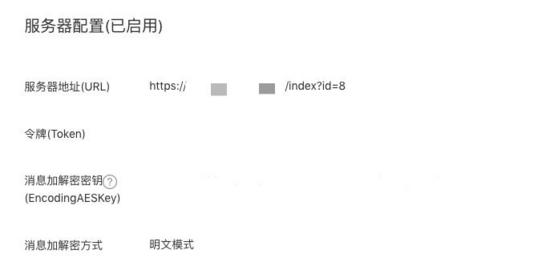
注:后面跟的id参数是为了区分是哪个公众号推过来的消息,在上面的接口参数中也有体现
微信相关API的编写
目录结构
|--- src
| |--- controller //控制器目录
| | |--- index.js // 处理微信推送的消息,上面有写到
| | |--- common.js // 一些公共方法
| | |--- open // 开放给其他业务服务的api接口
| | | |--- wx.js
| | |--- private // 放一些内部调用的方法,调用微信api的方法主要在这里面
| | | |--- wx.js
这个目录结构可能不太合理,后期再改进吧:grin:
公共方法
// src/controller/common.js

import axios from 'axios'
import {baseSql} from "./unit";

module.exports = class extends think.Controller {
  // 获取appinfo
  async getWxConfigById(id) {
    let that = this;
    let data = await that.cache(`wx_config:wxid_${id}`, async () => {
      // 数据库内取
      let info = await that.model('wx_config', baseSql).where({id: id}).find();
      if (!think.isEmpty(info)) {
        return info
      }
    })
    return data || {}
  }

  // 获取access_token
  async getAccessToken(id) {
    let that = this;
    let accessToken = await that.cache(`wx_access_token:wxid_${id}`, async () => {
      let {appid, secret} = await that.getWxConfigById(id);
      let {data} = await axios({
        method: 'get',
        url: `https://api.weixin.qq.com/cgi-bin/token?grant_type=client_credential&appid=${appid}&secret=${secret}`
      });
      return data.access_token
    });
    return accessToken
  }
}
接口过滤器
所有开放出来的接口的前置方法,俗称过滤器?所有开放的接口必传get参数是 wxid ,对应数据库表wx_config里面 id
// src/controller/open/wx.js

async __before() {
  let that = this;
  let wxid = that.get('wxid');
  if (think.isEmpty(wxid)) {
    return that.json({code: 1, msg: 'wxid不存在'})
  }
  that.wxConfig = await that.controller('common').getWxConfigById(wxid);
  if (think.isEmpty(that.wxConfig)) {
    return that.json({code: 1, msg: 'wxid不存在'})
  }
}
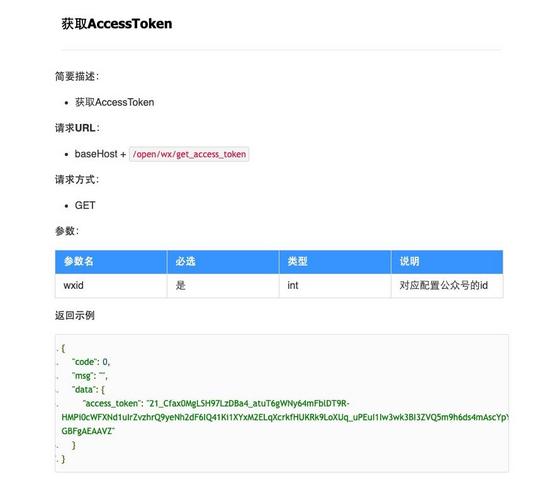
接口 - 获取AccessToken
代码
// src/controller/open/wx.js

async get_access_tokenAction() {
  let that = this;
  let accessToken = await that.controller('common').getAccessToken(that.wxConfig.id);
  return that.json({code: 0, msg: '', data: {access_token: accessToken}})
}
文档
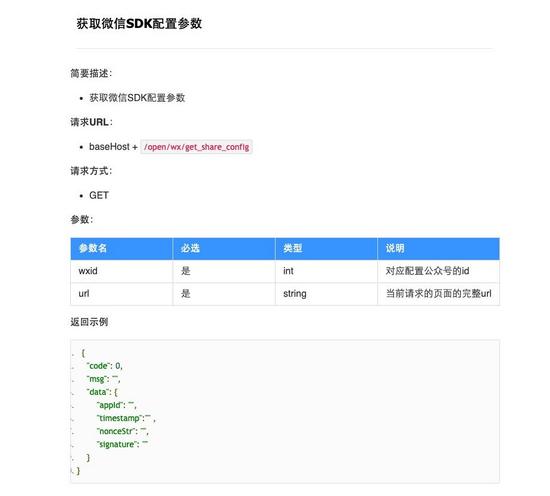
接口 - 获取微信sdk的config
代码
// src/controller/open/wx.js

async get_wxsdk_configAction() {
  let that = this;
  let {url} = that.get();
  if (think.isEmpty(url)) {
    return that.json({code: 1, msg: '参数不正确'})
  }
  let sdkConfig = await that.controller('private/wx').getSdkConfig(that.wxConfig.id, url);
  return that.json({code: 0, msg: '', data: sdkConfig})
}


// src/controller/private/wx.js

const sha1 = require('sha1');
const getTimestamp = () => parseInt(Date.now() / 1000)
const getNonceStr = () => Math.random().toString(36).substr(2, 15)
const getSignature = (params) => sha1(Object.keys(params).sort().map(key => `${key.toLowerCase()}=${params[key]}`).join('&'));

async getSdkConfig(id, url) {
  let that = this;
  let {appid} = await that.controller('common').getWxConfigById(id);
  let shareConfig = {
    nonceStr: getNonceStr(),
    jsapi_ticket: await that.getJsapiTicket(id),
    timestamp: getTimestamp(),
    url: url
  }
  return {
    appId: appid,
    timestamp: shareConfig.timestamp,
    nonceStr: shareConfig.nonceStr,
    signature: getSignature(shareConfig)
  }
}
文档
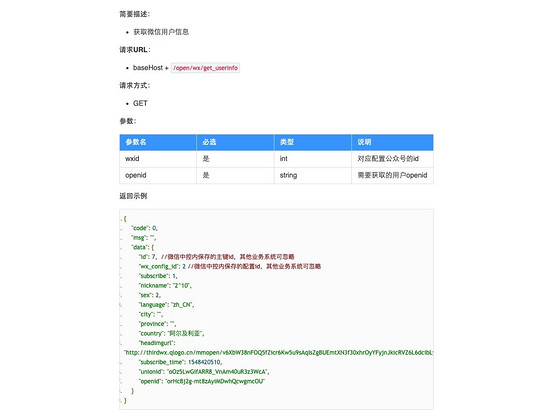
接口 - 获取UserInfo
代码
// src/controller/open/wx.js

async get_userinfoAction() {
  let that = this;
  let {openid} = that.get();
  if (think.isEmpty(openid)) {
    return that.json({code: 1, msg: '参数不正确'})
  }
  let userInfo = await that.controller('private/wx').getUserInfo(that.wxConfig.id, openid);
  if (think.isEmpty(userInfo)) {
    return that.json({code: 1, msg: 'openid不存在', data: null})
  }
  return that.json({code: 0, msg: '', data: userInfo})
}


// src/controller/private/wx.js

async getUserInfo(id, openid) {
  let that = this;
  let userInfo = await that.cache(`wx_userinfo:wxid_${id}:${openid}`, async () => {
    //先取数据库
    let model = that.model('wx_userinfo', baseSql);
    let userInfo = await model.where({wx_config_id: id, openid: openid}).find();
    if (!think.isEmpty(userInfo) && userInfo.subscribe == 1 && userInfo.unionid != null) {
      return userInfo
    }
    //如果数据库内没有,取新的存入数据库
    let accessToken = await that.controller('common').getAccessToken(id);
    let url = `https://api.weixin.qq.com/cgi-bin/user/info?access_token=${accessToken}&openid=${openid}&lang=zh_CN`;
    let {data} = await axios({method: 'get', url: url});
    if (data.openid) {
      //命中修改,没有命中添加
      let resId = await model.thenUpdate(
        Object.assign(data, {wx_config_id: id}),
        {openid: openid, wx_config_id: id});
      return await model.where({id: resId}).find();
    }
  })
  return userInfo
}
文档
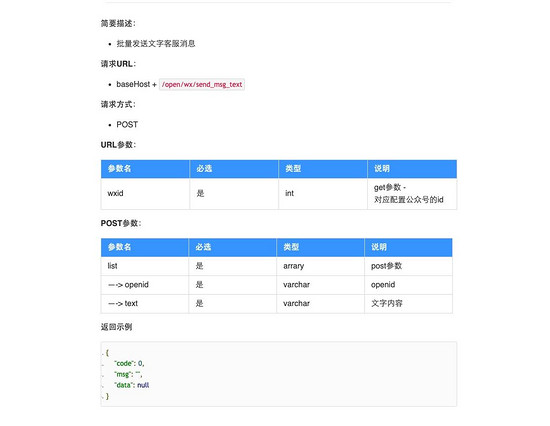
接口 - 批量发送文字客服消息
代码
// src/controller/open/wx.js

async send_msg_textAction() {
  let that = this;
  let {list} = that.post();
  if (think.isEmpty(list)) {
    return that.json({code: 1, msg: '参数不正确'})
  }
  that._sendMsgTextList(that.wxConfig.id, list);
  return that.json({code: 0, msg: '', data: null})
 }

 async _sendMsgTextList(wxid, list) {
  let that = this;
  let apiWxController = that.controller('private/wx');
  for (let item of list) {
    let data = await apiWxController.sendMsgText(wxid, item.openid, item.text)
  }
}


// src/controller/private/wx.js

async sendMsgText(id, openid, content) {
  let that = this;
  let accessToken = await that.controller('common').getAccessToken(id);
  let url = `https://api.weixin.qq.com/cgi-bin/message/custom/send?access_token=${accessToken}`
  let {data} = await axios({
    method: 'post', url: url, data: {"msgtype": 'text', "touser": openid, "text": {"content": content}}
  })
  return data;
}
文档
写在结尾
其实还有很多接口,这里就不全部列出来了。
应该能看出来,在这个项目里面并不仅仅是把微信的接口做了个简单的转发,而是有一些自己的处理逻辑在里面。
比如获取微信用户信息的时候,会先判断缓存里有没有,如果没有就取数据库,如果还没有再去微信的接口取;如果数据库有,并且关注字段是未关注的话,还是会调用微信的接口取一波再更新。 反正一天内,微信接口的调用次数是绝对够用的。
再比如批量发送模版消息,中控服务在收到请求后会先创建一个uuid,要发的模版消息全部保存到数据库内,直接把uuid返给调用方。 然后中控会异步用uuid取出来这批模版消息,一个一个发,一个一个更新结果。 这样在业务方调用发送模版消息之后,无需等待全部发送完毕,就可以用拿到的uuid,去中控查询这次批量发送的状态结果。
目前是绑了七八个公众号,在没烧过香的前提下,还没出过什么问题
您可能感兴趣的文章:
加载全部内容