D3.js构建实时图形 使用D3.js构建实时图形的代码实例
_小生_ 人气:1首先你需要在计算机上安装Node和npm。
数据的可视化表示是传递复杂信息的最有效手段之一,D3.js提供了创建这些数据可视化的强大工具和灵活性。
D3.js是一个JavaScript库,用于使用SVG,HTML和CSS在Web浏览器中生成动态的交互式数据可视化。
D3 提供了各种简单易用的函数,大大简化了 JavaScript 操作数据的难度。由于它本质上是 JavaScript ,所以用 JavaScript 也是可以实现所有功能的,但它能大大减小你的工作量,尤其是在数据可视化方面,D3 已经将生成可视化的复杂步骤精简到了几个简单的函数,你只需要输入几个简单的数据,就能够转换为各种绚丽的图形。有过 JavaScript 基础的朋友一定很容易理解它。
在本教程中,我们将探讨如何使用D3.js和Pusher Channels构建实时图形。如果您在阅读本教程时想要使用代码,请查看此GitHub存储库,其中包含代码的最终版本。
准备
要完成本教程,您需要安装Node.js和npm。我在创建本教程时使用的版本如下:
- Node.js v10.4.1
- npm v6.3.0
您还需要在计算机上安装http-server。它可以通过运行以下命令通过npm安装:npm install http-server。
虽然不需要Pusher知识,但如果熟悉它后,对学习JavaScript和D3.js会很有帮助。
开始
首先,为我们要构建的应用程序创建一个新目录。将其称为实时图形或任何您喜欢的图形。在新创建的目录中,创建一个新的index.html文件并粘贴以下代码:
//index.html

  <!DOCTYPE html>
  <hml lang="en">
  <head>
   <meta charset="UTF-8">
   <meta name="viewport" content="width=device-width, initial-scale=1.0">
   <meta http-equiv="X-UA-Compatible" content="ie=edge">
   <link rel="stylesheet" href="style.css" rel="external nofollow" >
   <title>Realtime D3 Chart</title>
  </head>
  <body>

   <script src="https://js.pusher.com/4.2/pusher.min.js"></script>
   <script src="https://d3js.org/d3.v5.min.js"></script>
   <script src="app.js"></script>
  </body>
  </html>
如您所见,HTML文件只是提取构建图形所需的样式和脚本。我们正在利用D3.js来构建图表,并使用Pusher来添加实时功能。app.js文件是应用程序前端代码的写入位置。
在我们开始实现图表之前,让我们在style.css中添加应用程序的样式:
 // style.css

  html {
   height: 100%;
   box-sizing: border-box;
   padding: 0;
   margin: 0;
  }

  *, *::before, *::after {
   box-sizing: inherit;
  }

  body {
   height: 100%;
   font-family: -apple-system, BlinkMacSystemFont, "Segoe UI", Roboto, Oxygen-Sans, Ubuntu, Cantarell, "Helvetica Neue", sans-serif;
   overflow: hidden;
   background: linear-gradient(135deg, #ffffff 0%,#e8f1f5 100%);
  }

  .container {
   position: absolute;
   padding: 20px;
   top: 50%;
   left: 50%;
   background-color: white;
   border-radius: 4px;
   transform: translate(-50%, -50%);
   box-shadow: 0px 50px 100px 0px rgba(0,0,102,0.1);
   text-align: center;
  }

  .container h1 {
   color: #333;
  }

  .bar {
   fill: #6875ff;
   border-radius: 2px;
  }

  .bar:hover {
   fill: #1edede;
  }

  .tooltip {
   opacity: 0;
   background-color: rgb(170, 204, 247);
   padding: 5px;
   border-radius: 4px;
   transition: opacity 0.2s ease;
  }
安装服务器依赖项
假设您安装了Node和npm,请运行以下命令来安装应用程序的服务器组件所需的所有依赖项:
npm install express dotenv cors pusher
Pusher 设置
前往Pusher网站并注册一个免费帐户。选择侧栏上的Channels apps,然后点击Create Channels app以创建新应用。
创建应用程序后,从API Keys选项卡中检索凭据,然后在项目目录根目录中创建一个variables.env文件,将以下内容添加到这个文件中。
// variables.env

  PUSHER_APP_ID=<your app id>
  PUSHER_APP_KEY=<your app key>
  PUSHER_APP_SECRET=<your app secret>
  PUSHER_APP_CLUSTER=<your app cluster>
设置服务器
现在我们已经安装了相关的依赖项并且已经设置了我们的Pusher帐户,我们可以开始构建服务器。
在项目目录的根目录中创建一个名为server.js的新文件,并粘贴以下代码:
// server.js

  require('dotenv').config({ path: 'variables.env' });
  const express = require('express');
  const cors = require('cors');

  const poll = [
   {
    name: 'Chelsea',
    votes: 100,
   },
   {
    name: 'Arsenal',
    votes: 70,
   },
   {
    name: 'Liverpool',
    votes: 250,
   },
   {
    name: 'Manchester City',
    votes: 689,
   },
   {
    name: 'Manchester United',
    votes: 150,
   },
  ];

  const app = express();
  app.use(cors());

  app.get('/poll', (req, res) => {
   res.json(poll);
  });

  app.set('port', process.env.PORT || 4000);
  const server = app.listen(app.get('port'), () => {
   console.log(Express running → PORT ${server.address().port});
  });
保存文件并从项目目录的根目录运行节点server.js以启动服务器。
设置前端应用程序
应用程序的前端将写在我们之前引用的app.js文件中。在项目目录的根目录中创建此文件,并在其中粘贴以下代码:
// app.js

  // set the dimensions and margins of the graph
  const margin = { top: 20, right: 20, bottom: 30, left: 40 };
  const width = 960 - margin.left - margin.right;
  const height = 500 - margin.top - margin.bottom;

  // set the ranges for the graph
  const x = d3
   .scaleBand()
   .range([0, width])
   .padding(0.1);

  const y = d3.scaleLinear().range([height, 0]);

  // append the container for the graph to the page
  const container = d3
   .select('body')
   .append('div')
   .attr('class', 'container');

  container.append('h1').text('Who will win the 2018/19 Premier League Season?');

  // append the svg object to the body of the page
  // append a 'group' element to 'svg'
  // moves the 'group' element to the top left margin
  const svg = container
   .append('svg')
   .attr('width', width + margin.left + margin.right)
   .attr('height', height + margin.top + margin.bottom)
   .append('g')
   .attr('transform', 'translate(' + margin.left + ',' + margin.top + ')');

  // Create a skeleton structure for a tooltip and append it to the page
  const tip = d3
   .select('body')
   .append('div')
   .attr('class', 'tooltip');

  // Get the poll data from the /poll endpoint
  fetch('http://localhost:4000/poll')
   .then(response => response.json())
   .then(poll => {
    // add the x Axis
    svg
     .append('g')
     .attr('transform', 'translate(0,' + height + ')')
     .attr('class', 'x-axis')
     .call(d3.axisBottom(x));

    // add the y Axis
    svg
     .append('g')
     .attr('class', 'y-axis')
     .call(d3.axisLeft(y));

    update(poll);
   });

  function update(poll) {
   // Scale the range of the data in the x axis
   x.domain(
    poll.map(d => {
     return d.name;
    })
   );

   // Scale the range of the data in the y axis
   y.domain([
    0,
    d3.max(poll, d => {
     return d.votes + 200;
    }),
   ]);

   // Select all bars on the graph, take them out, and exit the previous data set.
   // Enter the new data and append the rectangles for each object in the poll array
   svg
    .selectAll('.bar')
    .remove()
    .exit()
    .data(poll)
    .enter()
    .append('rect')
    .attr('class', 'bar')
    .attr('x', d => {
     return x(d.name);
    })
    .attr('width', x.bandwidth())
    .attr('y', d => {
     return y(d.votes);
    })
    .attr('height', d => {
     return height - y(d.votes);
    })
    .on('mousemove', d => {
     tip
      .style('position', 'absolute')
      .style('left', ${d3.event.pageX + 10}px)
      .style('top', ${d3.event.pageY + 20}px)
      .style('display', 'inline-block')
      .style('opacity', '0.9')
      .html(
       <div><strong>${d.name}</strong></div> <span>${d.votes} votes</span>
      );
    })
    .on('mouseout', () => tip.style('display', 'none'));

   // update the x-axis
   svg.select('.x-axis').call(d3.axisBottom(x));

   // update the y-axis
   svg.select('.y-axis').call(d3.axisLeft(y));
  }
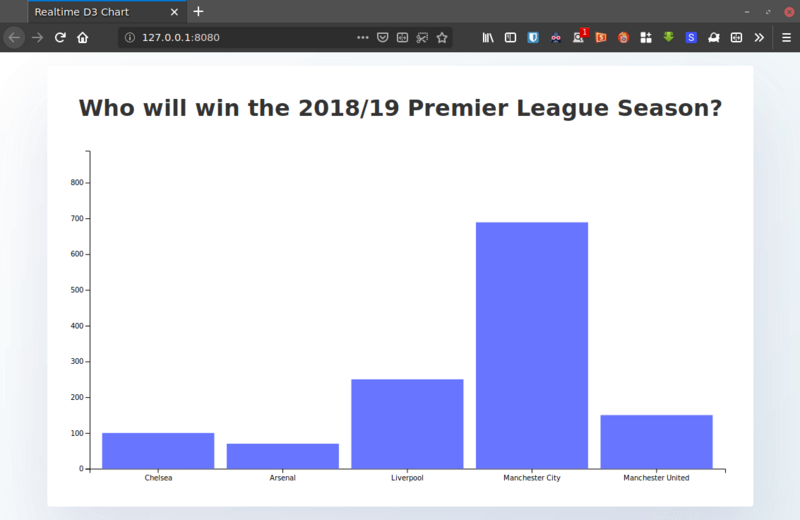
在上面的代码块中,我们使用通过/ poll端点接收的初始数据创建了一个基本条形图。如果您熟悉D3的工作原理,那么您应该熟悉这些代码。我在代码的关键部分添加了注释,以指导您构建图表的方式。
在新终端中,启动开发服务器以提供index.html文件:
npx http-server
我在这里使用http-server,但你可以使用你想要的任何服务器。您甚至可以直接在浏览器中打开index.html。
此时,您的图表应如下所示:

使用Pusher实时更新图表
让我们确保轮询的更新可以通过Pusher Channels实时反映在应用程序的前端中。将以下代码粘贴到app.js文件的末尾。
 // app.js

  const pusher = new Pusher('<your app key>', {
   cluster: '<your app cluster>',
   encrypted: true,
  });

  const channel = pusher.subscribe('poll-channel');
  channel.bind('update-poll', data => {
   update(data.poll);
  });
在这里,我们打开了与Channels的连接,并使用Pusher的subscribe()方法订阅了一个名为poll-channel的新频道。通过bind方法监听轮询更新,并在收到更新后使用最新数据调用update()函数,以便重新呈现图形。
不要忘记使用Pusher帐户信息中心中的相应详细信息替换占位符。
从服务器触发更新
我们将模拟每秒更新一次的轮询,并在数据发生变化时使用Pusher触发更新,以便轮询的订阅者(客户端)可以实时接收更新的数据。
在其他导入下面的server.js顶部添加以下代码:
 const Pusher = require('pusher');

  const pusher = new Pusher({
   appId: process.env.PUSHER_APP_ID,
   key: process.env.PUSHER_APP_KEY,
   secret: process.env.PUSHER_APP_SECRET,
   cluster: process.env.PUSHER_APP_CLUSTER,
   encrypted: true,
  });

  function getRandomNumber(min, max) {
   return Math.floor(Math.random() * (max - min) + min);
  }

  function increment() {
   const num = getRandomNumber(0, poll.length);
   poll[num].votes += 20;
  }

  function updatePoll() {
   setInterval(() => {
    increment();
    pusher.trigger('poll-channel', 'update-poll', {
     poll,
    });
   }, 1000);
  }
然后将/ poll端点更改为如下所示:
 app.get('/poll', (req, res) => {
   res.json(poll);
   updatePoll();
  });
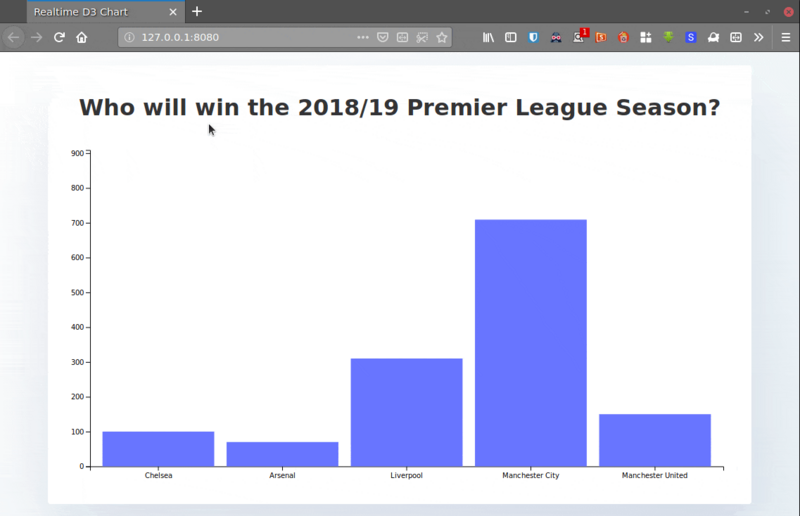
/ poll路由将初始轮询数据发送到客户端并调用updatePoll()函数,该函数以三秒为间隔递增随机俱乐部的投票,并触发我们在最后一步中在客户端上创建的轮询频道的更新。
通过从项目目录的根目录运行节点server.js,终止服务器并重新启动它。此时,您应该有一个实时更新的条形图。

结论
您已经看到了使用D3.js创建条形图的过程以及如何使用Pusher Channels实时创建条形图。
我们已经为Pusher和D3提供了一个简单的用例,但其中一个仅仅是表面上的问题。我建议深入研究docs,了解更多有关Pusher及其他功能的信息。
谢谢阅读!您可以在GitHub存储库中找到本教程的完整源代码。希望对大家的学习有所帮助,也希望大家多多支持。
加载全部内容