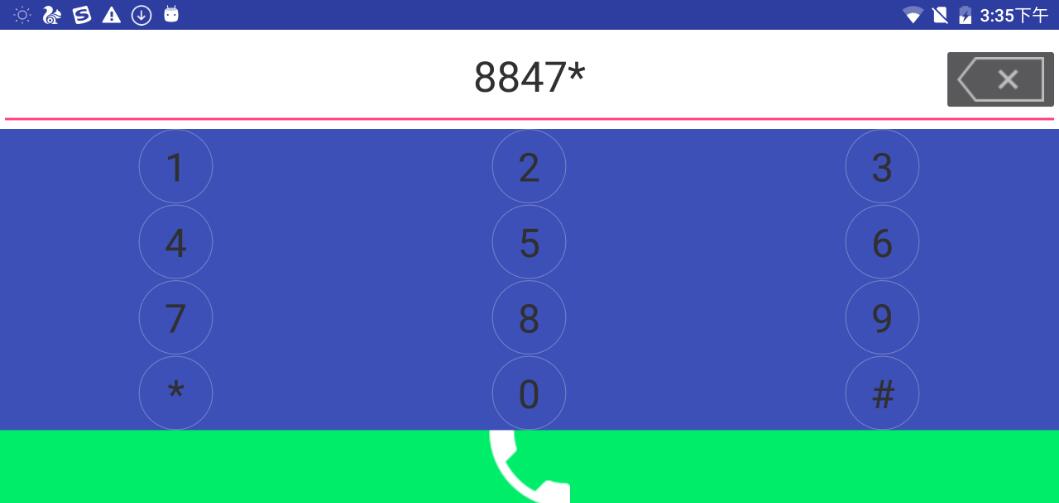
Android实现圆形纯数字按钮 Android实现圆形纯数字按钮
WhatYouSeeMe 人气:0最近在搞一个数字拨号按键按钮,就想到使用GridView,但在实现中遇到点问题,在给数字键进行圆形状态键设置时发现一个问题,GridView中自带的原生选择矩形按钮总是存在,于是就想到了让其状态背景设置成透明。

一、自定义按钮控件RelativeLayout
public class KeyboardView extends RelativeLayout {
  Context mContext;
  private GridView gridView;
  private List<Map<String, String>> dataList;
  public KeyboardView(Context context) {
    this(context, null);
  }
  public KeyboardView(Context context, AttributeSet attrs) {
    super(context, attrs);
    this.mContext = context;
    View view = View.inflate(context, R.layout.layout_virtual_keyboard, null);
    dataList = new ArrayList<>();
    gridView = (GridView) view.findViewById(R.id.gv_keybord);
    initDataList();
    setupView();
    addView(view); //添加view
  }
  public List<Map<String, String>> getDataList() {
    return dataList;
  }
  private void initDataList() {  //初始化数字数据
    for (int i = 1; i < 13; i++) {
      Map<String, String> map = new HashMap<>();
      if (i < 10) {
        map.put("keyName", String.valueOf(i));
      } else if (i == 10) {
        map.put("keyName", "*");
      } else if (i == 11) {
        map.put("keyName", String.valueOf(0));
      } else if (i == 12) {
        map.put("keyName", "#");
      }
      dataList.add(map);
    }
  }
  public GridView getGridView() {
    return gridView;
  }
  private void setupView() {
    KeyBoardAdapter keyBoardAdapter = new KeyBoardAdapter(mContext, dataList);
    gridView.setAdapter(keyBoardAdapter);
  }
}
填充的GridView布局其中android:listSelector=”@android:color/transparent”设置GridView选择器背景为透明色就可以按照item设置的样式显示状态选择了
<?xml version="1.0" encoding="utf-8"?>
<FrameLayout xmlns:android="http://schemas.android.com/apk/res/android"
  android:layout_width="wrap_content"
  android:background="#3F51B5"
  android:layout_height="wrap_content">
  <!-- 键盘 -->
  <GridView
    android:id="@+id/gv_keybord"
    android:layout_width="wrap_content"
    android:layout_height="wrap_content"
    android:layout_alignParentBottom="true"
    android:listSelector="@android:color/transparent"
    android:horizontalSpacing="1dp"
    android:numColumns="3"
    android:verticalSpacing="1dp" />
</FrameLayout>
二、GridView适配器,其中填充的item的背景可以是UI切的选型图,也可以自己通过shape绘制出来
public class KeyBoardAdapter extends BaseAdapter {
  private Context mContext;
  private List<Map<String, String>> mDataList;
  public KeyBoardAdapter(Context context, List<Map<String, String>> dataList) {
    this.mContext = context;
    this.mDataList = dataList;
  }
  @Override
  public int getCount() {
    return mDataList.size();
  }

  @Override
  public Object getItem(int position) {
    return mDataList.get(position);
  }

  @Override
  public long getItemId(int position) {
    return position;
  }

  @Override
  public View getView(int position, View convertView, ViewGroup parent) {
    ViewHolder viewHolder;
    if (convertView == null) {
      convertView = View.inflate(mContext, R.layout.grid_item_virtual_keyboard, null);
      viewHolder = new ViewHolder();
      viewHolder.btnKey = (TextView) convertView.findViewById(R.id.btn_keys);
      convertView.setTag(viewHolder);
    } else {
      viewHolder = (ViewHolder) convertView.getTag();
    }
      viewHolder.btnKey.setText(mDataList.get(position).get("keyName"));
    return convertView;
  }

  public final class ViewHolder {
    public TextView btnKey;
  }
}
适配器item布局
<?xml version="1.0" encoding="utf-8"?>
<RelativeLayout xmlns:android="http://schemas.android.com/apk/res/android"
  android:layout_width="wrap_content"
  android:layout_height="wrap_content">

  <TextView
    android:id="@+id/btn_keys"
    android:layout_width="60dp"
    android:layout_height="60dp"
    android:layout_centerInParent="true"
    android:gravity="center"
    android:background="@drawable/phone_bt_dial_num_selected"
    android:textColor="#333333"
    android:textSize="32sp" />

</RelativeLayout>
三,在Activity中调用,首先要禁止系统的按键的弹出
public class NormalKeyBoardActivity extends AppCompatActivity {
  private KeyboardView keyboardView;
  private GridView gridView;
  private List<Map<String, String>> valueList;
  private EditText textNum;
  private ImageButton phone_delete;
  private String amount;
  @Override
  protected void onCreate(Bundle savedInstanceState) {
    super.onCreate(savedInstanceState);
    setContentView(R.layout.activity_keyboard);
    initView();
    valueList = keyboardView.getDataList();
    phoneDelete();
  }

  private void phoneDelete() {
    phone_delete.setOnClickListener(new View.OnClickListener() {
      @Override
      public void onClick(View view) {
        DeleteNum();
      }
    });
  }
  //删除键删除的数字
  private void DeleteNum() {
    if (amount.length() > 0) {
      amount = amount.substring(0, amount.length() - 1);
      textNum.setText(amount);
      Editable ea = textNum.getText();
      textNum.setSelection(ea.length());
    }
  }

  private void initView() {
    textNum = (EditText) findViewById(R.id.textAmount);
    // 不调用系统键盘
    if (android.os.Build.VERSION.SDK_INT <= 10) {
      textNum.setInputType(InputType.TYPE_NULL);
    } else {
      this.getWindow().setSoftInputMode(
          WindowManager.LayoutParams.SOFT_INPUT_STATE_ALWAYS_HIDDEN);
      try {
        Class<EditText> cls = EditText.class;
        Method setShowSoftInputOnFocus;
        setShowSoftInputOnFocus = cls.getMethod("setShowSoftInputOnFocus",
            boolean.class);
        setShowSoftInputOnFocus.setAccessible(true);
        setShowSoftInputOnFocus.invoke(textNum, false);
      } catch (Exception e) {
        e.printStackTrace();
      }
    }
    keyboardView = (KeyboardView) findViewById(R.id.virtualKeyboardView);
    phone_delete = (ImageButton) findViewById(R.id.phone_bt_del);
    gridView = keyboardView.getGridView();
    gridView.setOnItemClickListener(onItemClickListener);
    textNum.setOnClickListener(new View.OnClickListener() {
      @Override
      public void onClick(View v) {
        keyboardView.setFocusable(true);
        keyboardView.setFocusableInTouchMode(true);
        keyboardView.setVisibility(View.VISIBLE);
      }
    });

  }
  private AdapterView.OnItemClickListener onItemClickListener = new AdapterView.OnItemClickListener() {
    @Override
    public void onItemClick(AdapterView<?> adapterView, View view, int position, long l) {
      if (position < 11 && position != 9) {
        amount = textNum.getText().toString().trim();
        amount = amount + valueList.get(position).get("keyName");
        textNum.setText(amount);
        Editable ea = textNum.getText();
        textNum.setSelection(ea.length());
      } else {
        if (position == 9) {
          amount = textNum.getText().toString().trim();
            amount = amount + valueList.get(position).get("keyName");
            textNum.setText(amount);
            Editable ea = textNum.getText();
            textNum.setSelection(ea.length());
        }else if (position == 11) {
          String amount = textNum.getText().toString().trim();
          amount = amount + valueList.get(position).get("keyName");
          textNum.setText(amount);
          Editable ea = textNum.getText();
          textNum.setSelection(ea.length());
        }
      }
    }

  };
}
activity中的布局
<?xml version="1.0" encoding="utf-8"?>
<LinearLayout xmlns:android="http://schemas.android.com/apk/res/android"
  xmlns:tools="http://schemas.android.com/tools"
  android:layout_width="match_parent"
  android:layout_height="match_parent"
  android:orientation="vertical">

  <FrameLayout
    android:layout_width="match_parent"
    android:layout_height="50dp">

    <EditText
      android:id="@+id/textAmount"
      android:layout_width="match_parent"
      android:layout_height="match_parent"
      android:inputType="numberDecimal"
      android:padding="14dp"
      android:gravity="center_horizontal"
      android:textColor="#333333"
      android:textSize="34sp" />

    <ImageButton
      android:id="@+id/phone_bt_del"
      android:layout_width="wrap_content"
      android:layout_height="wrap_content"
      android:layout_gravity="right|center_vertical"
      android:src="@drawable/phone_bt_del_num_selected" />
  </FrameLayout>
  <LinearLayout
    android:layout_width="match_parent"
    android:orientation="vertical"
    android:layout_marginRight="80dp"
    android:layout_marginLeft="80dp"
    android:layout_height="wrap_content">
  <com.ts.widget.KeyboardView
    android:id="@+id/keyboardView"
    android:layout_width="match_parent"
    android:layout_height="0dp"
    android:layout_weight="1" />

  <ImageButton
    android:layout_width="match_parent"
    android:layout_height="60dp"
    android:background="#00EC69"
    android:src="@drawable/phone_icon_answer"
    android:text="拨号" />
  </LinearLayout>
</LinearLayout>
加载全部内容