Android实现毛玻璃效果 Android实现毛玻璃效果的对话框
lvshaorong 人气:0想了解Android实现毛玻璃效果的对话框的相关内容吗,lvshaorong在本文为您仔细讲解Android实现毛玻璃效果的相关知识和一些Code实例,欢迎阅读和指正,我们先划重点:Android,毛玻璃,对话框,下面大家一起来学习吧。
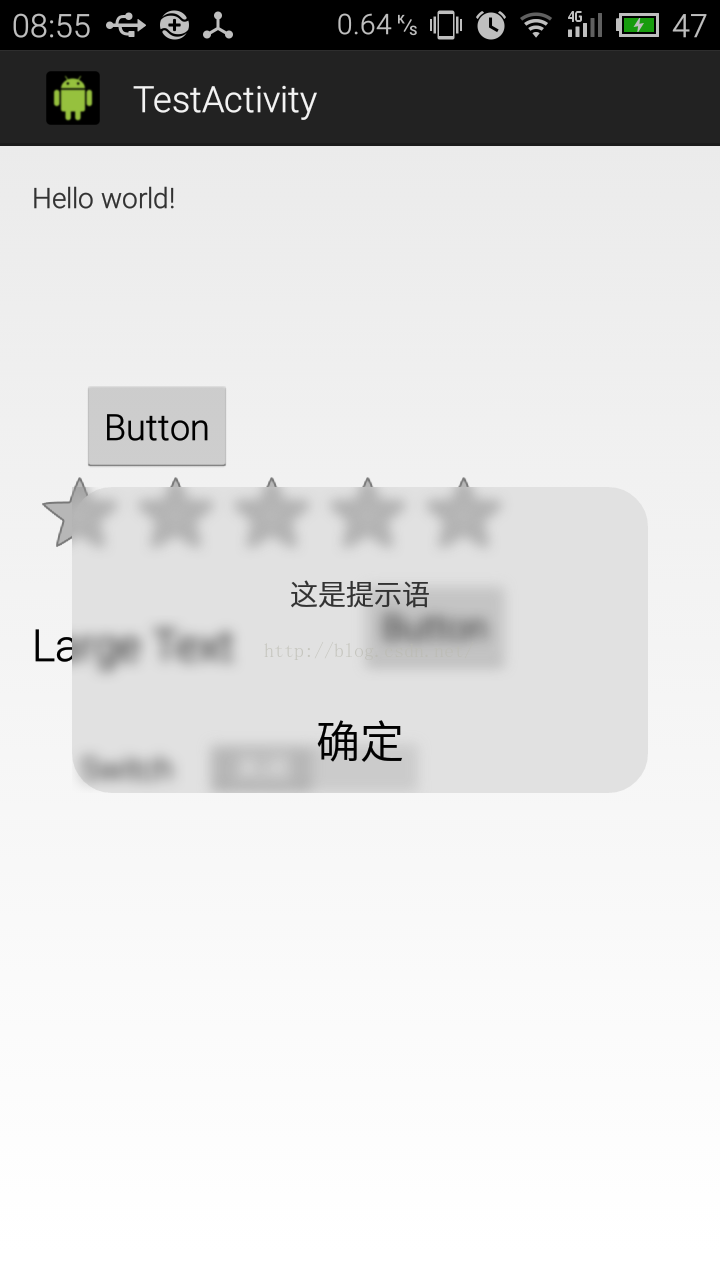
一个popwindow,在弹出的时候背景是原界面的截图加高斯模糊效果:

先给出popwindow的布局文件
<?xml version="1.0" encoding="utf-8"?>
<FrameLayout xmlns:android="http://schemas.android.com/apk/res/android"
 android:id="@+id/FrameLayout1"
 android:layout_width="match_parent"
 android:layout_height="match_parent"
 android:background="@drawable/roundcorner" >

 <com.npi.blureffect.ScrollableImageView
 android:id="@+id/imageView1"
 android:background="@drawable/roundcorner"
 android:layout_width="match_parent"
 android:layout_height="match_parent"
 android:src="@drawable/roundcorner" />

 <RelativeLayout
 android:id="@+id/RelativeLayout1"
 android:layout_width="match_parent"
 android:layout_height="match_parent" >

 <TextView
  android:id="@+id/textView1"
  android:layout_width="wrap_content"
  android:layout_height="wrap_content"
  android:layout_alignParentLeft="false"
  android:layout_alignParentTop="false"
  android:layout_centerHorizontal="true"
  android:layout_centerInParent="false"
  android:layout_centerVertical="false"
  android:layout_marginLeft="33dp"
  android:layout_marginTop="44dp"
  android:text="这是提示语" />

 <TextView
  android:id="@+id/textView2"
  android:layout_width="wrap_content"
  android:layout_height="wrap_content"
  android:layout_alignParentLeft="false"
  android:layout_below="@+id/textView1"
  android:layout_centerHorizontal="true"
  android:layout_marginTop="49dp"
  android:text="确定"
  android:textAppearance="?android:attr/textAppearanceLarge" />

 </RelativeLayout>

</FrameLayout>
里面那个自定义imageView控件在我上一篇博客里,下面是activity的布局
<RelativeLayout xmlns:android="http://schemas.android.com/apk/res/android"
 xmlns:tools="http://schemas.android.com/tools"
 android:id="@+id/window"
 android:layout_width="match_parent"
 android:layout_height="match_parent"
 android:paddingBottom="@dimen/activity_vertical_margin"
 android:paddingLeft="@dimen/activity_horizontal_margin"
 android:paddingRight="@dimen/activity_horizontal_margin"
 android:paddingTop="@dimen/activity_vertical_margin"
 tools:context="com.npi.blureffect.TestActivity" >

 <TextView
 android:id="@+id/textView1"
 android:layout_width="wrap_content"
 android:layout_height="wrap_content"
 android:text="@string/hello_world" />

 <RatingBar
 android:id="@+id/ratingBar1"
 android:layout_width="wrap_content"
 android:layout_height="wrap_content"
 android:layout_alignLeft="@+id/textView1"
 android:layout_below="@+id/textView1"
 android:layout_marginTop="124dp" />

 <Switch
 android:id="@+id/switch1"
 android:layout_width="wrap_content"
 android:layout_height="wrap_content"
 android:layout_alignLeft="@+id/ratingBar1"
 android:layout_below="@+id/ratingBar1"
 android:layout_marginLeft="24dp"
 android:layout_marginTop="81dp"
 android:text="Switch" />

 <Button
 android:id="@+id/button1"
 android:layout_width="wrap_content"
 android:layout_height="wrap_content"
 android:layout_alignRight="@+id/ratingBar1"
 android:layout_below="@+id/ratingBar1"
 android:text="Button" />

 <Button
 android:id="@+id/button2"
 android:layout_width="wrap_content"
 android:layout_height="wrap_content"
 android:layout_alignBottom="@+id/ratingBar1"
 android:layout_alignLeft="@+id/switch1"
 android:layout_marginBottom="52dp"
 android:text="Button" />

 <TextView
 android:id="@+id/textView2"
 android:layout_width="wrap_content"
 android:layout_height="wrap_content"
 android:layout_alignBottom="@+id/button1"
 android:layout_alignLeft="@+id/ratingBar1"
 android:text="Large Text"
 android:textAppearance="?android:attr/textAppearanceLarge" />

</RelativeLayout>
用于圆角的背景xml,放在drawable文件夹中
<?xml version="1.0" encoding="UTF-8" ?>
<layer-list xmlns:android="http://schemas.android.com/apk/res/android">
 <item>
  <shape>
  <solid android:color="#efefef" /><!-- 连框颜色值 -->

  <!-- 设置圆角边框 -->
   <corners
   android:topLeftRadius="20dp"
   android:topRightRadius="20dp"
   android:bottomRightRadius="20dp"
   android:bottomLeftRadius="20dp"
   />
  </shape>
 </item>
 <!-- 主体背景颜色值 -->
 <item android:bottom="20dp" android:top="20dp" android:left="20dp" android:right="20dp"> <!--上下左右四个边框的宽度,为0的话就没有了-->
  <shape>
  <solid android:color="#efefef" /> <!-- 背景白色 -->
  </shape>
 </item>
 </layer>
activity的源码
package com.npi.blureffect;

import android.annotation.SuppressLint;
import android.app.Activity;
import android.graphics.Bitmap;
import android.graphics.Point;
import android.os.Build;
import android.os.Bundle;
import android.util.Log;
import android.view.Display;
import android.view.Gravity;
import android.view.Menu;
import android.view.MenuItem;
import android.view.View;
import android.view.View.OnClickListener;
import android.view.ViewGroup.LayoutParams;
import android.widget.PopupWindow;
import android.widget.RelativeLayout;
import android.widget.TextView;

public class TestActivity extends Activity {
TextView textView1;
RelativeLayout window;
 @Override
 protected void onCreate(Bundle savedInstanceState) {
 super.onCreate(savedInstanceState);
 setContentView(R.layout.activity_test);
 textView1 = (TextView) findViewById(R.id.textView1);
 window = (RelativeLayout)findViewById(R.id.window);
 textView1.setOnClickListener(new OnClickListener() {

  @Override
  public void onClick(View v) {
  // TODO Auto-generated method stub
  initPopuptWindow(window);
  }
 });

 }
PopupWindow popupWindow;

 /**
 * 创建PopupWindow
 */
 protected void initPopuptWindow(View layout) {
 // TODO Auto-generated method stub
 //对当前页面进行截屏
 layout.setDrawingCacheEnabled(true);
 layout.buildDrawingCache(); //启用DrawingCache并创建位图
 Bitmap screen = Bitmap.createBitmap(layout.getDrawingCache()); //创建一个DrawingCache的拷贝,因为DrawingCache得到的位图在禁用后会被回收
 layout.setDrawingCacheEnabled(false); //禁用DrawingCahce否则会影响性能

 //将截屏进行模糊
 screen = Blur.fastblur(this, screen, 15);

 // 获取自定义布局文件activity_popupwindow_left.xml的视图
 final View popupWindow_view = getLayoutInflater().inflate(R.layout.ioswindow, null,
  false);
 // 创建PopupWindow实例,200,LayoutParams.MATCH_PARENT分别是宽度和高度
 final ScrollableImageView background = (ScrollableImageView) popupWindow_view.findViewById(R.id.imageView1);
 background.setoriginalImage(screen);
 final int screenWidth = getScreenWidth(this);
 final int screenHeight = screen.getHeight();
 final int heightless = getScreenHeight(this)-screenHeight;
 Log.i("Alex", "屏幕宽度为"+screenWidth+"高度为"+screenHeight+"偏差为"+heightless);
 popupWindow = new PopupWindow(popupWindow_view, (int) (screenWidth*0.8), (int) (screenWidth*0.85*0.5), true); //设置popwindow的大小
 popupWindow.showAtLocation(textView1, Gravity.CENTER, 0, 0);//设置popwindow的位置
 popupWindow_view.post(new Runnable() {

  @Override
  public void run() {
  // TODO Auto-generated method stub
  int left = screenWidth/10;
  Log.i("Alex", screenHeight+"-"+screenWidth*0.85*0.5);
  int top = (int) ((screenHeight-screenWidth*0.85*0.5)/2-heightless/2);
  Log.i("Alex", "top是"+top);
  background.handleScroll(top, left);
  }
 });

 // 设置动画效果
 // 点击其他地方消失
 TextView confirm = (TextView) popupWindow_view.findViewById(R.id.textView2);
 confirm.setOnClickListener(new OnClickListener() {

  @Override
  public void onClick(View v) {
  // TODO Auto-generated method stub
  popupWindow.dismiss();
  }
 });

 }

 /**
 * Get the screen width.
 *
 * @param context
 * @return the screen width
 */
 @SuppressWarnings("deprecation")
 @SuppressLint("NewApi")
 public static int getScreenWidth(Activity context) {

 Display display = context.getWindowManager().getDefaultDisplay();
 if (Build.VERSION.SDK_INT >= Build.VERSION_CODES.HONEYCOMB_MR2) {
  Point size = new Point();
  display.getSize(size);
  return size.x;
 }
 return display.getWidth();
 }

 /**
 * Get the screen height.
 *
 * @param context
 * @return the screen height
 */
 @SuppressWarnings("deprecation")
 @SuppressLint("NewApi")
 public static int getScreenHeight(Activity context) {

 Display display = context.getWindowManager().getDefaultDisplay();
 if (Build.VERSION.SDK_INT >= Build.VERSION_CODES.HONEYCOMB_MR2) {
  Point size = new Point();
  display.getSize(size);
  return size.y;
 }
 return display.getHeight();
 }
}
第二种样式,比第一种简单但是效果更明显也更大众化

这个是在原来布局的最上层加上了一个不可见的imageView,在弹出popwindow之前用这个imageView盖住底下的东西
布局如下
<RelativeLayout xmlns:android="http://schemas.android.com/apk/res/android"
 xmlns:tools="http://schemas.android.com/tools"
 android:id="@+id/window"
 android:layout_width="match_parent"
 android:layout_height="match_parent"
 tools:context="com.npi.blureffect.DialogActivity" >

 <TextView
 android:id="@+id/textView1"
 android:layout_width="wrap_content"
 android:layout_height="wrap_content"
 android:text="@string/hello_world" />
 <RatingBar
 android:id="@+id/ratingBar1"
 android:layout_width="wrap_content"
 android:layout_height="wrap_content"
 android:layout_alignLeft="@+id/textView1"
 android:layout_below="@+id/textView1"
 android:layout_marginTop="124dp" />

 <Switch
 android:id="@+id/switch1"
 android:layout_width="wrap_content"
 android:layout_height="wrap_content"
 android:layout_alignLeft="@+id/ratingBar1"
 android:layout_below="@+id/ratingBar1"
 android:layout_marginLeft="24dp"
 android:layout_marginTop="81dp"
 android:text="Switch" />

 <Button
 android:id="@+id/button1"
 android:layout_width="wrap_content"
 android:layout_height="wrap_content"
 android:layout_alignRight="@+id/ratingBar1"
 android:layout_below="@+id/ratingBar1"
 android:text="Button" />

 <Button
 android:id="@+id/button2"
 android:layout_width="wrap_content"
 android:layout_height="wrap_content"
 android:layout_alignBottom="@+id/ratingBar1"
 android:layout_alignLeft="@+id/switch1"
 android:layout_marginBottom="52dp"
 android:text="Button" />

 <TextView
 android:id="@+id/textView2"
 android:layout_width="wrap_content"
 android:layout_height="wrap_content"
 android:layout_alignBottom="@+id/button1"
 android:layout_alignLeft="@+id/ratingBar1"
 android:text="Large Text"
 android:textAppearance="?android:attr/textAppearanceLarge" />

 <ProgressBar
 android:id="@+id/progressBar1"
 style="?android:attr/progressBarStyleHorizontal"
 android:layout_width="wrap_content"
 android:layout_height="wrap_content"
 android:layout_alignParentBottom="true"
 android:layout_marginBottom="49dp"
 android:layout_toLeftOf="@+id/button1" />

 <ProgressBar
 android:id="@+id/progressBar2"
 style="?android:attr/progressBarStyleLarge"
 android:layout_width="wrap_content"
 android:layout_height="wrap_content"
 android:layout_below="@+id/switch1"
 android:layout_toRightOf="@+id/switch1" />

 <RadioButton
 android:id="@+id/radioButton1"
 android:layout_width="wrap_content"
 android:layout_height="wrap_content"
 android:layout_above="@+id/progressBar1"
 android:layout_alignLeft="@+id/switch1"
 android:text="RadioButton" />

 <Button
 android:id="@+id/button3"
 android:layout_width="wrap_content"
 android:layout_height="wrap_content"
 android:layout_alignLeft="@+id/progressBar2"
 android:layout_below="@+id/progressBar2"
 android:text="Button" />

 <ImageView
 android:id="@+id/background"
 android:layout_width="match_parent"
 android:layout_height="match_parent"
 android:background="#fff"
 android:visibility="gone" />

</RelativeLayout>
activity 如下
package com.npi.blureffect;

import android.annotation.SuppressLint;
import android.app.Activity;
import android.graphics.Bitmap;
import android.graphics.BitmapFactory;
import android.graphics.Matrix;
import android.graphics.Point;
import android.os.Build;
import android.os.Bundle;
import android.util.Log;
import android.view.Display;
import android.view.Gravity;
import android.view.Menu;
import android.view.MenuItem;
import android.view.View;
import android.view.View.OnClickListener;
import android.widget.ImageView;
import android.widget.PopupWindow;
import android.widget.RelativeLayout;
import android.widget.TextView;

public class DialogActivity extends Activity {
TextView textView1;
RelativeLayout window;
ImageView background;
 @Override
 protected void onCreate(Bundle savedInstanceState) {
 super.onCreate(savedInstanceState);
 setContentView(R.layout.activity_dialog);
 textView1 = (TextView) findViewById(R.id.textView1);
 window = (RelativeLayout)findViewById(R.id.window);
 background = (ImageView) findViewById(R.id.background);

 textView1.setOnClickListener(new OnClickListener() {

 @Override
 public void onClick(View v) {
 // TODO Auto-generated method stub
 initPopuptWindow(window);
 }
 });
 }

 PopupWindow popupWindow;


 /**
 * 创建PopupWindow
 */
 protected void initPopuptWindow(View layout) {
 // TODO Auto-generated method stub
 //对当前页面进行截屏
 layout.setDrawingCacheEnabled(true);
 layout.buildDrawingCache(); //启用DrawingCache并创建位图
 Bitmap screen = Bitmap.createBitmap(layout.getDrawingCache()); //创建一个DrawingCache的拷贝,因为DrawingCache得到的位图在禁用后会被回收
 layout.setDrawingCacheEnabled(false); //禁用DrawingCahce否则会影响性能
 Log.i("Alex", "转换前bitmap的大小是"+screen.getWidth()+" : "+screen.getHeight());
 screen = scaleBitmap(screen, screen.getWidth()/2, screen.getHeight()/2);//压缩bitmap到指定大小
 Log.i("Alex", "转换后bitmap的大小是"+screen.getWidth()+" : "+screen.getHeight());
 //将截屏进行模糊
 screen = Blur.fastblur(this, screen, 10);

 // 获取自定义布局文件activity_popupwindow_left.xml的视图
 final View popupWindow_view = getLayoutInflater().inflate(R.layout.ioswindow, null,
 false);

 // 创建PopupWindow实例,200,LayoutParams.MATCH_PARENT分别是宽度和高度
 background.setImageBitmap(screen);
 background.setVisibility(View.VISIBLE);
 final int screenWidth = getScreenWidth(this);
 popupWindow = new PopupWindow(popupWindow_view, (int) (screenWidth*0.8), (int) (screenWidth*0.85*0.5), true); //设置popwindow的大小
 popupWindow.showAtLocation(textView1, Gravity.CENTER, 0, 0);//设置popwindow的位置
 popupWindow_view.post(new Runnable() {

 @Override
 public void run() {
 // TODO Auto-generated method stub
 int left = screenWidth/10;
 }
 });

 // 设置动画效果
 // 点击其他地方消失
 TextView confirm = (TextView) popupWindow_view.findViewById(R.id.textView2);
 confirm.setOnClickListener(new OnClickListener() {

 @Override
 public void onClick(View v) {
 // TODO Auto-generated method stub
 background.setVisibility(View.GONE);
 popupWindow.dismiss();
 }
 });

 }

 /**
 * Get the screen width.
 *
 * @param context
 * @return the screen width
 */
 @SuppressWarnings("deprecation")
 @SuppressLint("NewApi")
 public static int getScreenWidth(Activity context) {

 Display display = context.getWindowManager().getDefaultDisplay();
 if (Build.VERSION.SDK_INT >= Build.VERSION_CODES.HONEYCOMB_MR2) {
 Point size = new Point();
 display.getSize(size);
 return size.x;
 }
 return display.getWidth();
 }

 /**
 * 把一个bitmap压缩,压缩到指定大小
 * @param bm
 * @param width
 * @param height
 * @return
 */
 private static Bitmap scaleBitmap(Bitmap bm, float width, float height) {
 if (bm == null) {
 return null;
 }
 int bmWidth = bm.getWidth();
 int bmHeight = bm.getHeight();
 float scaleWidth = width / bmWidth;
 float scaleHeight = height / bmHeight;
 Matrix matrix = new Matrix();
 matrix.postScale(scaleWidth, scaleHeight);

 if (scaleWidth == 1 && scaleHeight == 1) {
 return bm;
 } else {
 Bitmap resizeBitmap = Bitmap.createBitmap(bm, 0, 0, bmWidth,
  bmHeight, matrix, false);
 bm.recycle();//回收图片内存
 bm.setDensity(240);
 return resizeBitmap;
 }
 }
}
以上就是本文的全部内容,希望对大家的学习有所帮助,也希望大家多多支持。
加载全部内容