安卓中使用Volley库发送HTTP请求 Android开发中使用Volley库发送HTTP请求的实例教程
人气:0Android Volley 是Google开发的一个网络lib,可以让你更加简单并且快速的访问网络数据。Volley库的网络请求都是异步的,你不必担心异步处理问题。
Volley的优点:
- 请求队列和请求优先级
- 请求Cache和内存管理
- 扩展性性强
- 可以取消请求
下载和编译volley.jar
需要安装git,ant,android sdk
clone代码:
git clone https://android.googlesource.com/platform/frameworks/volley
编译jar:
android update project -p . ant jar
添加volley.jar到你的项目中
不过已经有人将volley的代码放到github上了:
https://github.com/mcxiaoke/android-volley,你可以使用更加简单的方式来使用volley:
Maven
format: jar
<dependency>
  <groupId>com.mcxiaoke.volley</groupId>
  <artifactId>library</artifactId>
  <version>1.0.6</version>
</dependency>
Gradle
format: jar
compile 'com.mcxiaoke.volley:library:1.0.6'
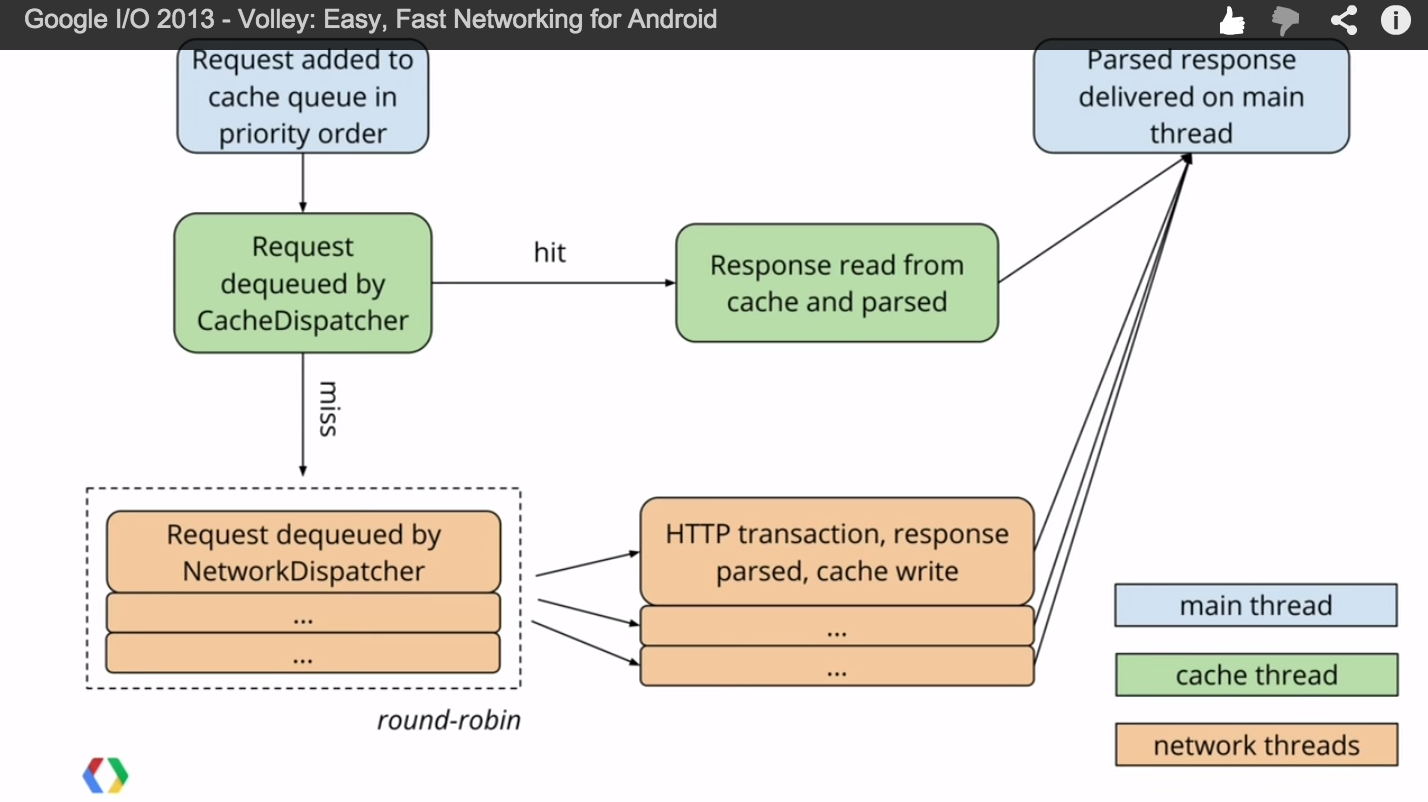
Volley工作原理图

创建Volley 单例
使用volley时,必须要创建一个请求队列RequestQueue,使用请求队列的最佳方式就是将它做成一个单例,整个app使用这么一个请求队列。
public class AppController extends Application {

public static final String TAG = AppController.class
    .getSimpleName();

private RequestQueue mRequestQueue;
private ImageLoader mImageLoader;

private static AppController mInstance;

@Override
public void onCreate() {
  super.onCreate();
  mInstance = this;
}

public static synchronized AppController getInstance() {
  return mInstance;
}

public RequestQueue getRequestQueue() {
  if (mRequestQueue == null) {
    mRequestQueue = Volley.newRequestQueue(getApplicationContext());
  }

  return mRequestQueue;
}

public ImageLoader getImageLoader() {
  getRequestQueue();
  if (mImageLoader == null) {
    mImageLoader = new ImageLoader(this.mRequestQueue,
        new LruBitmapCache());
  }
  return this.mImageLoader;
}

public <T> void addToRequestQueue(Request<T> req, String tag) {
  // set the default tag if tag is empty
  req.setTag(TextUtils.isEmpty(tag) ? TAG : tag);
  getRequestQueue().add(req);
}

public <T> void addToRequestQueue(Request<T> req) {
  req.setTag(TAG);
  getRequestQueue().add(req);
}

public void cancelPendingRequests(Object tag) {
  if (mRequestQueue != null) {
    mRequestQueue.cancelAll(tag);
  }
}
}
另外,你还需要一个Cache来存放请求的图片:
public class LruBitmapCache extends LruCache<String, Bitmap> implement ImageCache {
  public static int getDefaultLruCacheSize() {
    final int maxMemory = (int) (Runtime.getRuntime().maxMemory() / 1024);
    final int cacheSize = maxMemory / 8;

    return cacheSize;
  }

  public LruBitmapCache() {
    this(getDefaultLruCacheSize());
  }

  public LruBitmapCache(int sizeInKiloBytes) {
    super(sizeInKiloBytes);
  }

  @Override
  protected int sizeOf(String key, Bitmap value) {
    return value.getRowBytes() * value.getHeight() / 1024;
  }

  @Override
  public Bitmap getBitmap(String url) {
    return get(url);
  }

  @Override
  public void putBitmap(String url, Bitmap bitmap) {
    put(url, bitmap);
  }
}
别忘记在AndroidManifest.xml文件中添加android.permission.INTERNET权限。
HTTP请求实例
  private Context mContext;
  private RequestQueue mRequestQueue;
  private StringRequest mStringRequest;

  // 利用Volley实现Post请求
  private void volley_post() {
    String url = "http://aplesson.com/wap/api/user.php?action=login";
    mContext = this;
    mRequestQueue = Volley.newRequestQueue(mContext);
    mStringRequest = new StringRequest(Method.POST, url,
        new Response.Listener<String>() {
          @Override
          public void onResponse(String response) {
            System.out.println("请求结果:" + response);
          }
        }, new Response.ErrorListener() {
          @Override
          public void onErrorResponse(VolleyError error) {
            System.out.println("请求错误:" + error.toString());
          }
        }) {
      // 携带参数
      @Override
      protected HashMap<String, String> getParams()
          throws AuthFailureError {
        HashMap<String, String> hashMap = new HashMap<String, String>();
        hashMap.put("un", "852041173");
        hashMap.put("pw", "852041173abc");
        return hashMap;
      }

      // Volley请求类提供了一个 getHeaders()的方法,重载这个方法可以自定义HTTP 的头信息。(也可不实现)
      public Map<String, String> getHeaders() throws AuthFailureError {
        HashMap<String, String> headers = new HashMap<String, String>();
        headers.put("Accept", "application/json");
        headers.put("Content-Type", "application/json; charset=UTF-8");
        return headers;
      }

    };

    mRequestQueue.add(mStringRequest);

  }

  private JsonObjectRequest mJsonObjectRequest;

  // 利用Volley实现Json数据请求
  private void volley_json() {
    mContext = this;
    String url = "http://aplesson.com/data/101010100.html";
    // 1 创建RequestQueue对象
    mRequestQueue = Volley.newRequestQueue(mContext);
    // 2 创建JsonObjectRequest对象
    mJsonObjectRequest = new JsonObjectRequest(url, null,
        new Response.Listener<JSONObject>() {
          @Override
          public void onResponse(JSONObject response) {
            System.out.println("请求结果:" + response.toString());
          }
        }, new Response.ErrorListener() {
          @Override
          public void onErrorResponse(VolleyError error) {
            System.out.println("请求错误:" + error.toString());
          }
        });

    // 3 将JsonObjectRequest添加到RequestQueue
    mRequestQueue.add(mJsonObjectRequest);

  }

  // 利用Volley实现Get请求
  private void volley_get() {
    mContext = this;
    String url = "http://www.aplesson.com/";
    // 1 创建RequestQueue对象
    mRequestQueue = Volley.newRequestQueue(mContext);
    // 2 创建StringRequest对象
    mStringRequest = new StringRequest(url,
        new Response.Listener<String>() {
          @Override
          public void onResponse(String response) {
            System.out.println("请求结果:" + response);
          }
        }, new Response.ErrorListener() {
          @Override
          public void onErrorResponse(VolleyError error) {
            System.out.println("请求错误:" + error.toString());
          }
        });
    // 3 将StringRequest添加到RequestQueue
    mRequestQueue.add(mStringRequest);
  }
Volley提供了JsonObjectRequest、JsonArrayRequest、StringRequest等Request形式。JsonObjectRequest:返回JSON对象。
JsonArrayRequest:返回JsonArray。
StringRequest:返回String,这样可以自己处理数据,更加灵活。
另外可以继承Request<T>自定义Request。
取消Request
Activity里面启动了网络请求,而在这个网络请求还没返回结果的时候,Activity被结束了,此时如果继续使用其中的Context等,除了无辜的浪费CPU,电池,网络等资源,有可能还会导致程序crash,所以,我们需要处理这种一场情况。使用Volley的话,我们可以在Activity停止的时候,同时取消所有或部分未完成的网络请求。Volley里所有的请求结果会返回给主进程,如果在主进程里取消了某些请求,则这些请求将不会被返回给主线程。Volley支持多种request取消方式。
可以针对某些个request做取消操作:
 @Override
  public void onStop() {
    for (Request <?> req : mRequestQueue) {
      req.cancel();
    }
  }
取消这个队列里的所有请求:
 @Override
  protected void onStop() {
    // TODO Auto-generated method stub
    super.onStop();
    mRequestQueue.cancelAll(this);
  }
可以根据RequestFilter或者Tag来终止某些请求
 @Override
  protected void onStop() {
    // TODO Auto-generated method stub
    super.onStop();

    mRequestQueue.cancelAll( new RequestFilter() {});
    or
    mRequestQueue.cancelAll(new Object());
  }
Volley支持http的GET、POST、PUT、DELETE等方法。
加载全部内容