ASP.NET 2.0 GridView批量更新 在ASP.NET 2.0中操作数据之六十二:GridView批量更新数据
heker2007 人气:0导言:
在前面的教程,我们对数据访问层进行扩展以支持数据库事务.数据库事务确保一系列的操作要么都成功,要么都失败。本文我们将注意力转到创建一个批更新数据界面.
在本文,我们将创建一个GridView控件,里面的每一行记录都可以进行编辑(见图1),因此我们没有必要多添加一列来包含Edit, Update,和Cancel按钮,而是在页面包含2个“Update Products”按钮,被点击时,遍历所有的产品并对数据库进行更新.让我们开始吧.
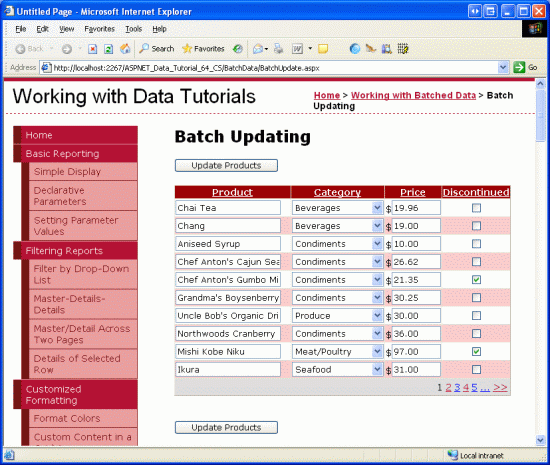
图1:GridView控件里的每一行记录都可以编辑
注意:在第37章《DataList批量更新》里我们用一个DataList控件创建了一个批编辑界面, 那篇文章与本文的区别之一在于本文使用GridView控件且使用了事务.
考察设置所有GridView Rows可编辑的步骤
就像在第16章《概述插入、更新和删除数据》考察的那样,GridView控件使用内置的编辑功能编辑每一行记录。在其内部,GridView控件通过EditIndex属性来判断哪一行可编辑. 一旦GridView绑定到数据源之后,它就逐行检查,看哪行的index值与EditIndex的值匹配,如果找到的话,该行就呈现为编辑界面.如果是绑定列(BoundFields),则呈现为一个TextBox,其Text值为对应的BoundField的DataField属性的值;如果是模板列(TemplateFields),那么呈现为EditItemTemplate而不是ItemTemplate.
我们知道当某个用户点击某行的Edit按钮时,页面产生回传,将该行的index值为GridView控件的EditIndex属性赋值,再重新绑定数据.当点击某行的Cancel按钮后产生页面回传,在重新绑定数据以前,将EditIndex属性设置为-1.因为,对GridView控件的rows而言,开始时Index值为0,而将EditIndex设为-1的话就变成只读模式了.
如果只对行进行编辑,EditIndex属性工作正常,但不支持批编辑。要对GridView实施批编辑的话,我们必须使每行都呈现为编辑界面.为此,最简单的方法是将要编辑的列,转换为TemplateField,然后在ItemTemplate模板里创建编辑界面.在接下来的几步,我们将创建一个完整的可批编辑的GridView,在第一步,我们将创建一个GridView及其ObjectDataSource,并将BoundFields和CheckBoxField转换为TemplateFields。在第二步和第三步,我们将编辑界面从ItemTemplates模板转移到EditItemTemplates.
第一步:展示Product信息
首先,我们先创建一个显示产品信息的GridView.打开BatchData文件夹里的页面BatchUpdate.aspx,从工具箱拖一个GridView控件到页面,设ID值为ProductsGrid,从其智能标签里绑定到一个名为ProductsDataSource的ObjectDataSource,设其调用ProductsBLL class类的GetProducts方法.
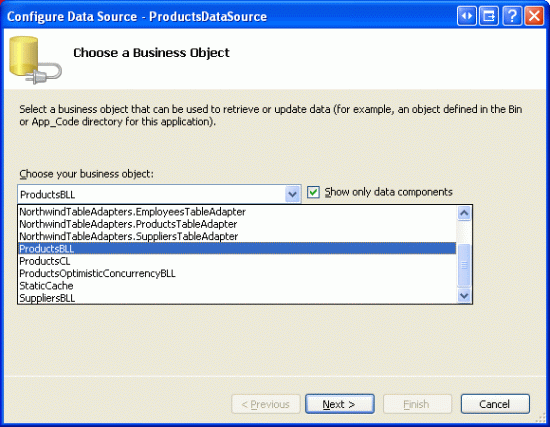
图2:设置ObjectDataSourc调用ProductsBLL Class类
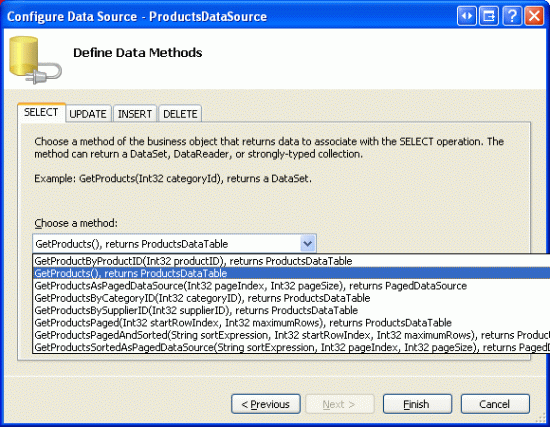
图3: 使用GetProducts方法获取产品信息
像GridView一样,该ObjectDataSource调用的方法也只能对每行记录起作用。为了批更新记录,我们必须在ASP.NET页面的后台代码类里多写些代码,批处理数据并传递给BLL.因此,在ObjectDataSource的UPDATE, INSERT,和DELETE标签里选“(None)”. 点Finish完成设置.
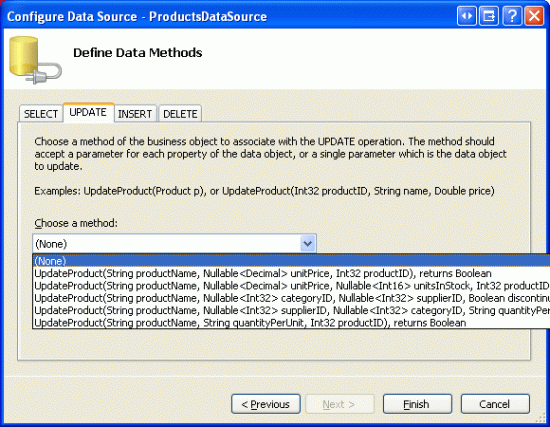
图4:在UPDATE, INSERT,和DELETE标签里选“(None)”
完成设置后,ObjectDataSource控件的声明代码看起来和下面的差不多:
<asp:ObjectDataSource ID="ProductsDataSource" runat="server"
 OldValuesParameterFormatString="original_{0}"
 SelectMethod="GetProducts" TypeName="ProductsBLL">
</asp:ObjectDataSource>
完成设置后,Visual Studio会向GridView控件添加BoundFields以及一个 CheckBoxField.就本文而言,我们只允许用户查看和编辑产品的名称、类别、价格、以及discontinued状态.将ProductName, CategoryName, UnitPrice和 Discontinued以外的列全部删除,并分别将头3个列的HeaderText属性设置为“Product”, “Category”,“Price”。最后,启用GridView的分页、排序功能.
此时,GridView控件含有3个BoundFields(ProductName,CategoryName,和UnitPrice)以及一个CheckBoxField (Discontinued).我们希望将这4个列转换为TemplateFields,并将编辑界面从TemplateField的EditItemTemplate模板转移到ItemTemplate模板.
注意:我们在第20章《定制数据修改界面》里探讨了如何创建并定制TemplateFields.我们将BoundFields和CheckBoxField转换成TemplateFields,然后再在ItemTemplates模板里定制其编辑界面。如果有什么不清楚的,可参考前面的文章.
从GridView的智能标签里,点“编辑列”,这将打开Fields对话框,然后选中每一列,点击“Convert this field into a TemplateField”。
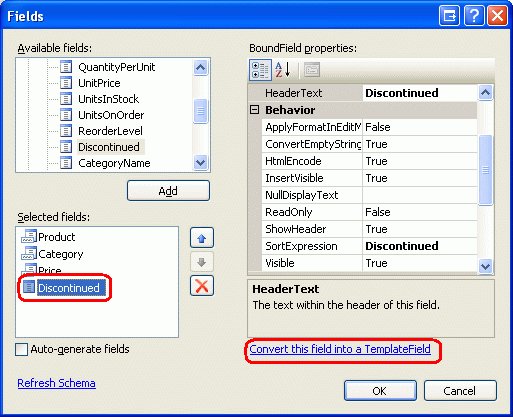
图5:将现有的BoundFields和CheckBoxField转换为TemplateField
现在每一列都是TemplateField,我们将把编辑界面从EditItemTemplates模板转移到ItemTemplates模板.
第2步:创建ProductName, UnitPrice,和Discontinued列的编辑界面
创建ProductName, UnitPrice,和Discontinued这3列的编辑界面是比较简单的,因为它们都在TemplateField的EditItemTemplate模板里定义好了的;而创建CategoryName的编辑界面比较麻烦,因为我们需要创建一个DropDownList控件来显示可用的categories,我们将在第3步实现.
我们首先创建ProductName的编辑界面。在GridView控件的智能标签里点“编辑模板”,再点ProductName TemplateField的EditItemTemplate项.选中其中的TextBox,将其复制、粘贴到ProductName TemplateField的ItemTemplate模板.将该TextBox的ID属性设置为ProductName.
然后,在ItemTemplate模板里添加一个RequiredFieldValidator控件,以确保用户输入的产品name不为空.将其ControlToValidate属性设置为“ProductName”;ErrorMessage属性为“You must provide the product's name.”;Text属性为“*”.添加完后,屏幕看起来应该像图6那样:
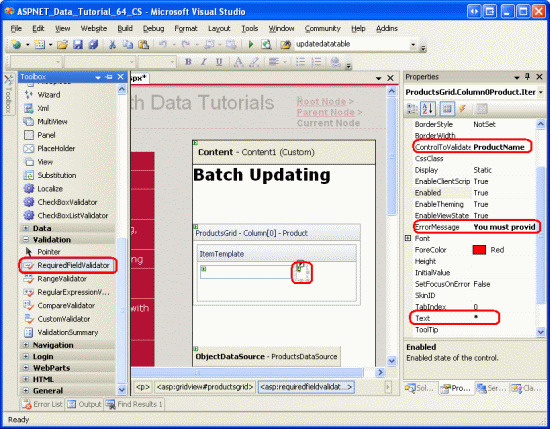
图6:ProductName TemplateField现在包含一个TextBox控件和一个 RequiredFieldValidator控件
对UnitPrice编辑界面而言,先从EditItemTemplate模板里将TextBox拷贝到ItemTemplate模板.然后,在TextBox前面放置一个“$”符合,将其ID属性设置为“UnitPrice”;Columns属性设置为“8”.
然后再添加一个CompareValidator控件,确保用户输入的是大于或等于$0.00的货币值.设其ControlToValidate属性为“UnitPrice”;ErrorMessage 属性为“You must enter a valid currency value. Please omit any currency symbols.”;Text属性为“*”;Type属性为Currency;Operator属性为GreaterThanEqual;ValueToCompare属性为“0”.
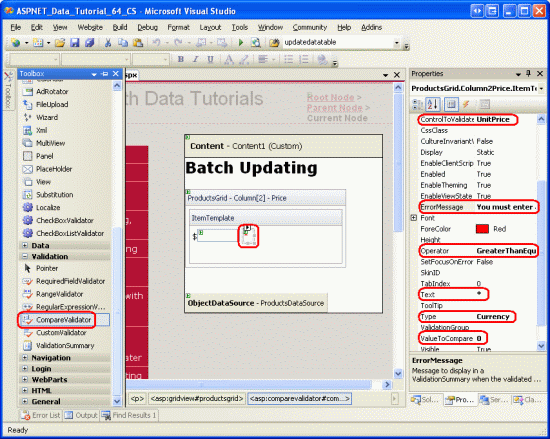
图7:添加一个CompareValidator控件以确保用户输入的是非负的货币值
对Discontinued TemplateField而言,直接使用已经在ItemTemplate模板里定义好了的CheckBox,只需要设其ID为“Discontinued”,Enabled属性为true.
第三步:创建CategoryName的编辑界面
CategoryName TemplateField的EditItemTemplate模板里的编辑界面里包含一个TextBox,其用来显示CategoryName列的值,我们要将其替换为一个DropDownList控件以显示categories.
注意:在第20章《定制数据修改界面》里我们详细地探讨了如何用DropDownList控件来替换TextBox控件。在此我们将过程一略而过,具体创建和设置DropDownList控件的细节可参考第20章.
从工具箱里拖一个DropDownList控件到CategoryNameTemplateField的ItemTemplate模板, 设其ID为Categories.通常情况下,我们会通过其智能标签来定义DropDownLists的数据源,来创建一个新的ObjectDataSource.然而,这将在ItemTemplate模板里新添一个ObjectDataSource,后果是每一个GridView row都会创建一个ObjectDataSource实例.因此,我们在GridView的TemplateFields外创建ObjectDataSource.结束模板编辑,从工具箱拖一个ObjectDataSource到页面,放置在名为ProductsDataSource的ObjectDataSource控件下面。将该新O用GetCategories Method bjectDataSource命名为CategoriesDataSource,设其使用CategoriesBLL class类的GetCategories方法.
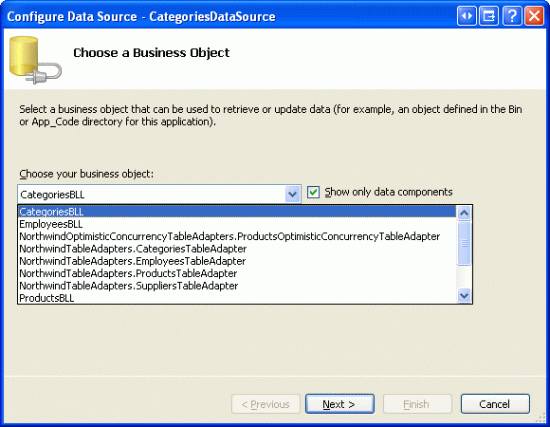
图8:设置该ObjectDataSource使用CategoriesBLL类

图9:从GetCategories方法获取数据
因为该ObjectDataSource仅仅是用来检索数据,在UPDATE 和 DELETE标签里选 “(None)”. 点Finish完成设置.
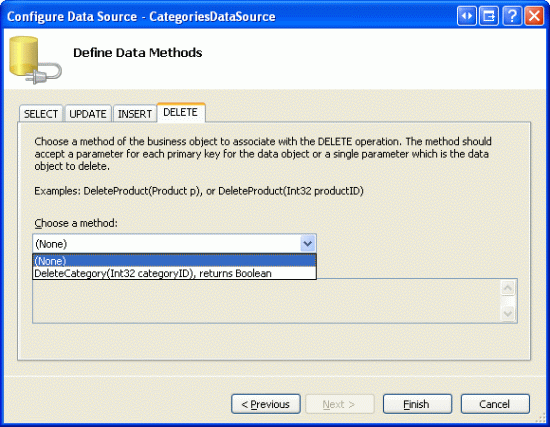
图10:在UPDATE和DELETE标签里选“(None)”
完成设置后,CategoriesDataSource的声明代码看起来根下面的差不多:
<asp:ObjectDataSource ID="CategoriesDataSource" runat="server"
 OldValuesParameterFormatString="original_{0}"
 SelectMethod="GetCategories" TypeName="CategoriesBLL">
</asp:ObjectDataSource>
设置好后,返回CategoryName TemplateField的ItemTemplate模板,在DropDownList的智能标签里点“Choose Data Source”,在数据源设置向导里,在第一个下拉列表里选CategoriesDataSource;再下面的2个下拉列表里分别选CategoryName和CategoryID.
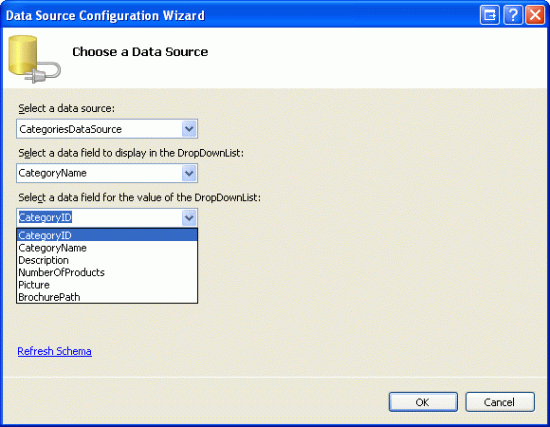
图11:将DropDownList控件绑定到CategoriesDataSource
此时,DropDownList控件虽然列出了所有的categories,但对绑定到GridViewrow里的产品而言,其并没有自动的选择产品对应的category.为此,我们将DropDownList的SelectedValue值设置为产品的CategoryID值。在DropDownList的智能标签里点“Edit DataBindings”,并将SelectedValue属性赋值为CategoryID ,如图12:
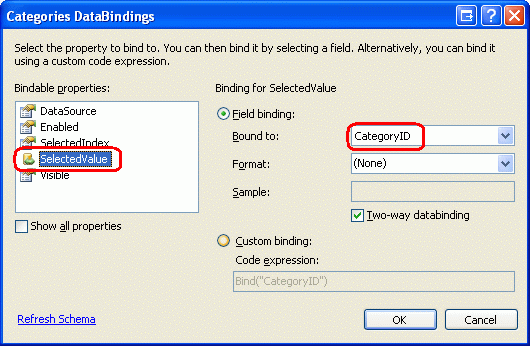
图12:将产品的CategoryID值绑定到DropDownList的SelectedValue属性
还有最后一个问题,如果产品的CategoryID为空的话,对SelectedValue的数据绑定将会抛出异常. 因为DropDownList只列出了那些指定了CategoryID值的产品,但不会列出那些CategoryID值为NULL的产品.怎样解决呢?将DropDownList的AppendDataBoundIt属性设为rue,并向DropDownList新添加一个item,忽略其Value属性就像下面的声明代码那样:
<asp:DropDownList ID="Categories" runat="server" AppendDataBoundItems="True"
 DataSourceID="CategoriesDataSource" DataTextField="CategoryName"
 DataValueField="CategoryID" SelectedValue='<%# Bind("CategoryID") %>'>
 <asp:ListItem Value="">-- Select One --</asp:ListItem>
</asp:DropDownList>
我们注意到<asp:ListItem Value=""> “-- Select One --”里,将Value属性设置为一个空字符串.为什么要新添该item来处理值为NULL的情况?为什么要将Value属性设置为一个空字符串呢?这些疑问可参考前面第20章《定制数据修改界面》
注意:这里有一个关乎性能的潜在问题要提一下。因为每行记录都包含一个DropDownList,其数据源为CategoriesDataSource.每次登录页面时,都会调用CategoriesBLL class类的GetCategories方法N次,这里N为GridView控件里行的数目.对GetCategories的N次调用就会导致对数据库的N次查询.我们可以对返回结果进行缓存以减轻对数据库造成的影响;至于方式嘛,可以运用per-request caching策略,也可以在缓存层Caching Layer里使用SQL高速缓存依赖性(SQL caching dependency)或基于短时间缓存周期(a very short time-based expiry)的策略。对per-request caching策略的更多信息可参考文章《HttpContext.Items – a Per-Request Cache Store》(http://aspnet.4guysfromrolla.com/articles/060904-1.aspx)
第四步:完善编辑界面
在浏览器里查看该页面,就像图13所示,每行都使用ItemTemplate模板,以包含其编辑页面。
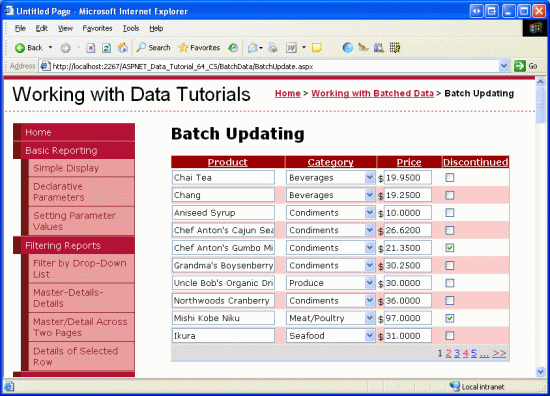
图13:每个GridView Row都是可编辑的
不过仍有一些问题。首先,UnitPrice值为四个小数点,为此,返回UnitPrice TemplateField的ItemTemplate模板, 在TextBox的智能标签里点“Edit DataBindings”,然后,将Text属性格式指定为number.
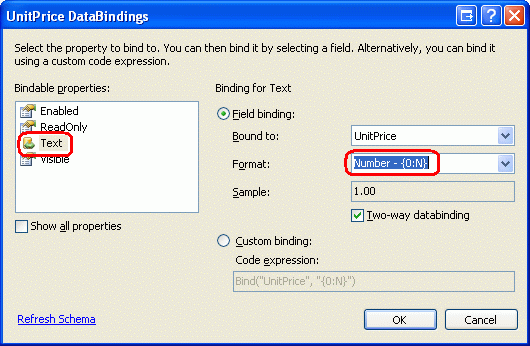
图14:将Text格式指定为Number
然后,将Discontinued列里的checkbox控件居中(而不是居左),在GridView的智能标签里点“编辑列”,选取左边方框里的Discontinued,再在右边方框里的ItemStyle里将HorizontalAlign属性设置为Center,如图15所示:
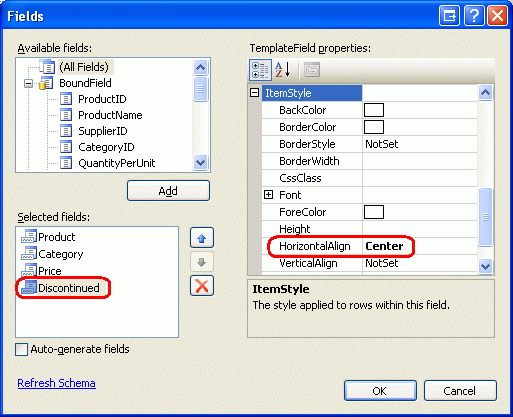
图15:将Discontinued列里的CheckBox居左
接下来在页面上添加一个ValidationSummar控件,将其ShowMessageBox属性设置为true;ShowSummary属性设置为false. 同时再添加一个Button Web控件,用来更新用户所做的更该。特别的,添加2个,一个在GridView控件上面,一个在下面,将它们的Text属性设置为“Update Products”.由于我们已经在TemplateFields模板定义了编辑界面,那么EditItemTemplates模板就显得多余了,将其删除.
完成上述修改后,你的页面声明代码看起来应该和下面的差不多:
<p>
 <asp:Button ID="UpdateAllProducts1" runat="server" Text="Update Products" />
</p>
<p>
 <asp:GridView ID="ProductsGrid" runat="server" AutoGenerateColumns="False"
 DataKeyNames="ProductID" DataSourceID="ProductsDataSource"
 AllowPaging="True" AllowSorting="True">
 <Columns>
  <asp:TemplateField HeaderText="Product" SortExpression="ProductName">
  <ItemTemplate>
   <asp:TextBox ID="ProductName" runat="server"
   Text='<%# Bind("ProductName") %>'></asp:TextBox>
   <asp:RequiredFieldValidator ID="RequiredFieldValidator1"
   ControlToValidate="ProductName"
   ErrorMessage="You must provide the product's name."
   runat="server">*</asp:RequiredFieldValidator>
  </ItemTemplate>
  </asp:TemplateField>
  <asp:TemplateField HeaderText="Category"
  SortExpression="CategoryName">
  <ItemTemplate>
   <asp:DropDownList ID="Categories" runat="server"
   AppendDataBoundItems="True"
   DataSourceID="CategoriesDataSource"
   DataTextField="CategoryName"
   DataValueField="CategoryID"
   SelectedValue='<%# Bind("CategoryID") %>'>
   <asp:ListItem>-- Select One --</asp:ListItem>
   </asp:DropDownList>
  </ItemTemplate>
  </asp:TemplateField>
  <asp:TemplateField HeaderText="Price"
  SortExpression="UnitPrice">
  <ItemTemplate>
   $<asp:TextBox ID="UnitPrice" runat="server" Columns="8"
   Text='<%# Bind("UnitPrice", "{0:N}") %>'></asp:TextBox>
   <asp:CompareValidator ID="CompareValidator1" runat="server"
   ControlToValidate="UnitPrice"
   ErrorMessage="You must enter a valid currency value.
     Please omit any currency symbols."
   Operator="GreaterThanEqual" Type="Currency"
   ValueToCompare="0">*</asp:CompareValidator>
  </ItemTemplate>
  </asp:TemplateField>
  <asp:TemplateField HeaderText="Discontinued" SortExpression="Discontinued">
  <ItemTemplate>
   <asp:CheckBox ID="Discontinued" runat="server"
   Checked='<%# Bind("Discontinued") %>' />
  </ItemTemplate>
  <ItemStyle HorizontalAlign="Center" />
  </asp:TemplateField>
 </Columns>
 </asp:GridView>
</p>
<p>
 <asp:Button ID="UpdateAllProducts2" runat="server" Text="Update Products" />

 <asp:ObjectDataSource ID="ProductsDataSource" runat="server"
 OldValuesParameterFormatString="original_{0}"
 SelectMethod="GetProducts" TypeName="ProductsBLL">
 </asp:ObjectDataSource>

 <asp:ObjectDataSource ID="CategoriesDataSource" runat="server"
 OldValuesParameterFormatString="original_{0}"
 SelectMethod="GetCategories" TypeName="CategoriesBLL">
 </asp:ObjectDataSource>

 <asp:ValidationSummary ID="ValidationSummary1" runat="server"
 ShowMessageBox="True" ShowSummary="False" />
</p>
当添加Button Web控件并对相关格式进行修改后,页面如下图所示:
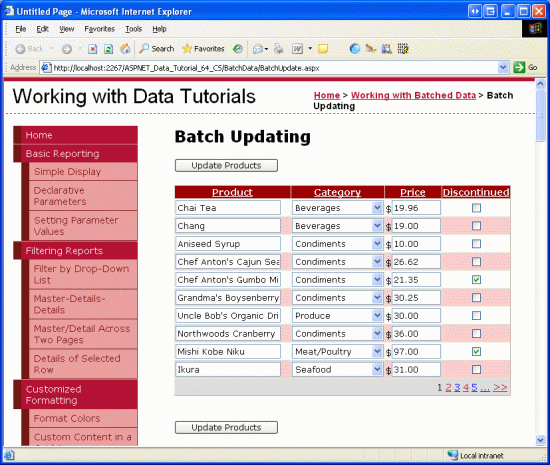
图16:页面现在包含了2个“Update Products”按钮
第五步:更新产品
当用户登录该页面进行修改时并点击“Update Products”按钮时,我们需要将用户输入的值保存为一个ProductsDataTable instance实例;再将该实例传递给一个BLL method方法,进而将该实例传递给DAL层的UpdateWithTransaction method方法。该方法是在前面的文章里创建的,确保对批处理进行原子操作.
在BatchUpdate.aspx.cs文件里创建一个名为BatchUpdate的方法,代码如下:
private void BatchUpdate()
{
 // Enumerate the GridView's Rows collection and create a ProductRow
 ProductsBLL productsAPI = new ProductsBLL();
 Northwind.ProductsDataTable products = productsAPI.GetProducts();

 foreach (GridViewRow gvRow in ProductsGrid.Rows)
 {
 // Find the ProductsRow instance in products that maps to gvRow
 int productID = Convert.ToInt32(ProductsGrid.DataKeys[gvRow.RowIndex].Value);

 Northwind.ProductsRow product = products.FindByProductID(productID);
 if (product != null)
 {
  // Programmatically access the form field elements in the
  // current GridViewRow
  TextBox productName = (TextBox)gvRow.FindControl("ProductName");
  DropDownList categories =
  (DropDownList)gvRow.FindControl("Categories");
  TextBox unitPrice = (TextBox)gvRow.FindControl("UnitPrice");
  CheckBox discontinued =
  (CheckBox)gvRow.FindControl("Discontinued");

  // Assign the user-entered values to the current ProductRow
  product.ProductName = productName.Text.Trim();
  if (categories.SelectedIndex == 0)
  product.SetCategoryIDNull();
  else
  product.CategoryID = Convert.ToInt32(categories.SelectedValue);
  if (unitPrice.Text.Trim().Length == 0)
  product.SetUnitPriceNull();
  else
  product.UnitPrice = Convert.ToDecimal(unitPrice.Text);
  product.Discontinued = discontinued.Checked;
 }
 }

 // Now have the BLL update the products data using a transaction
 productsAPI.UpdateWithTransaction(products);
}
该方法调用BLL层的GetProducts method方法,通过一个ProductsDataTable来获取所有的产品.然后遍历GridView控件的Rows collection集,该Rows collection集包含了GridView里每行所对应的GridViewRow instance实例。由于GridView里每页最多显示了10行,所以GridView控件的Rows collection集包含的条码最多不超过10条.
每行记录的ProductID来源于DataKeys collection集,并从ProductsDataTable里选出对应的ProductsRow.这4个TemplateField input控件的值赋值给ProductsRow instance实例的属性。当对ProductsDataTable更新完成后,又转到BLL业务逻辑层的UpdateWithTransaction method方法,就像我们在前面的教程看到的一样,该方法仅仅调用DAL数据访问层的UpdateWithTransaction方法.
本文使用的批更新策略是:将ProductsDataTable里对应于GridView里每行记录的所有row进行更新,不管用户有没有改动过产品信息.这种盲目的更改虽然执行起来没什么问题,但将会导致database table里出现多余的记录.在前面的第37章《DataList批量更新》里,我们考察里DataList控件的批更新界面,在那篇文章里我们使用饿代码只更新那些确实被用户改动过的记录.如果愿意的话,你可以使用37章的方法.
注意:当通过GridView的智能标签来绑定数据源时,Visual Studio会自动的将数据源的主键值指定为GridView的DataKeyNames属性.如果你没有通过GridView的智能标签来绑定ObjectDataSource的话,我们需要手工设置GridView控件DataKeyNames属性为“ProductID”, 以便通过DataKeys collection集来访问ProductID值.
BatchUpdate方法里的代码和BLL业务逻辑层里的UpdateProduct methods方法的代码很相似,主要的区别在于UpdateProduct methods方法仅仅获取一个单一的ProductRow instance实例.UpdateProducts methods方法里对ProductRow的属性赋值的代码与BatchUpdate方法里foreach循环里的代码是一模一样的.
最后,当点击任意一个“Update Products”按钮时,将调用BatchUpdate方法,为这2个按钮的Click events事件创建事件处理器,在里面添加如下的代码:
BatchUpdate();

ClientScript.RegisterStartupScript(this.GetType(), "message",
 "alert('The products have been updated.');", true);
以上代码首先调用BatchUpdate()方法;再使用ClientScript property属性来注入JavaScript,以显示一个messagebox,提示“The products have been updated.”
花几分钟测试代码.在浏览器的登录BatchUpdate.aspx页面,编辑几行记录,点任意一个“Update Products”按钮。假定输入无误,你会看到一个消息框显示“The products have been updated.”为了测试原子操作,你可以任意添加一个CHECK约束,比如不接受UnitPrice的值为“1234.56”。然后再登录BatchUpdate.aspx页面,编辑几行记录,确保设置其中的一条记录的UnitPrice值为“1234.56”. 当点“Update Products”按钮时,将会出错。结果是所有的操作回滚,回到原来的值.
另一种可供选择的BatchUpdate方法
上面我们探讨的BatchUpdate方法从BLL业务逻辑层的GetProducts方法获取所有的产品.
如果GridView没有启用分页的话,一切都很完美.如果启用了分页了呢?比如可能总共有几百、几千、几万条产品记录,而GridView里每页只显示了10条记录。在这种情况下,该方法获取了所有的记录,但只更新其中的10条记录,实在是难称完美.
面对这种情况,可以考虑使用下面的BatchUpdateAlternate代替:
private void BatchUpdateAlternate()
{
 // Enumerate the GridView's Rows collection and create a ProductRow
 ProductsBLL productsAPI = new ProductsBLL();
 Northwind.ProductsDataTable products = new Northwind.ProductsDataTable();

 foreach (GridViewRow gvRow in ProductsGrid.Rows)
 {
 // Create a new ProductRow instance
 int productID = Convert.ToInt32(ProductsGrid.DataKeys[gvRow.RowIndex].Value);

 Northwind.ProductsDataTable currentProductDataTable =
  productsAPI.GetProductByProductID(productID);
 if (currentProductDataTable.Rows.Count > 0)
 {
  Northwind.ProductsRow product = currentProductDataTable[0];

  // Programmatically access the form field elements in the
  // current GridViewRow
  TextBox productName = (TextBox)gvRow.FindControl("ProductName");
  DropDownList categories =
  (DropDownList)gvRow.FindControl("Categories");
  TextBox unitPrice = (TextBox)gvRow.FindControl("UnitPrice");
  CheckBox discontinued =
  (CheckBox)gvRow.FindControl("Discontinued");

  // Assign the user-entered values to the current ProductRow
  product.ProductName = productName.Text.Trim();
  if (categories.SelectedIndex == 0)
  product.SetCategoryIDNull();
  else
  product.CategoryID = Convert.ToInt32(categories.SelectedValue);
  if (unitPrice.Text.Trim().Length == 0)
  product.SetUnitPriceNull();
  else
  product.UnitPrice = Convert.ToDecimal(unitPrice.Text);
  product.Discontinued = discontinued.Checked;

  // Import the ProductRow into the products DataTable
  products.ImportRow(product);
 }
 }

 // Now have the BLL update the products data using a transaction
 productsAPI.UpdateProductsWithTransaction(products);
}
该方法首先创建一个名为products的空白的ProductsDataTable,再通过BLL业务逻辑层的GetProductByProductID(productID)方法来获取具体的产品信息.获取的ProductsRow instance实例更新其属性,就像BatchUpdate()做的那样。更新完后,通过ImportRow(DataRow)method方法将row导入名为products的ProductsDataTable.
foreach循环完成后, products将包含那些对应于GridView里每行记录的ProductsRowinstance实例,由于这些实例是添加(而不是更新)到products,如果我们盲目的传递给UpdateWithTransaction method方法的话,ProductsTableAdatper会将每条记录插入数据库.在此,我们必须声明只对这些行进行更新(而不是添加).
为此,我们需要在业务逻辑层里添加一个名为UpdateProductsWithTransaction的方法来达到上述目的。该方法,就像下面代码显示的那样,将ProductsDataTable里的每一个ProductsRow instances实例的RowState设置为Modified,然后将该ProductsDataTable传递给DAL数据访问层的UpdateWithTransaction method方法.
public int UpdateProductsWithTransaction(Northwind.ProductsDataTable products)
{
 // Mark each product as Modified
 products.AcceptChanges();
 foreach (Northwind.ProductsRow product in products)
 product.SetModified();

 // Update the data via a transaction
 return UpdateWithTransaction(products);
}
总结:
GridView控件内置的编辑功能只能对每行进行编辑,对批编辑无能为力.就像本文探讨的那样,要创建一个批处理界面我们要多做一些工作。为此,我们需要将GridView里的列转换为TemplateFields,并在ItemTemplates模板里定义编辑界面,另外要在页面添加“Update All”按钮,该按钮与GridView彼此分开.该按钮的Click event事件必须要确保遍历GridView的Rows collection集、在一个ProductsDataTable里存储改动信息,然后再传递给相应的BLL业务逻辑层的方法.
下一篇,我们将考察如何创建一个批删除的界面,具体来说,每个GridView row都会包含一个checkbox。另外, 我们将用一个“Delete Selected Rows”按钮来替换“Update All”按钮.
祝编程快乐!
作者简介
本系列教程作者 Scott Mitchell,著有六本ASP/ASP.NET方面的书,是4GuysFromRolla.com的创始人,自1998年以来一直应用 微软Web技术。大家可以点击查看全部教程《[翻译]Scott Mitchell 的ASP.NET 2.0数据教程》,希望对大家的学习ASP.NET有所帮助。
加载全部内容