Android tween动画效果 Android基础知识之tween动画效果
_江南一点雨 人气:0Android中一共提供了两种动画,其一便是tween动画,tween动画通过对view的内容进行一系列的图像变换(包括平移,缩放,旋转,改变透明度)来实现动画效果,动画效果的定义可以使用xml,也可以使用编码来实现。 下面我们逐一查看tween能够实现的动画效果。
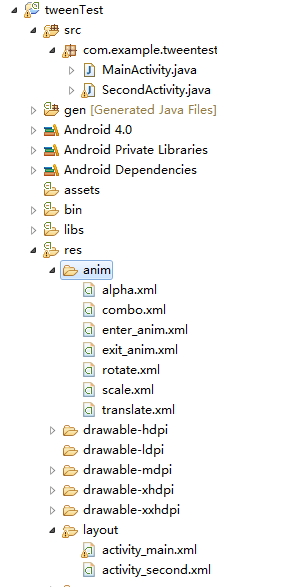
先看看工程的整体结构吧:

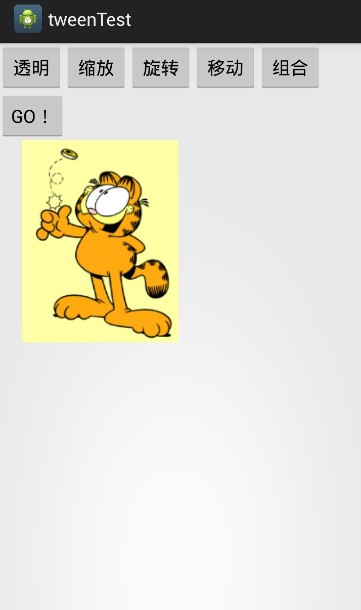
我们要实现的效果图如图

点击按钮则执行相应的动画操作。
布局文件activity_main.xml
<LinearLayout xmlns:android="http://schemas.android.com/apk/res/android"
 xmlns:tools="http://schemas.android.com/tools"
 android:layout_width="match_parent"
 android:layout_height="match_parent"
 android:orientation="vertical"
 tools:context="com.example.tweentest.MainActivity" >

 <LinearLayout
 android:layout_width="match_parent"
 android:layout_height="wrap_content"
 android:orientation="vertical" >

 <LinearLayout
  android:layout_width="match_parent"
  android:layout_height="wrap_content"
  android:orientation="horizontal" >

  <Button
  android:id="@+id/alpha"
  android:layout_width="wrap_content"
  android:layout_height="wrap_content"
  android:onClick="doanim"
  android:text="透明" />

  <Button
  android:id="@+id/scale"
  android:layout_width="wrap_content"
  android:layout_height="wrap_content"
  android:onClick="doanim"
  android:text="缩放" />

  <Button
  android:id="@+id/rotate"
  android:layout_width="wrap_content"
  android:layout_height="wrap_content"
  android:onClick="doanim"
  android:text="旋转" />

  <Button
  android:id="@+id/translate"
  android:layout_width="wrap_content"
  android:layout_height="wrap_content"
  android:onClick="doanim"
  android:text="移动" />

  <Button
  android:id="@+id/combo"
  android:layout_width="wrap_content"
  android:layout_height="wrap_content"
  android:onClick="doanim"
  android:text="组合" />
 </LinearLayout>

 <Button
  android:id="@+id/go_other_activity"
  android:layout_width="wrap_content"
  android:layout_height="wrap_content"
  android:onClick="doanim"
  android:text="GO!" />
 </LinearLayout>

 <LinearLayout
 android:layout_width="match_parent"
 android:layout_height="match_parent"
 android:orientation="horizontal" >

 <ImageView
  android:id="@+id/image1"
  android:layout_width="200dp"
  android:layout_height="200dp"
  android:src="@drawable/jiafeimao" />
 </LinearLayout>

</LinearLayout>
好了,先来看第一个动画效果。
要实现让图片变成透明的动画效果,先在anim文件夹中新建一个名为alpha的xml文件,关于透明的动画效果都写在这个文件中:
<?xml version="1.0" encoding="utf-8"?>
<set xmlns:android="http://schemas.android.com/apk/res/android"
 android:shareInterpolator="false" >

 <!-- 花1000毫秒,从不透明(1)变为透明(0) -->
 <!--
 repeatCount表示重复次数
 repeatMode表示开始的模式,restart表示每次重新开始,reverse表示接着来,即不透明->透明->不透明
 -->
 <alpha
 android:duration="2000"
 android:fromAlpha="1"
 android:repeatCount="5"
 android:repeatMode="reverse"
 android:toAlpha="0" />

</set>
duration属性表示动画执行的时间,以毫秒为单位,repeatCount表示动画重复的次数,repeatMode属性有两个值,一个是restart,表示动画每次执行完之后都重新开始执行(不透明->透明,不透明->透明….),reverse表示动画每次执行完之后不重新开始而是接着反向执行(不透明->透明->不透明->透明….),换句话说,如果是reverse,则表示动画从不透明变为透明后再慢慢变回不透明,如果是restart则表示动画从不透明变为透明后,然后快速恢复原状。以上这三个属性在所有的tween动画中都有,也是最常用的属性。fromAlpha表示初始透明度,1表示不透明,0表示完全透明;toAlpha表示动画结束时的透明度。
这是动画的xml文件,再看看Java代码是怎样的。
public class MainActivity extends Activity {

 private ImageView iv = null;
 private Animation animation = null;
 @Override
 protected void onCreate(Bundle savedInstanceState) {
 super.onCreate(savedInstanceState);
 setContentView(R.layout.activity_main);
 this.iv = (ImageView) this.findViewById(R.id.image1);
 }
 public void doanim(View v){
 switch (v.getId()) {
 case R.id.alpha:
  //读取动画文件
  animation = AnimationUtils.loadAnimation(this, R.anim.alpha);
  //动画结束之后使用什么页面填充
  //使用动画结束后的样子填充,即保持结束时的画面
  animation.setFillAfter(true);
  //应用动画特效
  iv.startAnimation(animation);
  break;
 case R.id.scale:
  animation = AnimationUtils.loadAnimation(this, R.anim.scale);
  iv.startAnimation(animation);
  break;
 case R.id.rotate:
  animation = AnimationUtils.loadAnimation(this, R.anim.rotate);
  iv.startAnimation(animation);
  break;
 case R.id.translate:
  animation = AnimationUtils.loadAnimation(this, R.anim.translate);
  iv.startAnimation(animation);
  break;
 case R.id.combo:
  animation = AnimationUtils.loadAnimation(this, R.anim.combo);
  iv.startAnimation(animation);
  break;
 case R.id.go_other_activity:
  Intent intent = new Intent(MainActivity.this,SecondActivity.class);
  startActivity(intent);
  //设置让MainActivity从左边出,SecondActivity从右边进
  overridePendingTransition(R.anim.enter_anim, R.anim.exit_anim);
  break;
 }
 }
}
先拿到ImageView,然后在点击按钮时读取动画文件,并给imageview设置动画效果。
缩放动画:
<?xml version="1.0" encoding="utf-8"?>
<set xmlns:android="http://schemas.android.com/apk/res/android"
 android:shareInterpolator="false" >

 <!--
 两个1表示开始时图像大小不变,两个2表示图像放大一倍,
 如果小于1则表示图像缩小。两个0表示基于左上角进行放大
 pivotX如果是50%,表示基于图像中心放大
 pivotX如果是50%p,表示基于父级中心放大
 infinite如它的英文意思,无限循环

 -->
 <scale
 android:duration="1000"
 android:fromXScale="1"
 android:fromYScale="1"
 android:pivotX="0"
 android:pivotY="0"
 android:repeatCount="infinite"
 android:repeatMode="reverse"
 android:toXScale="2"
 android:toYScale="2" />

</set>
fromXScale和fromYScale分别表示初始时图像的缩放比例,1表示不缩放,toXScale和toYScale表示动画结束时的缩放比例,2表示动画放大一倍,如果是0.5则表示缩小一倍。pivotX和pivotY表示执行缩放时的参考点,两个值都为0表示是基于图像左上角来执行缩放操作,如果都是50%表示基于图像中心来执行缩放操作,如果是100%表示基于图像右下角执行缩放操作,如果是50%p,表示基于屏幕的中心执行缩放操作,如果是100%p表示基于屏幕的右下角执行缩放操作。
java代码见上文。
旋转动画:
<?xml version="1.0" encoding="utf-8"?>
<set xmlns:android="http://schemas.android.com/apk/res/android"
 android:shareInterpolator="false" >

 <!-- fromDegrees表示开始的角度
 toDegrees结束的角度,180表示旋转半圈
 两个100%表示基于自己的右下角旋转
 想让倒着转,把180改为-180即可
 -->
 <rotate
 android:duration="1000"
 android:fromDegrees="0"
 android:pivotX="100%"
 android:pivotY="100%"
 android:toDegrees="180" />

</set>
这里有两个参数解释,fromDegrees表示初始角度,0表示正常,toDegrees表示旋转角度,180表示顺时针旋转180度,-180表示逆时针旋转180度pivotX参数的意义和缩放动画中的参数意义相同。
Java代码同上文。
移动动画:
<?xml version="1.0" encoding="utf-8"?>
<set xmlns:android="http://schemas.android.com/apk/res/android"
 android:shareInterpolator="false" >
<!-- from表示从哪里开始移动
to表示移动到那里
100%表示移动到自己的右下角
100%p表示移动到屏幕右下角
 -->
 <translate
 android:repeatCount="infinite"
 android:repeatMode="reverse"
 android:duration="1000"
 android:fromXDelta="0"
 android:fromYDelta="0"
 android:toXDelta="100%"
 android:toYDelta="100%" />

</set>
fromXDelta表示初始时图像在x轴的位置toXDelta表示结束时图像在X轴的位置。
四种动画效果都已经说完,如果要实现组合效果呢?
<?xml version="1.0" encoding="utf-8"?>
<set xmlns:android="http://schemas.android.com/apk/res/android"
 android:shareInterpolator="false" >

 <rotate
 android:duration="1000"
 android:fromDegrees="0"
 android:pivotX="100%"
 android:pivotY="100%"
 android:toDegrees="180" />

 <alpha
 android:duration="2000"
 android:fromAlpha="1"
 android:repeatCount="5"
 android:repeatMode="reverse"
 android:toAlpha="0" />

 <scale
 android:duration="1000"
 android:fromXScale="1"
 android:fromYScale="1"
 android:pivotX="0"
 android:pivotY="0"
 android:repeatCount="infinite"
 android:repeatMode="reverse"
 android:toXScale="2"
 android:toYScale="2" />

 <translate
 android:duration="1000"
 android:fromXDelta="0"
 android:fromYDelta="0"
 android:repeatCount="infinite"
 android:repeatMode="reverse"
 android:toXDelta="100%"
 android:toYDelta="100%" />

</set>
把之前所有的动画效果放在一个文件中就可以了。
android中的动画效果可以对任何组件使用,因为组件都是继承自View,而startAnimation(Animation animation)方法就是View中的方法。那么两个Activity之间切换能不能使用动画效果呢?当然可以。上文中的Java代码中,有这么一句:
case R.id.go_other_activity:
  Intent intent = new Intent(MainActivity.this,SecondActivity.class);
  startActivity(intent);
  //设置让MainActivity从左边出,SecondActivity从右边进
  overridePendingTransition(R.anim.enter_anim, R.anim.exit_anim);
  break;
想要实现activity之间切换的动画,使用overridePendingTransition(R.anim.enter_anim, R.anim.exit_anim);方法即可,该方法要两个参数,分别表示新activity进入时的动画和旧activity出去时的动画。
进入时动画:
<?xml version="1.0" encoding="utf-8"?>
<set xmlns:android="http://schemas.android.com/apk/res/android"
 android:shareInterpolator="false" >
 <translate
 android:duration="1000"
 android:fromXDelta="100%"
 android:fromYDelta="0"
 android:toXDelta="0"
 android:toYDelta="0" />

</set>
出去时动画:
<?xml version="1.0" encoding="utf-8"?>
<set xmlns:android="http://schemas.android.com/apk/res/android"
 android:shareInterpolator="false" >
 <translate
 android:duration="1000"
 android:fromXDelta="0"
 android:fromYDelta="0"
 android:toXDelta="-100%"
 android:toYDelta="0" />

</set>
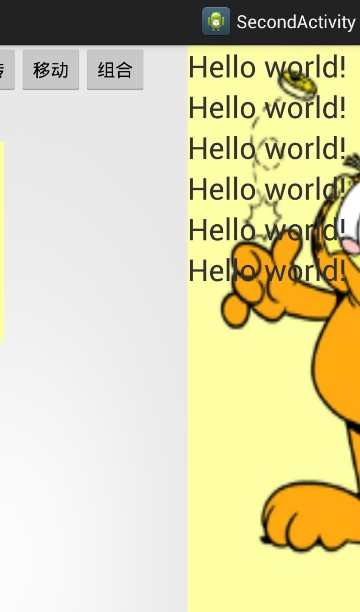
效果如图:

MainActivity逐渐移出,SecondActivity逐渐从右边进来。
原文链接:http://blog.csdn.net/u012702547/article/details/45697505
加载全部内容