spring 表单验证 文件上传 Spring学习笔记2之表单数据验证、文件上传实例代码
everSeeker 人气:0在上篇文章给大家介绍了Spring学习笔记1之IOC详解尽量使用注解以及java代码,接下来本文重点给大家介绍Spring学习笔记2之表单数据验证、文件上传实例代码,具体内容,请参考本文吧!
一、表单数据验证
用户注册时,需要填写账号、密码、邮箱以及手机号,均为必填项,并且需要符合一定的格式。比如账号需要32位以内,邮箱必须符合邮箱格式,手机号必须为11位号码等。可以采用在注册时验证信息,或者专门写一个工具类用来验证;来看下在SpringMVC中如何通过简单的注释实现表单数据验证。
在javax.validation.constraints包下面,定义了多个注解。比如:
@NotNull: 所注解元素的值必须不能为null。注:表单中不填写任何数据直接提交,并不意味着为null,而是空字符串。
@Size: 所注解的元素必须为String、集合或者数组,并且长度要符合给定的范围。
@Past: 所注解的元素的值必须是一个过去的时间。
@Digits: 所注解的元素必须是数字,并且它的值必须有指定的位数。
@Pattern: 所注解的元素的值必须匹配给定的正则表达式
另外,在org.hibernate.validator.constraints包下面,定义了更多的注解。比如:
@Email: 匹配email格式。
@URL: 匹配url格式。
下面看一下在SpringMVC中如何使用。
1、首先在pom.xml文件中载入需要的
<dependency>
<groupId>javax.validation</groupId>
<artifactId>validation-api</artifactId>
<version>1.1.0.Final</version>
</dependency>
<dependency>
<groupId>org.hibernate</groupId>
<artifactId>hibernate-validator</artifactId>
<version>5.2.4.Final</version>
</dependency>
需要注意的是,javax.validation只是定义了校验API,必须添加API的实现才行,比如org.hibernate.validator,否则会报错。
2、在类的属性上添加注解,以User.java为例。
public class User implements Serializable {
@Size(min = 32, max = 32, message = "uuid应该为32位字符串")
private String id;
@Size(min = 1, max = 32, message = "账号长度应该在1-32位之间")
private String username;
@NotEmpty(message = "密码不能为空")
private String password;
@NotEmpty(message = "email不能为空")
@Email(message = "email格式不正确")
private String email;
@Size(min = 11, max = 11, message = "手机号长度为11位")
private String cellphone;
}
message: 如果表单数据验证失败,可以显示的错误信息。
3、在UserController中应用校验功能,添加@Valid注解即可。
以UserController.java为例:
@Controller
@RequestMapping("/user")
public class UserController {
private UserService userService;
@Autowired
public UserController(UserService userService) {
this.userService = userService;
}
@RequestMapping(value = "/register", method = RequestMethod.POST)
public String processRegistration(@Valid User user, Errors errors) { //@Valid,user对象应用校验功能
if (errors.hasErrors()) { //如果表单验证失败,返回注册页面
return "register";
}
if (user.getId() == "")
user.setId(UUID.randomUUID().toString().replaceAll("-", ""));
if (user.getRegDate() == 0)
user.setRegDate(new Date().getTime());
userService.addUser(user);
return "redirect:/user/" + user.getUsername();
}
}
4、编写jsp文件,展示页面,以register.jsp为例:
<%@ page contentType="text/html;charset=UTF-8" language="java" %>
<%@ taglib prefix="c" uri="http://java.sun.com/jsp/jstl/core" %>
<%@ taglib prefix="sf" uri="http://www.springframework.org/tags/form" %>
<%@ page session="false" %>
<html lang="en">
<head>
<title>Register</title>
<link rel="stylesheet"
type="text/css"
href="<c:url value="/resources/style.css" />" >
</head>
<body>
<sf:form method="POST" action="/register/user/register" commandName="user">
<%-- 如果表单数据验证失败,显示错误信息 --%>
<sf:errors path="*" element="div" cssClass="errors"/><br />
<table align="center">
<tr>
<td>UserName: </td>
<td><sf:input path="username" cssErrorClass="errors"/></td>
</tr>
<tr>
<td>Password: </td>
<td><sf:password path="password" cssErrorClass="errors"/></td>
</tr>
<tr>
<td>Email: </td>
<td><sf:input path="email" cssErrorClass="errors"/></td>
</tr>
<tr>
<td>CellPhone: </td>
<td><sf:input path="cellphone" cssErrorClass="errors"/></td>
</tr>
</table><br />
<input type="submit" value="Register"/>
</sf:form>
</body>
</html>
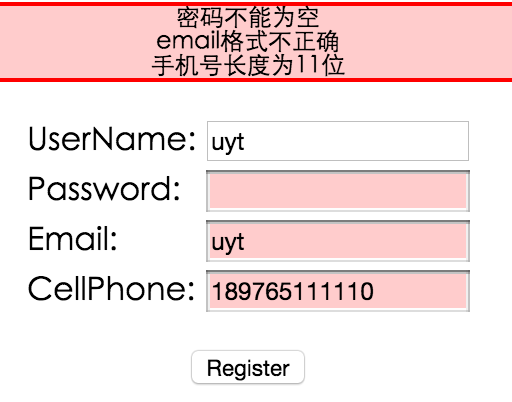
最终效果如下:

二、文件上传
在Spring中,文件上传很简单,只需要3步即可。
1、如果我们配置的DispartcherServlet继承了AbstractAnnotationConfigDispatcherServletInitializer的话,重载customizeRegistration()方法来配置multipart的具体细节。
@Override
protected void customizeRegistration(ServletRegistration.Dynamic registration) {
//限制上传文件的大小不超过2MB,整个请求不超过4M,所有上传的文件都要写到磁盘中
registration.setMultipartConfig(new MultipartConfigElement("/tmp/uploads", 2097152, 4194304, 0));
}
2、配置multipart解析器。
//配置multipart解析器
@Bean
public MultipartResolver multipartResolver() throws IOException {
return new StandardServletMultipartResolver();
}
3、处理multipart请求。对于用户上传的文件等信息,可以用byte[]数组来表示,但更推荐Spring提供的MultipartFile接口。它提供了更多功能,比如获取文件名、文件大小、文件类型等。
@RequestMapping(value = "/{username}", method = RequestMethod.POST)
public String showUserInfo(@RequestPart("icon") MultipartFile icon) throws IOException {
icon.transferTo(new File("/Users/pingping/Projects/IdeaProjects/spring/register/src/main/webapp/uploads/" + icon.getOriginalFilename()));
return "user";
}
transferTo(File dest)方法: 将文件写入到系统中。
写个页面测试,看指定的文件目录下文件是否已上传成功。
<form method="post" enctype="multipart/form-data">
<label>上传头像图片?</label>
<input type="file" name="icon" accept="image/jpeg, image/png" value="选择文件"/>
<button type="submit">确定</button>
</form>
1、参考文献:Spring实战(第4版)。
2、github地址:https://github.com/everseeker0307/register。
以上所述是小编给大家介绍的Spring学习笔记2之表单数据验证、文件上传实例代码,希望对大家有所帮助,如果大家有任何疑问请给我留言,小编会及时回复大家的。在此也非常感谢大家对网站的支持!
加载全部内容