C#环形队列的实现 C#环形队列的实现方法详解
独孤飞 人气:0一、环形队列是什么
队列是一种常用的数据结构,这种结构保证了数据是按照“先进先出”的原则进行操作的,即最先进去的元素也是最先出来的元素.环形队列是一种特殊的队列结构,保证了元素也是先进先出的,但与一般队列的区别是,他们是环形的,即队列头部的上个元素是队列尾部,通常是容纳元素数固定的一个闭环。
二、环形队列的优点
1.保证元素是先进先出的
是由队列的性质保证的,在环形队列中通过对队列的顺序访问保证。
2.元素空间可以重复利用
因为一般的环形队列都是一个元素数固定的一个闭环,可以在环形队列初始化的时候分配好确定的内存空间,当进队或出队时只需要返回指定元素内存空间的地址即可,这些内存空间可以重复利用,避免频繁内存分配和释放的开销。
3.为多线程数据通信提供了一种高效的机制。
在最典型的生产者消费者模型中,如果引入环形队列,那么生成者只需要生成“东西”然后放到环形队列中即可,而消费者只需要从环形队列里取“东西”并且消费即可,没有任何锁或者等待,巧妙的高效实现了多线程数据通信。
三、C#环形队列的实现
看了一个数据结构的教程,是用C++写的,可自己C#还是一个菜鸟,更别说C++了,但还是大胆尝试用C#将其中的环形队列的实现写出来,先上代码:
public class MyQueue<T> : IDisposable
 {
  private T[] queue;
  private int length;
  private int capacity;
  private int head = 0;
  private int tail = 0;

  public MyQueue(int capacity) {
   this.capacity = capacity;
   this.head = 0;
   this.tail = 0;
   this.length = 0;
   this.queue = new T[capacity];
  }

  public void Clear() {
   head = 0;
   tail = 0;
   length = 0;
  }

  public bool IsEmpty() {
   return length == 0;
  }

  public bool IsFull() {
   return length == capacity;
  }

  public int Length() {
   return length;
  }

  public bool EnQueue(T node) {
   if (!IsFull()) {
    queue[tail] = node;
    tail = (++tail) % capacity;
    length++;
    return true;
   }
   return false;
  }

  public T DeQueue() {
   T node = default(T);
   if (!IsEmpty()) {
    node = queue[head];
    head = (++head) % capacity;
    length--;
   }
   return node;
  }

  public void Traverse() {
   for (int i = head; i < length + head; i++) {
    Console.WriteLine(queue[i % capacity]);
    Console.WriteLine($"前面还有{i - head}个");
   }
  }

  public void Dispose() {
   queue = null;
  }
 }
为了能够通用,所以用的是泛型来实现环形队列类。这里最重要的是进队(EnQueue)和出队(DeQueue)两个方法,进队或出队后头和尾的位置都要通过取模运算来获得,因为是环形队列嘛,你懂的。
1、简单类型队列
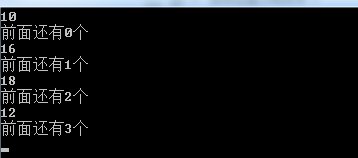
好了,测试下入队:
class Program
 {
  static void Main(string[] args) {
   MyQueue<int> queue = new MyQueue<int>(4);
   queue.EnQueue(10);
   queue.EnQueue(16);
   queue.EnQueue(18);
   queue.EnQueue(12);
   queue.Traverse();
   Console.Read();
  }
 }
显示结果:

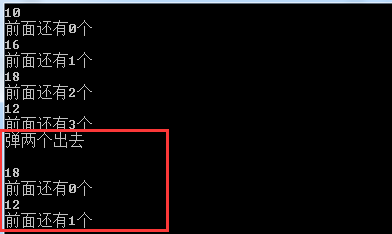
再测试下出队:
class Program
 {
  static void Main(string[] args) {
   MyQueue<int> queue = new MyQueue<int>(4);
   queue.EnQueue(10);
   queue.EnQueue(16);
   queue.EnQueue(18);
   queue.EnQueue(12);
   queue.Traverse();

   Console.WriteLine("弹两个出去");
   queue.DeQueue();
   queue.DeQueue();
   Console.WriteLine();
   queue.Traverse();
   Console.Read();
  }
 }
运行结果:

2、复杂类型队列
之前也说了,这个队列类是用的泛型写的,对应于C++的模板了,那就意味着任何类型都可以使用这个队列类,来测试个自定义的类试试,如下先定义一个Customer类:
public class Customer
 {
  public string Name { get; set; }

  public int Age { get; set; }

  public void PringInfo() {
   Console.WriteLine("姓名:" + Name);
   Console.WriteLine("年龄:" + Age);
   Console.WriteLine();
  }
 }
然后进行入队,如下:
class Program
 {
  static void Main(string[] args) {
   MyQueue<Customer> queue = new MyQueue<Customer>(5);
   queue.EnQueue(new Customer() { Name = "宋小二", Age = 29 });
   queue.EnQueue(new Customer() { Name = "陈小三", Age = 28 });
   queue.EnQueue(new Customer() { Name = "王小四", Age = 26 });
   queue.EnQueue(new Customer() { Name = "朱小五", Age = 48 });
   for (int i = 0; i < queue.Length(); i++) {
    queue[i].PringInfo();
   }
   Console.Read();
  }
 }
上面的代码 queue[i].PringInfo();是通过索引来实现,所以我们得在队列类中实现索引,添加如下代码到MyQueue.cs类中,如下:
   public T this[int index] {
    get {
     return queue[index];
    }
   }
感觉用for循环来遍历还是不够好,想用foreach,那就给MyQueue类加个遍历接口,如下:

然后实现这个接口,如下:
public IEnumerator<T> GetEnumerator() {
   foreach(T node in queue) {
    if(node != null) {
     yield return node;
    }
   }
  }

  IEnumerator IEnumerable.GetEnumerator() {
   return GetEnumerator();
  }
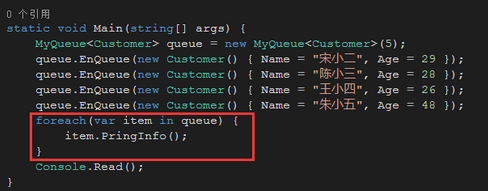
这样遍历的地方就可以改成foreach了,如下:

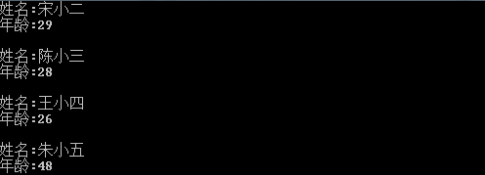
执行结果:

总结:
编程的思想才是最重要的,无关语言。以上就是这篇文章的全部内容了,希望能对大家的学习或者工作带来一定的帮助,如果有疑问大家可以留言交流。
加载全部内容