最适合新手入门的SpringCloud教程 6—Ribbon负载均衡「F版本」
鹿老师的Java笔记 人气:2

> SpringCloud版本:Finchley.SR2
> SpringBoot版本:2.0.3.RELEASE
> 源码地址:https://gitee.com/bingqilinpeishenme/Java-Tutorials
>
## 前言
写博客一个多月了,断断续续的更新,今天有小伙伴催更新了,很高兴,说明我的分享是有意义的。
于是乎,更新来了,还顺便给该系列教程改了个名儿《最适合入门的SpringCloud教程》

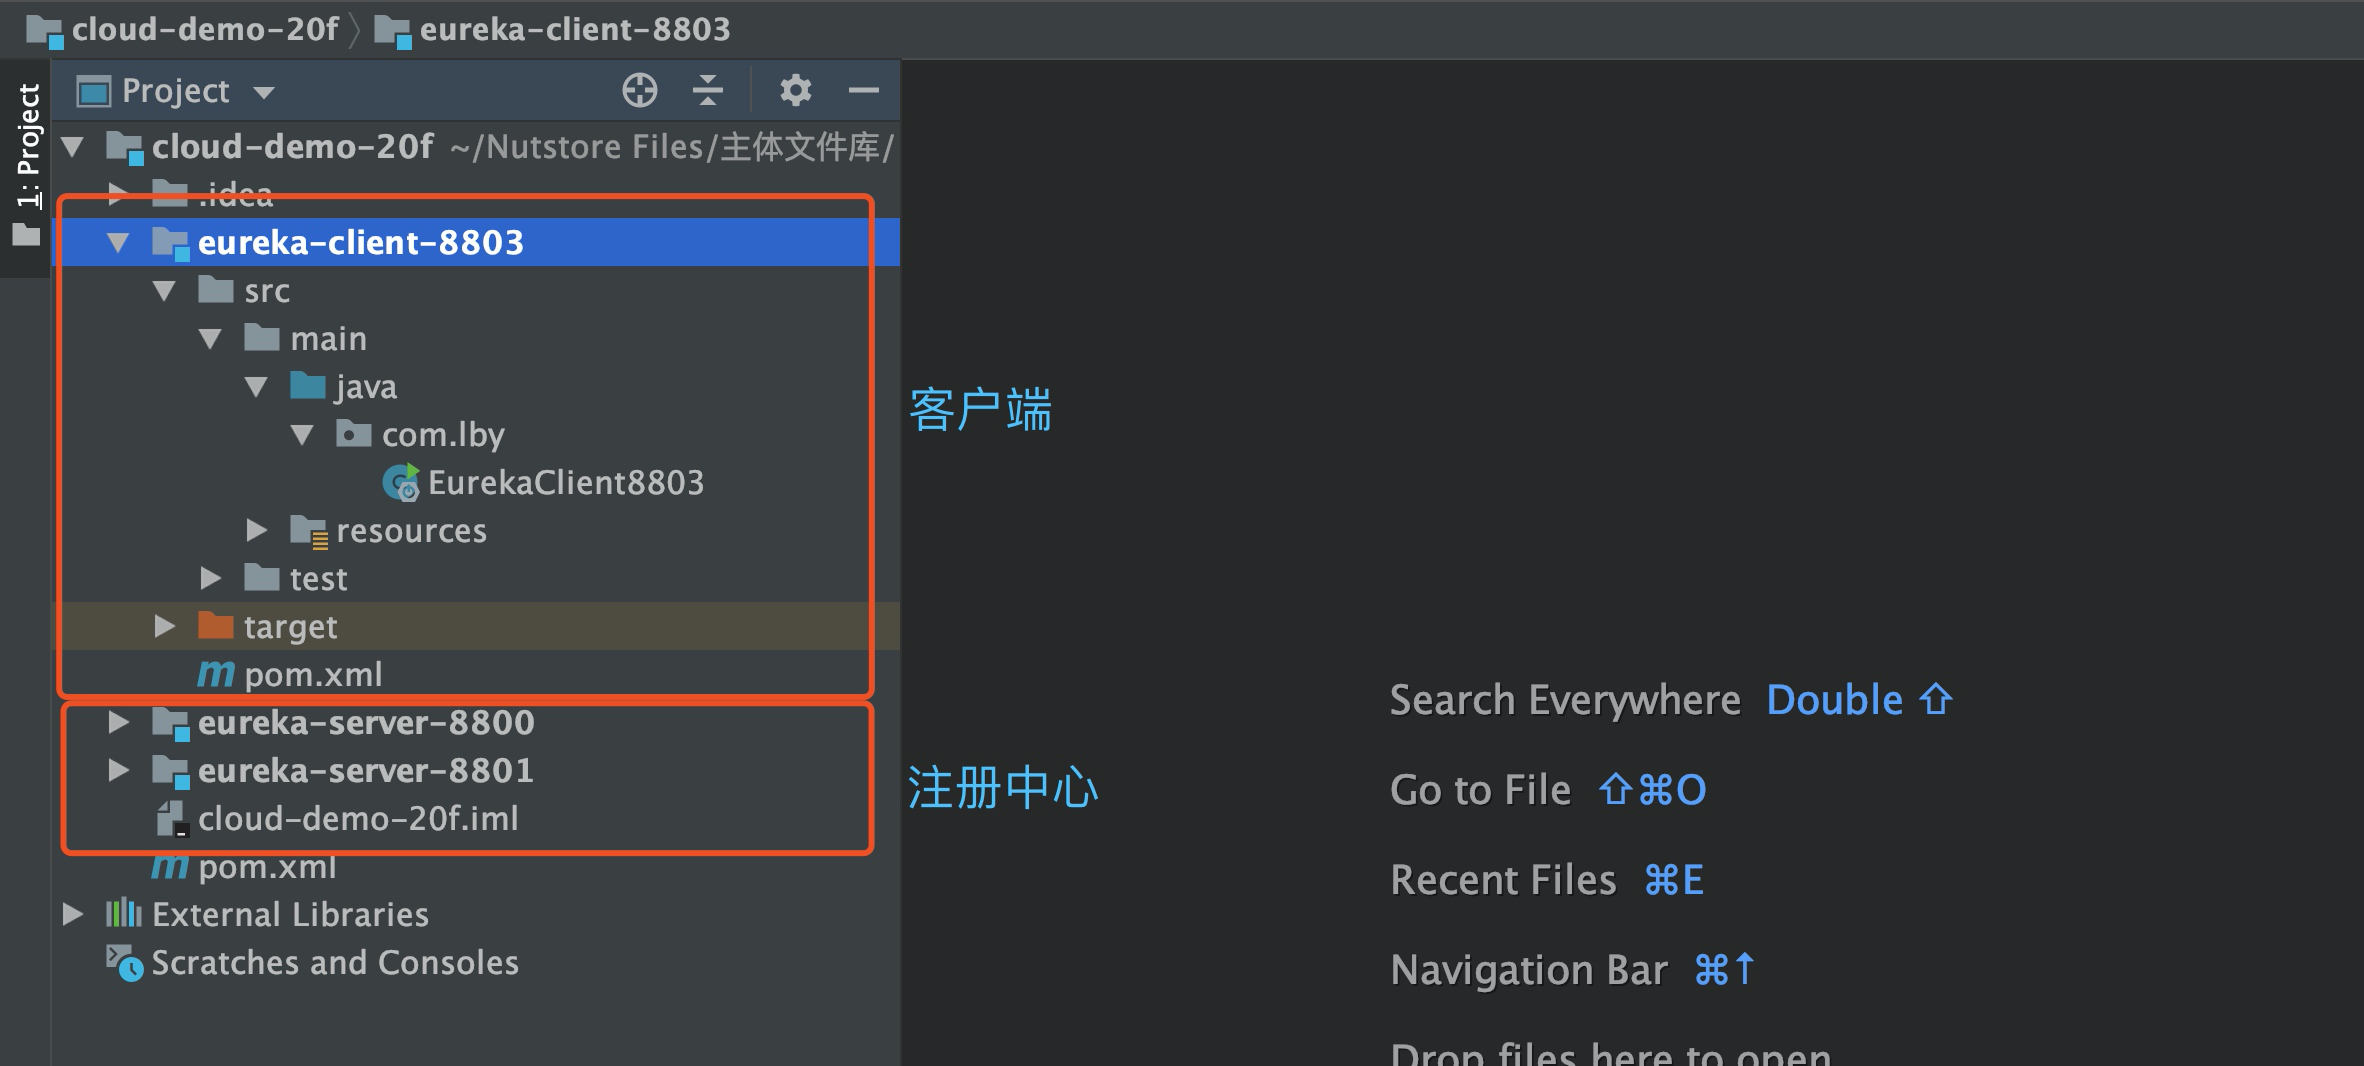
通过之前的几篇文章,在代码中会有三个项目,分别是两个注册中心和一个客户端,如下图:
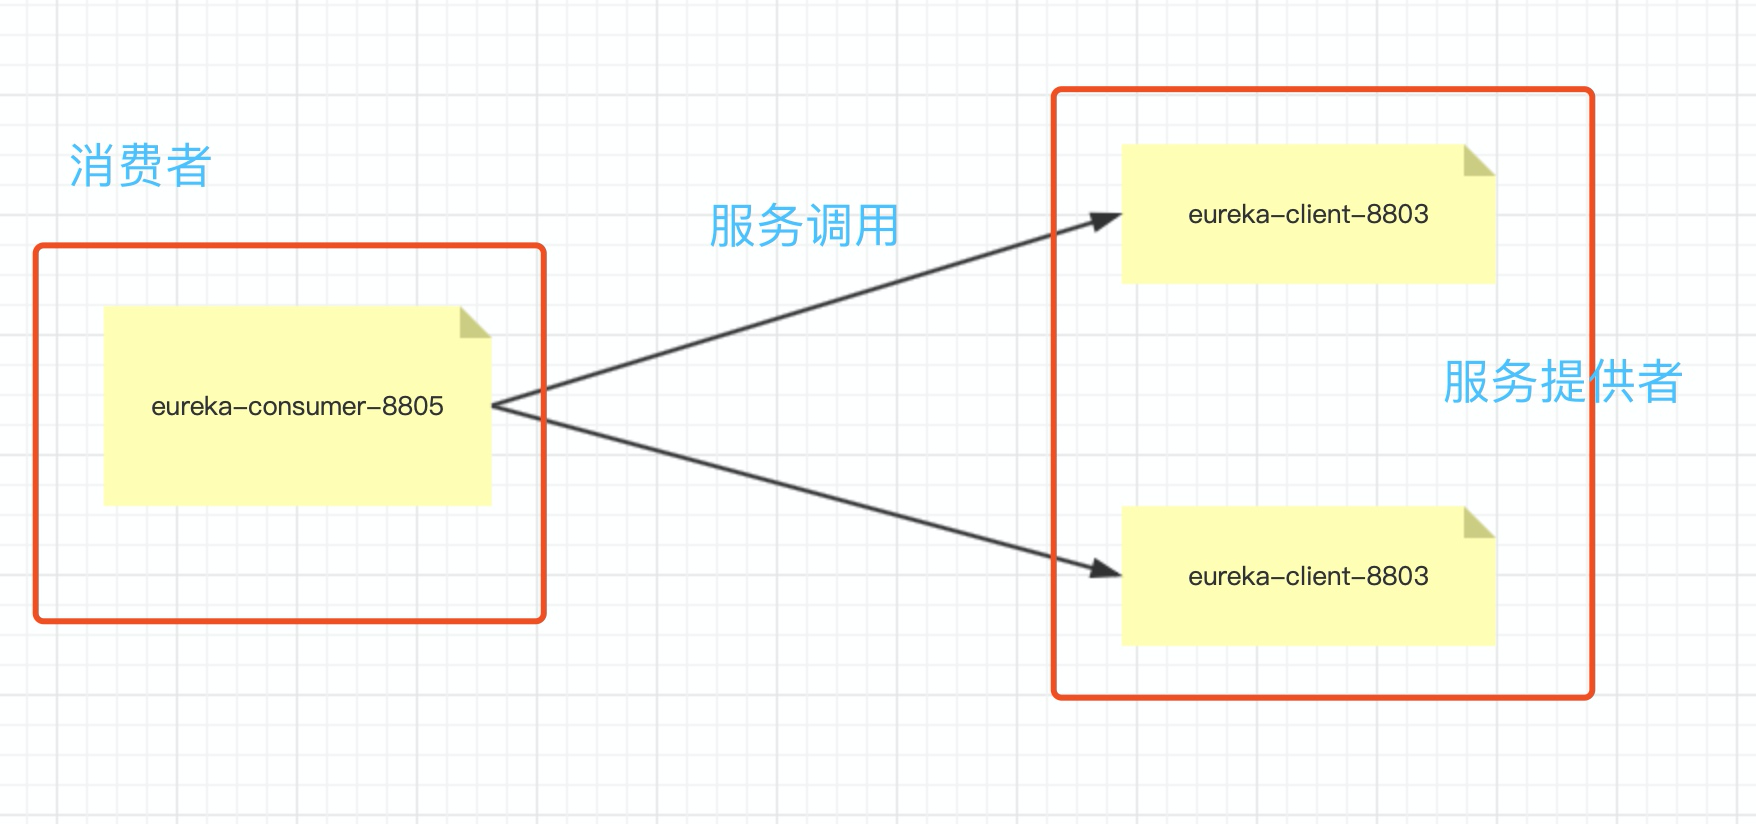
今天将会在这个代码的基础上:
1. 将 eureka-client-8803 作为服务提供者
2. 通过IDEA将eureka-client-8803启动在8803和8804端口上,模拟服务提供者集群
3. 再创建一个服务消费者eureka-consumer-8805
4. 让消费者通过服务调用和负载均衡调用服务提供者的服务。
**Tips:需要了解过RestTemplate的使用** [SpringBoot图文教程17—上手就会 RestTemplate 使用指南「Get Post」「设置请求头」](https://mp.weixin.qq.com/s/3MfNWtTfckGr2hG9Ly9OPg)
## 服务提供者集群运行,创建服务消费者
### 服务提供者写Controller接口
在服务提供者eureka-client-8803中写入一个TestController类
```
package com.lby.controller;
import org.springframework.beans.factory.annotation.Value;
import org.springframework.web.bind.annotation.GetMapping;
import org.springframework.web.bind.annotation.RequestParam;
import org.springframework.web.bind.annotation.RestController;
/**
* @author luxiaoyang
* @create 2020-04-02-20:13
*/
@RestController
public class TestController {
/**
* @Value("${server.port}") 读取application配置文件中的值
* 赋值到成员变量上
*
* ${server.port} 参数为 application配置文件中的key
*/
@Value("${server.port}")
private String port;
/**
* @RequestParam 获取Request参数的 用于RestFul风格中
* @PathVariable 获取路径中的参数
*/
@GetMapping("showImgById")
public String showImgById(@RequestParam("id") Integer id){
return "查询到id为:"+id+"的信息,使用端口号为:"+port;
}
}
```
### 通过IDEA在8803和8804端口号启动服务提供者「模拟集群」
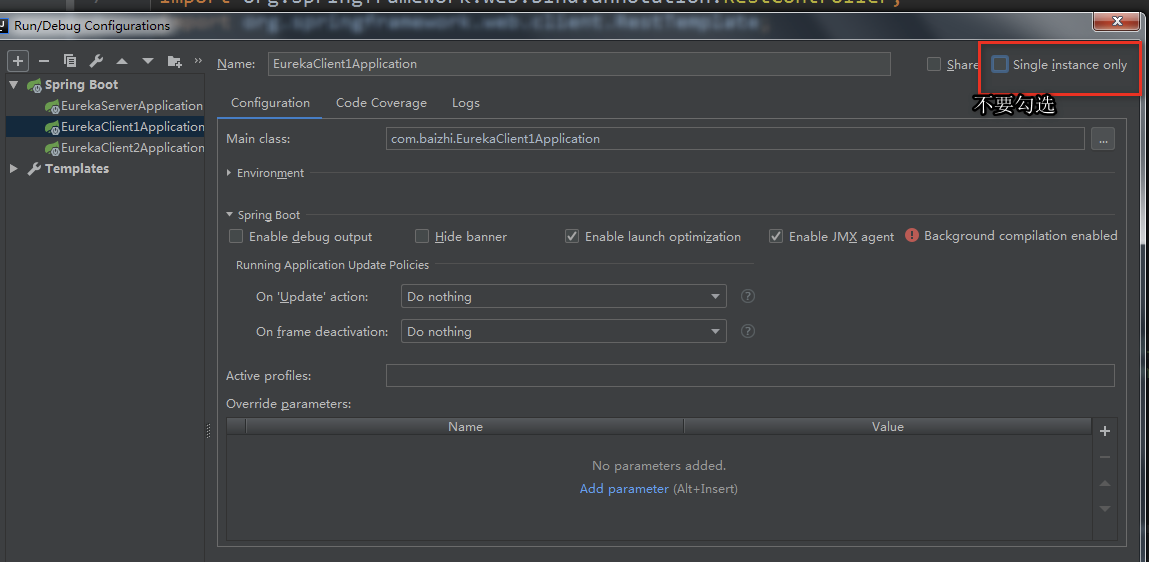
IDEA 中 默认项目启动是单例的,即一个项目只能够在一个端口号启动一次。但是在IDEA 实际上是支持多实例的,一个项目可以通过修改端口号启动多次。
**以eureka-client-8803为例**
**1.修改eureka-client-8803的IDEA启动设置**
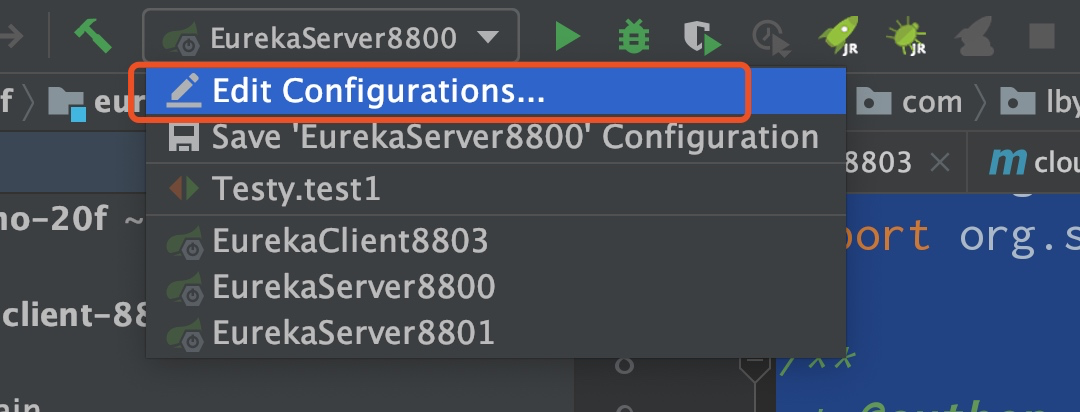

> IDEA的版本不同,还会出现如图所示的配置
>
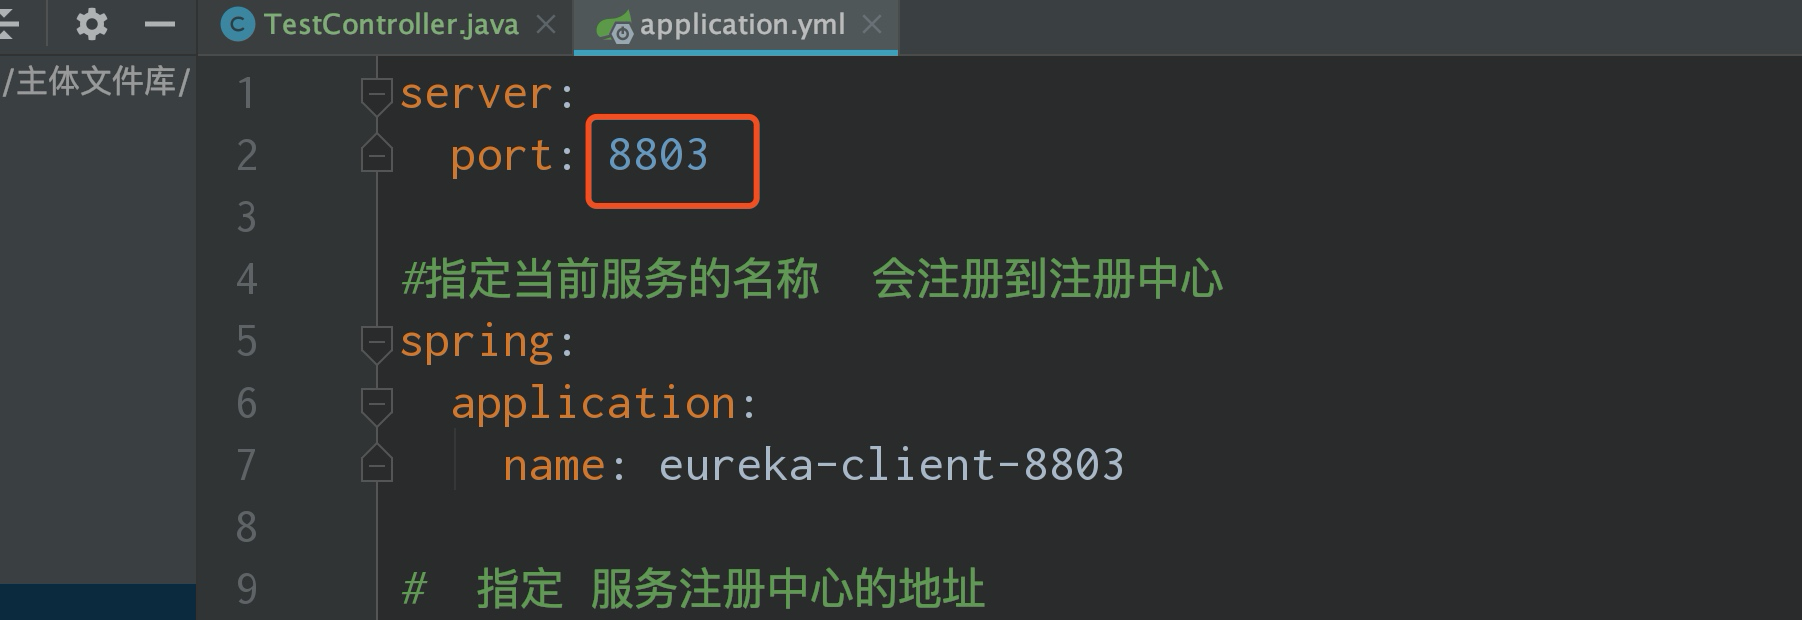
**2.在 8803 端口号启动项目**

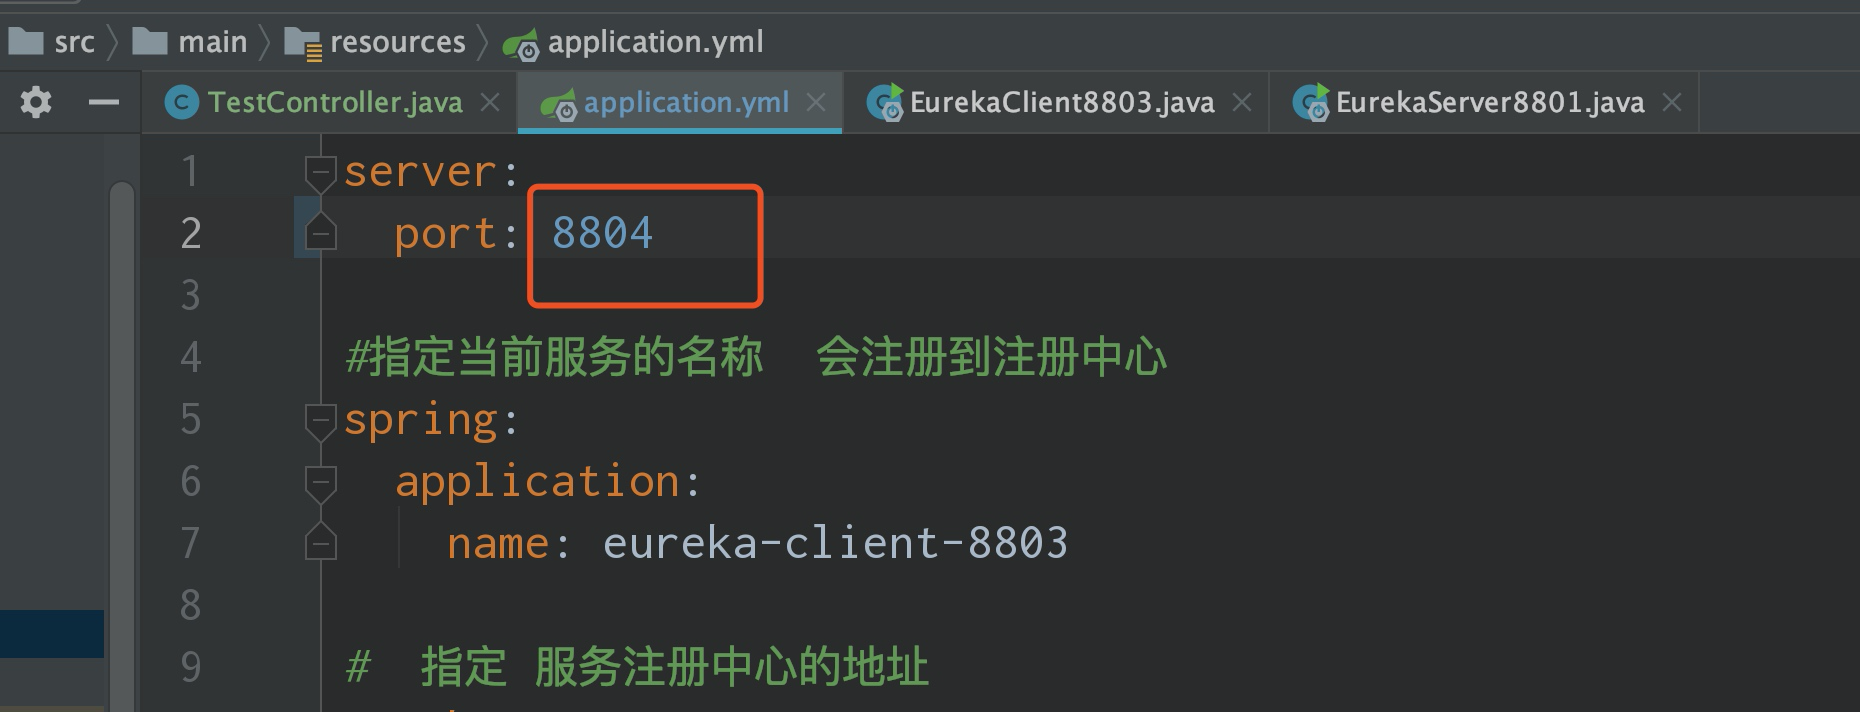
**3.不要关闭 8803 这个服务,然后直接修改yml中的端口号为8804,再次通过启动类启动**

**通过以上步骤,就启动了两个服务提供者,用来模拟集群**,效果如下

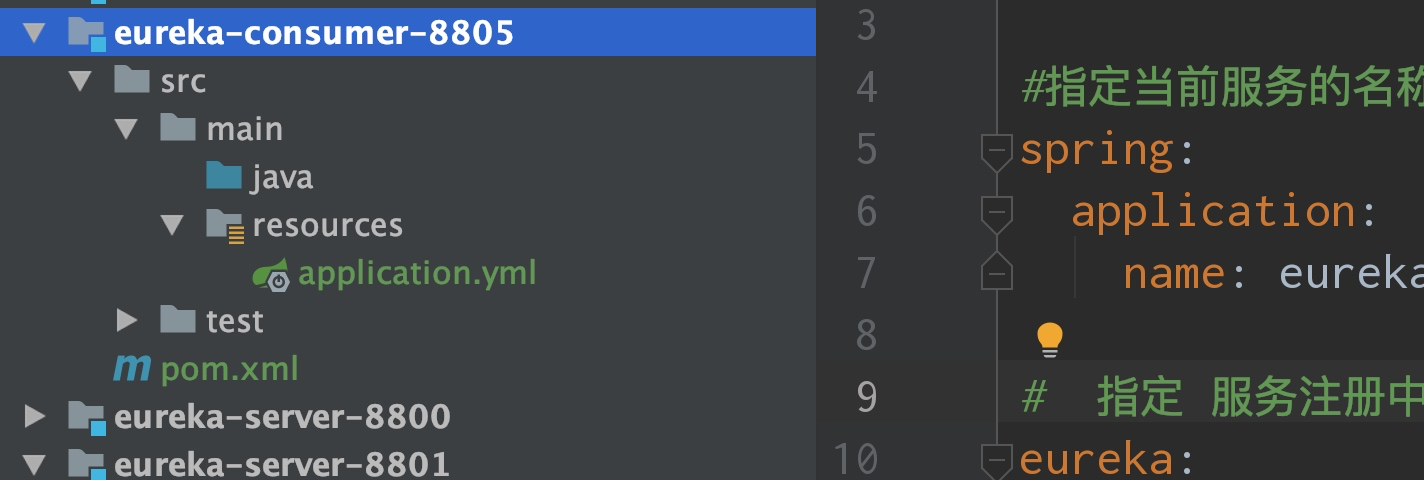
### 创建服务消费者 eureka-consumer-8805
根据之前教程中的步骤,再创建一个客户端eureka-consumer-8805作为消费者
**pom配置**
```
```
**application配置文件**
```
server:
port: 8805
#指定当前服务的名称 会注册到注册中心
spring:
application:
name: eureka-consumer-8805
# 指定 服务注册中心的地址
eureka:
client:
serviceUrl:
defaultZone: http://localhost:8801/eureka,http://localhost:8800/eureka
```
**启动类**
```
package com.lby;
import org.springframework.boot.SpringApplication;
import org.springframework.boot.autoconfigure.SpringBootApplication;
import org.springframework.cloud.client.discovery.EnableDiscoveryClient;
/**
* @author luxiaoyang
* @create 2020-04-02-20:43
*/
@EnableDiscoveryClient
@SpringBootApplication
public class EurekaConsumer8805 {
public static void main(String[] args) {
SpringApplication.run(EurekaConsumer8805.class,args);
}
}
```
## 服务调用和负载均衡
### Ribbon负载均衡
Ribbon是一个基于HTTP和TCP的客户端负载均衡工具。
Ribbon是Netflix发布的开源项目,主要功能是提供客户端的负载均衡算法。
> 关于Ribbon的简介,有一个名词需要进行解释,客户端负载均衡?
> 负载均衡是一种非常常见的技术,例如:Nginx,F5。
>

> 对于Nginx来说,在Nginx中存储一份服务端的清单,用户的请求到达Nginx之后,Nginx会根据负载均衡策略从服务清单中选择一台服务器去处理客户端的请求。
> 服务清单存储在负载均衡服务中,这就是**服务端负载均衡**。
> 而**客户端负责均衡**,例如Ribbon,本身是不存储可用服务清单的,需要服务清单的时候通过服务节点找注册中心获取。
### 服务消费者 eureka-consumer-8805 中通过RestTemplate+Ribbon调用服务提供者
#### RestTemplate+Ribbon的配置
**1.在服务消费者 eureka-consumer-8805中导入Ribbon的依赖**
```
```
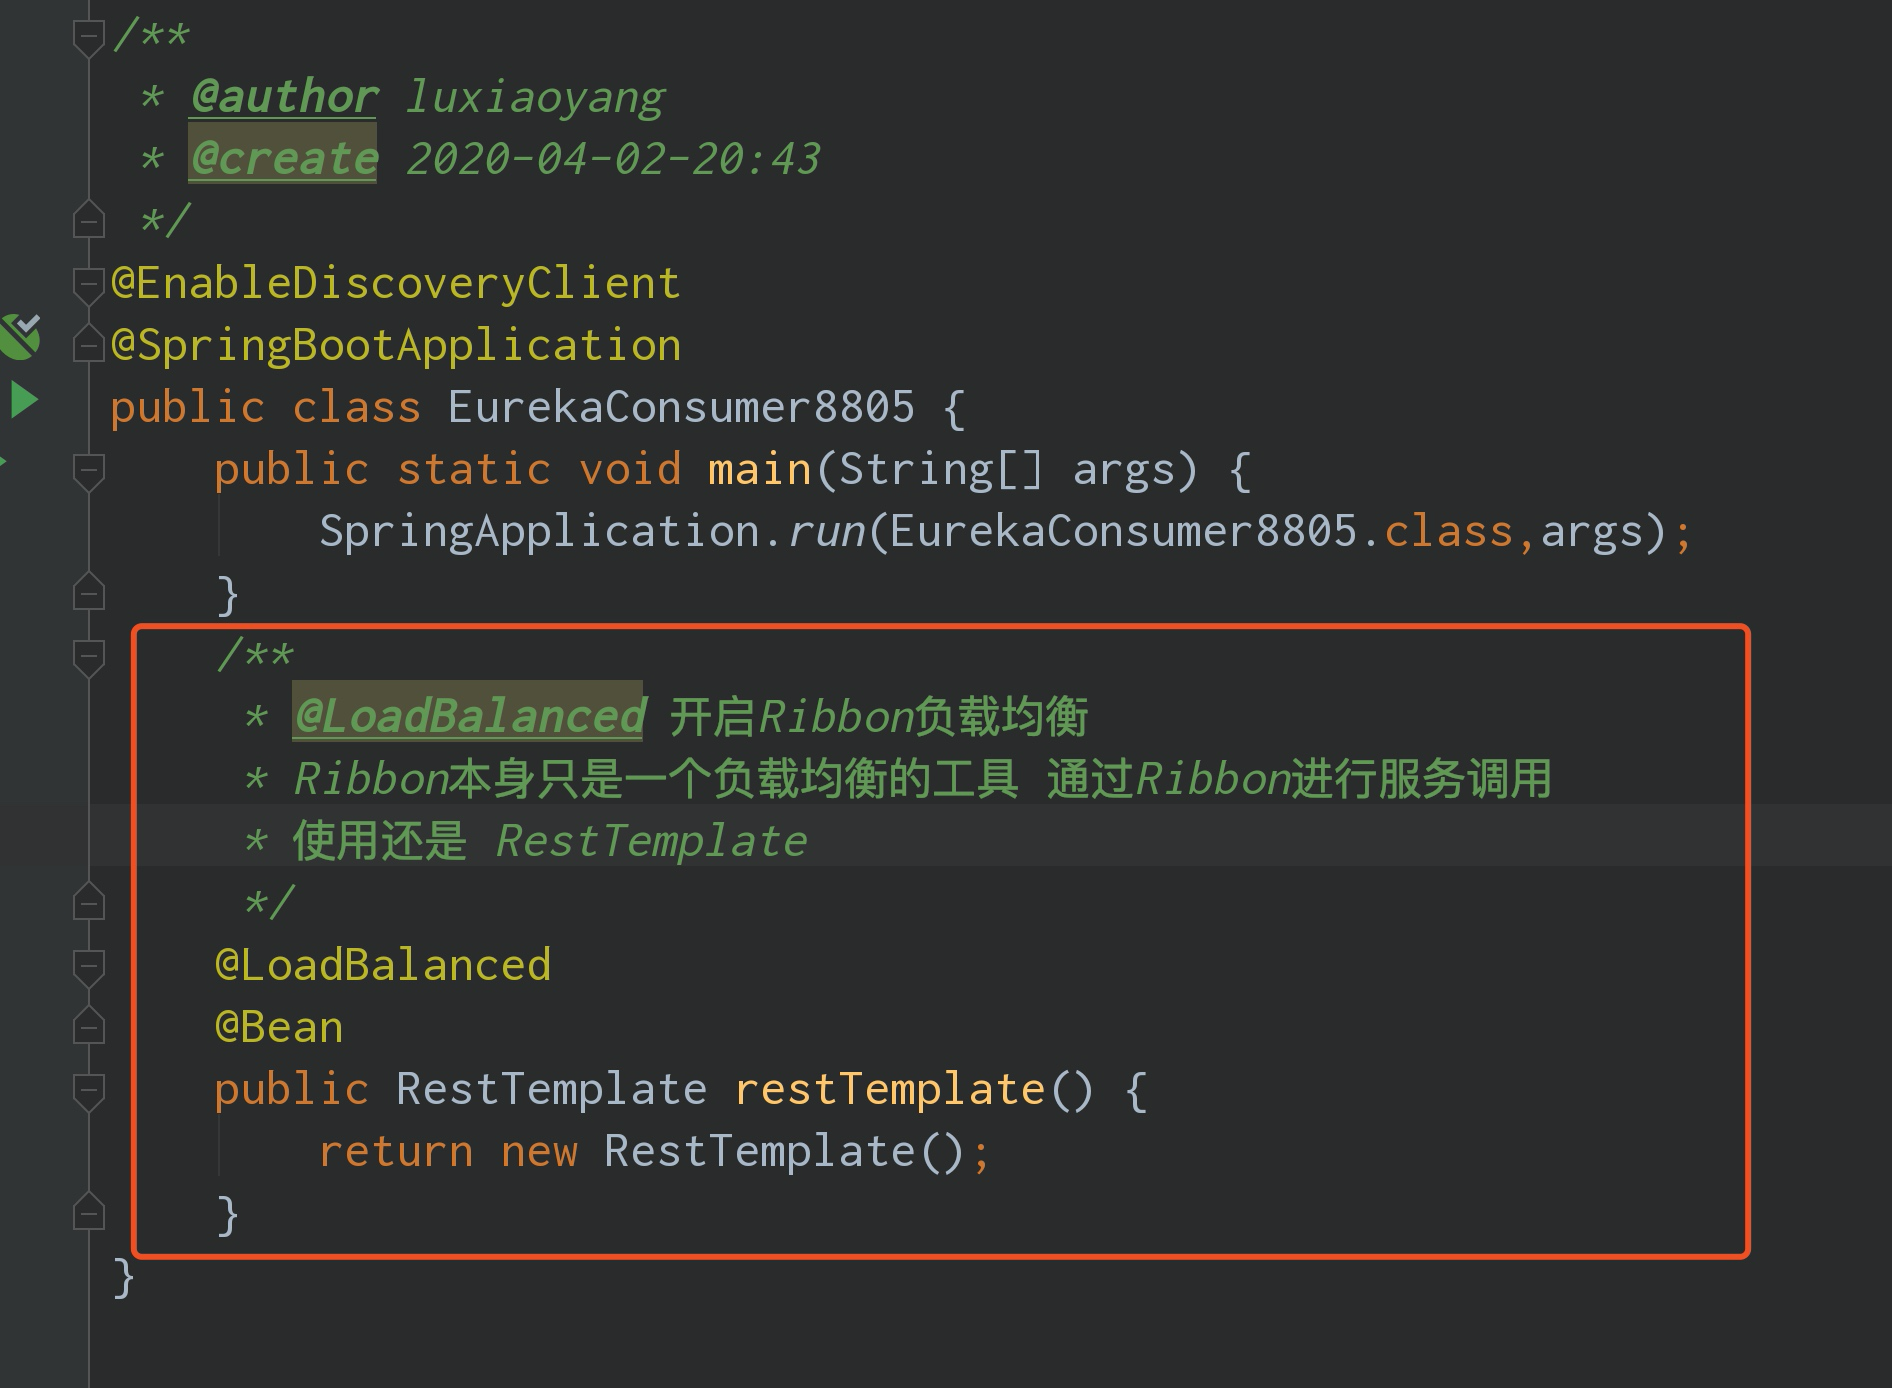
**2.在启动类中写RestTemplate+Ribbon的配置**
#### 演示Ribbon负载均衡的效果
**1.在消费者中创建接口 通过RestTemplate调用服务提供者**
```
package com.lby.controller;
import org.springframework.beans.factory.annotation.Autowired;
import org.springframework.web.bind.annotation.RequestMapping;
import org.springframework.web.bind.annotation.RestController;
import org.springframework.web.client.RestTemplate;
/**
* @author luxiaoyang
* @create 2020-04-02-20:49
*/
@RestController
public class ConsumerController {
@Autowired
private RestTemplate restTemplate;
/**
* 调用服务提供者
*/
@RequestMapping("/consumer/showConsumer")
public String showConsumer(){
/**
* 通过Ribbon 发送服务调用 用的是RestTemplate
* RestTemplate 本身没有负载均衡的能力
*
* 注意:RestTemplate请求地址中写的不是 ip+端口号 而是被调用服务的服务名称
*/
String object = restTemplate.getForObject("http://eureka-client-8803/showImgById?id=1", String.class);
return "查询到服务提供者的数据,"+object;
}
}
```
> **注意:RestTemplate请求地址中写的不是 ip+端口号 而是被调用服务的服务名称**
**2.重启所有的服务,两个服务提供者,一个服务消费者**
**3.访问服务消费者的接口**
请求地址:http://localhost:8805/consumer/showConsumer
可以看到每次请求端口号不一样


## 总结
以上就是RestTemplate+Ribbon的负载均衡的基本使用
- RestTemplate负责服务调用
- Ribbon实现负载均衡
> 源码地址:https://gitee.com/bingqilinpeishenme/Java-Tutorials
**恭喜你完成了本章的学习,为你鼓掌!如果本文对你有帮助,请帮忙点赞,评论,转发,这对作者很重要,谢谢。**

要掌握SpringCloud更多的用法,请持续关注本系列教程。
## 求关注,求点赞,求转发
加载全部内容