WPF MVVM WPF MVVM示例讲解
人气:0在没给大家讲解wpf mwm示例之前先给大家简单说下MVVM理论知识:
WPF技术的主要特点是数据驱动UI,所以在使用WPF技术开发的过程中是以数据为核心的,WPF提供了数据绑定机制,当数据发生变化时,WPF会自动发出通知去更新UI。
我们使用模式,一般是想达到高内聚低耦合。在WPF开发中,经典的编程模式是MVVM,是为WPF量身定做的模式,该模式充分利用了WPF的数据绑定机制,最大限度地降低了Xmal文件和CS文件的耦合度,也就是UI显示和逻辑代码的耦合度,如需要更换界面时,逻辑代码修改很少,甚至不用修改。与WinForm开发相比,我们一般在后置代码中会使用控件的名字来操作控件的属性来更新UI,而在WPF中通常是通过数据绑定来更新UI;在响应用户操作上,WinForm是通过控件的事件来处理,而WPF可以使用命令绑定的方式来处理,耦合度将降低。
首先MVVM设计模式的结构

Views: 由Window/Page/UserControl等构成,通过DataBinding与ViewModels建立关联;
ViewModels:由一组命令,可以绑定的属性,操作逻辑构成;因为View与ViewModel进行了解耦,我们可以对ViewModel进行Unit Test;
Models:可以是实体对象或者Web服务;
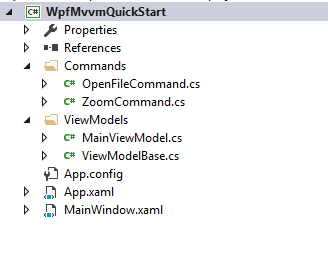
下面通过一个简单的例子,来介绍一些WPF MVVM模式。示例将展示一个图片浏览器,打开图片,放大/缩小图片大小。首先项目结构:

UI:
 <Grid>
  <DockPanel>
   <Menu DockPanel.Dock="Top">
    <Menu>
     <MenuItem Header="_Open" Command="{Binding OpenFileCommand}"/>
    </Menu>
    <Menu>
     <MenuItem Header="_ZoomIn" Command="{Binding ZoomCommand}" CommandParameter="ZoomIn"/>
    </Menu>
    <Menu>
     <MenuItem Header="_ZoomOut" Command="{Binding ZoomCommand}" CommandParameter="ZoomOut"/>
    </Menu>
    <Menu>
     <MenuItem Header="_Normal" Command="{Binding ZoomCommand}" CommandParameter="Normal"/>
    </Menu>
   </Menu>
   <ScrollViewer>
    <Image Source="{Binding ImagePath}" Stretch="None">
     <Image.LayoutTransform>
      <ScaleTransform ScaleX="{Binding Zoom}" ScaleY="{Binding Zoom}"/>
     </Image.LayoutTransform>
    </Image>
   </ScrollViewer>
  </DockPanel>
 </Grid>
ViewModelBase(用来实现修改通知):
 public class ViewModelBase : INotifyPropertyChanged
 {
  public event PropertyChangedEventHandler PropertyChanged;
  protected virtual void OnPropertyChanged(string propName)
  {
   if(PropertyChanged!=null)
   {
    PropertyChanged(this, new PropertyChangedEventArgs(propName));
   }
  }
 }
OpenFileCommand:
public class OpenFileCommand : ICommand
 {
  private MainViewModel _data;
  public OpenFileCommand(MainViewModel data)
  {
   _data = data;
  }
  public event EventHandler CanExecuteChanged;
  public bool CanExecute(object parameter)
  {
   return true;
  }
  public void Execute(object parameter)
  {
   OpenFileDialog dialog = new OpenFileDialog() { Filter = "Image Files|*.jpg;*.png;*.bmp;*.gif" };
   if(dialog.ShowDialog().GetValueOrDefault())
   {
    _data.ImagePath = dialog.FileName;
   }
  }
ZoomCommand:
 public enum ZoomType
 {
  ZoomIn = 0,
  ZoomOut = 1,
  Normal = 2
 }
 public class ZoomCommand : ICommand
 {
  private MainViewModel _data;
  public ZoomCommand(MainViewModel data)
  {
   _data = data;
  }
  public event EventHandler CanExecuteChanged
  {
   add { CommandManager.RequerySuggested += value; }
   remove { CommandManager.RequerySuggested -= value; }
  }
  public bool CanExecute(object parameter)
  {
   return _data.ImagePath != null;
  }
  public void Execute(object parameter)
  {
   ZoomType type = (ZoomType)Enum.Parse(typeof(ZoomType), (string)parameter, true);
   switch(type)
   {
    case ZoomType.Normal:
     _data.Zoom = 1;
     break;
    case ZoomType.ZoomIn:
     _data.Zoom *= 1.2;
     break;
    case ZoomType.ZoomOut:
     _data.Zoom /= 1.2;
     break;
   }
  }
 }
MainViewModel:
public class MainViewModel : ViewModelBase
 {
  private string _imagePath;
  public string ImagePath
  {
   get
   {
    return _imagePath;
   }
   set
   {
    if (_imagePath != value)
    {
     _imagePath = value;
     OnPropertyChanged("ImagePath");
    }
   }
  }
  private double _zoom = 1.0;
  public double Zoom
  {
   get
   {
    return _zoom;
   }
   set
   {
    if(_zoom != value)
    {
     _zoom = value;
     OnPropertyChanged("Zoom");
    }
   }
  }
  private ICommand _openFileCommand;
  public ICommand OpenFileCommand
  {
   get { return _openFileCommand; }
  }
  private ZoomCommand _zoomCommand;
  public ZoomCommand ZoomCommand
  {
   get { return _zoomCommand; }
  }
  public MainViewModel()
  {
   _openFileCommand = new OpenFileCommand(this);
   _zoomCommand = new ZoomCommand(this);
  }
 }
下一步我们要做的是将MainViewModel绑定到MainWindow上,我们可以通过下面两种方式绑定:
1. 直接在MainWindow的Code Behind中进行绑定:
 public MainWindow()
  {
   InitializeComponent();
   DataContext = new MainViewModel();
  }
2. 在App.xaml后台代码中绑定(将App.xaml中StartupUri="MainWindow.xaml"删除掉):
  public App()
  {
   MainWindow window = new MainWindow();
   window.DataContext = new MainViewModel();
   window.Show();
  }
运行效果图如下:

以上就是针对WPF MVVM示例讲解的全部内容,并附有效果图,看着还不错吧,希望大家能够喜欢,欢迎提出宝贵意见。
加载全部内容