jersey文件上传方式 基于Java中两种jersey文件上传方式
一名清官 人气:0本文将带领大家使用基于JAX-RS REST风格的实现Jersey来上传文件到服务器制定的文件夹,如果是图片并读取显示出该图片。
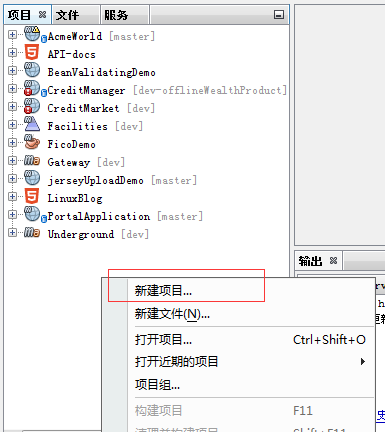
准备工作:准备一个form表单,有两个字段,一个是type="file"和type="text",并且表单需要使用POST方式提交。注意改表单需要使用multipart/form-data。该项目使用netbeans8.0和glassfish4.0开发和运行。并且使用maven管理该工程;需要在您的C盘建立一个文件夹,用来存储上传的文件。如C:\Newsportal\article_images开发环境:1 创建工程 在你项目空白处右键-》点击新建项目

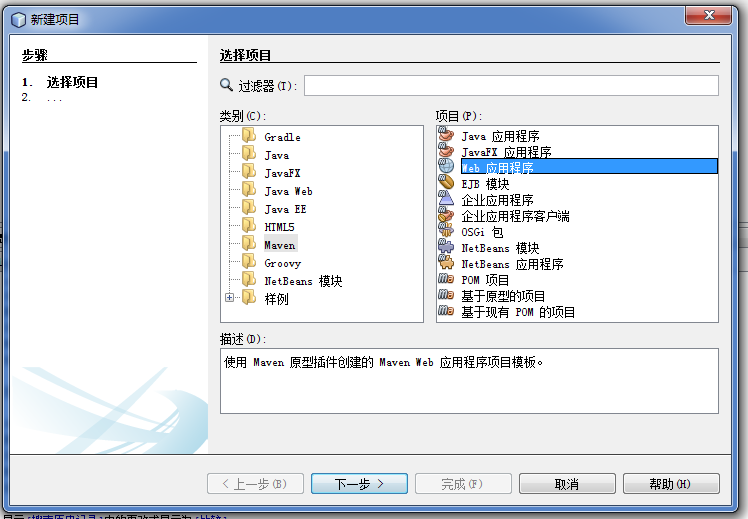
2 在创建的项目中选择maven-》点击右侧web应用程序

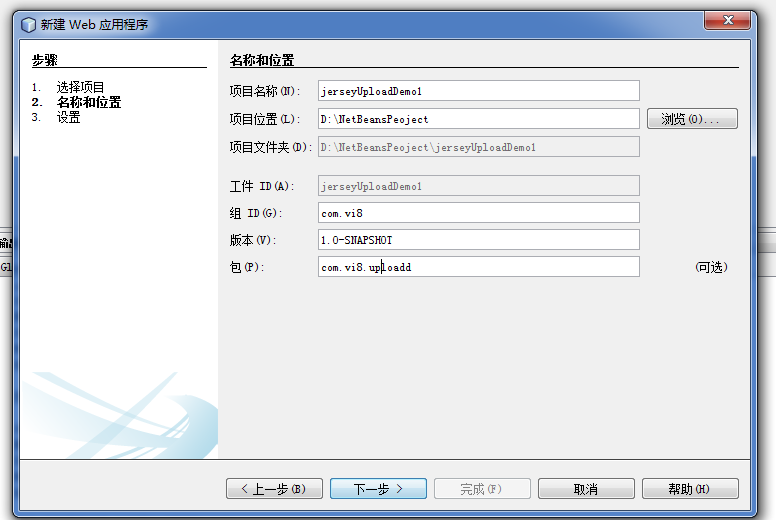
3 填写工程的名字和maven的组ID和包名

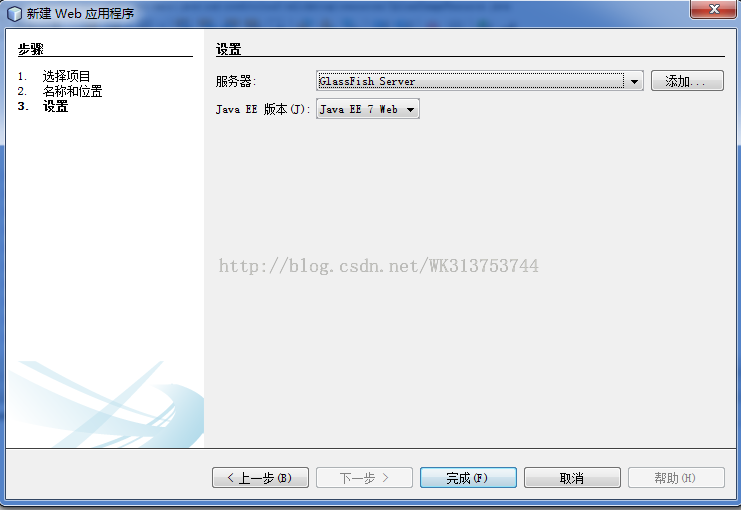
4 选择该项目的运行环境为服务器Glassfish server

5 最后点击完成
准备搭建jersey的运行环境:
1 配置maven需要依赖包,maven的pom文件依赖如下:
<?xml version="1.0" encoding="UTF-8"?>
<project xmlns="http://maven.apache.org/POM/4.0.0" xmlns:xsi="http://www.w3.org/2001/XMLSchema-instance" xsi:schemaLocation="http://maven.apache.org/POM/4.0.0 http://maven.apache.org/xsd/maven-4.0.0.xsd">
<modelVersion>4.0.0</modelVersion>
<groupId>com.vi8</groupId>
<artifactId>jerseyUploadDemo</artifactId>
<version>1.0-SNAPSHOT</version>
<packaging>war</packaging>
<name>jerseyUploadDemo</name>
<description>
jersey上传文件DMEO
</description>
<properties>
<endorsed.dir>${project.build.directory}/endorsed</endorsed.dir>
<project.build.sourceEncoding>UTF-8</project.build.sourceEncoding>
</properties>
<dependencies>
<!-- Jersey -->
<dependency>
<groupId>org.glassfish.jersey.core</groupId>
<artifactId>jersey-server</artifactId>
<version>2.0</version>
<type>jar</type>
<scope>provided</scope>
</dependency>
<dependency>
<groupId>org.glassfish.jersey.ext</groupId>
<artifactId>jersey-mvc-jsp</artifactId>
<version>2.0</version>
<type>jar</type>
<scope>provided</scope>
</dependency>
<dependency>
<groupId>org.glassfish.jersey.media</groupId>
<artifactId>jersey-media-json-jackson</artifactId>
<version>2.0</version>
<type>jar</type>
<scope>provided</scope>
</dependency>
<!-- 上传文件需要该依赖-->
<dependency>
<groupId>org.glassfish.jersey.media</groupId>
<artifactId>jersey-media-multipart</artifactId>
<version>2.0</version>
<scope>provided</scope>
</dependency>
<!-- 这个用于上传文件工具操作-->
<dependency>
<groupId>commons-io</groupId>
<artifactId>commons-io</artifactId>
<version>2.4</version>
</dependency>
<dependency>
<groupId>javax</groupId>
<artifactId>javaee-web-api</artifactId>
<version>7.0</version>
<scope>provided</scope>
</dependency>
</dependencies>
<build>
<plugins>
<plugin>
<groupId>org.apache.maven.plugins</groupId>
<artifactId>maven-compiler-plugin</artifactId>
<version>3.1</version>
<configuration>
<source>1.7</source>
<target>1.7</target>
<compilerArguments>
<endorseddirs>${endorsed.dir}</endorseddirs>
</compilerArguments>
</configuration>
</plugin>
<plugin>
<groupId>org.apache.maven.plugins</groupId>
<artifactId>maven-war-plugin</artifactId>
<version>2.3</version>
<configuration>
<failOnMissingWebXml>false</failOnMissingWebXml>
</configuration>
</plugin>
<plugin>
<groupId>org.apache.maven.plugins</groupId>
<artifactId>maven-dependency-plugin</artifactId>
<version>2.6</version>
<executions>
<execution>
<phase>validate</phase>
<goals>
<goal>copy</goal>
</goals>
<configuration>
<outputDirectory>${endorsed.dir}</outputDirectory>
<silent>true</silent>
<artifactItems>
<artifactItem>
<groupId>javax</groupId>
<artifactId>javaee-endorsed-api</artifactId>
<version>7.0</version>
<type>jar</type>
</artifactItem>
</artifactItems>
</configuration>
</execution>
</executions>
</plugin>
</plugins>
</build>
</project>
2 配置web.xml用以支持jersey,配置如下:
<?xml version="1.0" encoding="UTF-8"?>
<web-app version="3.1" xmlns="http://xmlns.jcp.org/xml/ns/javaee" xmlns:xsi="http://www.w3.org/2001/XMLSchema-instance" xsi:schemaLocation="http://xmlns.jcp.org/xml/ns/javaee http://xmlns.jcp.org/xml/ns/javaee/web-app_3_1.xsd">
<filter>
<filter-name>JerseyFilter</filter-name>
<filter-class>org.glassfish.jersey.servlet.ServletContainer</filter-class>
<init-param>
<param-name>javax.ws.rs.Application</param-name>
<!--MyApplication.java jersey加载-->
<param-value>com.vi8.upload.MyApplication</param-value>
</init-param>
<init-param>
<param-name>jersey.config.servlet.filter.staticContentRegex</param-name>
<param-value>/(img|css|js|font)/.*</param-value>
</init-param>
<init-param>
<param-name>jersey.config.servlet.filter.forwardOn404</param-name>
<param-value>true</param-value>
</init-param>
<init-param>
<param-name>jersey.config.server.mvc.templateBasePath.jsp</param-name>
<param-value>/WEB-INF/pages</param-value>
</init-param>
</filter>
<filter-mapping>
<filter-name>JerseyFilter</filter-name>
<url-pattern>/*</url-pattern>
</filter-mapping>
<welcome-file-list>
<welcome-file>index.jsp</welcome-file>
</welcome-file-list>
</web-app>
3 编写上面web.xml用到的MyApplication.java 如下:
package com.vi8.upload;
import javax.ws.rs.ApplicationPath;
import org.glassfish.jersey.jackson.JacksonFeature;
import org.glassfish.jersey.media.multipart.MultiPartFeature;
import org.glassfish.jersey.server.ResourceConfig;
import org.glassfish.jersey.server.mvc.jsp.JspMvcFeature;
/**
* qq: 845885222@qq.com
*
* @author Administrator
*/
@ApplicationPath("/")
public class MyApplication extends ResourceConfig {
public MyApplication() {
packages("com.vi8.upload.resources");
register(JspMvcFeature.class);
register(JacksonFeature.class);
register(MultiPartFeature.class);
}
}
以上步骤基本就是jersey运行环境准备工作,接下开始讨论文件如何上传的。
jersey文件上传:
1 文件上传的Resource类,你可以理解是spring mvc中控制器。UploadImageResource.java清单代码
package com.vi8.upload.resources;
import java.io.File;
import java.io.FileInputStream;
import java.io.FileOutputStream;
import java.io.IOException;
import java.io.InputStream;
import java.io.OutputStream;
import java.io.UnsupportedEncodingException;
import java.util.Calendar;
import java.util.logging.Level;
import java.util.logging.Logger;
import javax.servlet.http.HttpServletResponse;
import javax.ws.rs.Consumes;
import javax.ws.rs.GET;
import javax.ws.rs.POST;
import javax.ws.rs.Path;
import javax.ws.rs.PathParam;
import javax.ws.rs.Produces;
import javax.ws.rs.core.Context;
import javax.ws.rs.core.MediaType;
import org.apache.commons.io.FileUtils;
import org.glassfish.jersey.media.multipart.ContentDisposition;
import org.glassfish.jersey.media.multipart.FormDataBodyPart;
import org.glassfish.jersey.media.multipart.FormDataContentDisposition;
import org.glassfish.jersey.media.multipart.FormDataMultiPart;
import org.glassfish.jersey.media.multipart.FormDataParam;
@Path("upload")
public class UploadImageResource {
/**
* Constants operating with images
*/
private static final String ARTICLE_IMAGES_PATH = "c:/Newsportal/article_images/";
private static final String JPG_CONTENT_TYPE = "image/jpeg";
private static final String PNG_CONTENT_TYPE = "image/png";
/**
* 第一种方式上传
*
* @param fileInputStream
* @param disposition
* @return
*/
@POST
@Path("uploadimage1 ")
@Consumes(MediaType.MULTIPART_FORM_DATA)
public String uploadimage1(@FormDataParam("file") InputStream fileInputStream,
@FormDataParam("file") FormDataContentDisposition disposition) {
String imageName = Calendar.getInstance().getTimeInMillis()
+ disposition.getFileName();
File file = new File(ARTICLE_IMAGES_PATH + imageName);
try {
//使用common io的文件写入操作
FileUtils.copyInputStreamToFile(fileInputStream, file);
//原来自己的文件写入操作
//saveFile(fileInputStream, file);
} catch (IOException ex) {
Logger.getLogger(UploadImageResource.class.getName()).log(Level.SEVERE, null, ex);
}
return "images/" + imageName;
}
/**
* *
* 第二种方式上传 使用FormDataMultiPart 获取表单数据
*
* @param form
* @param response
* @return
* @throws UnsupportedEncodingException
*/
@POST
@Path("uploadimage2")
@Consumes(MediaType.MULTIPART_FORM_DATA)
@Produces(MediaType.APPLICATION_JSON)
public String uploadimage2(FormDataMultiPart form, @Context HttpServletResponse response) throws UnsupportedEncodingException {
//获取文件流
FormDataBodyPart filePart = form.getField("file");
//获取表单的其他数据
FormDataBodyPart usernamePart = form.getField("username");
//ContentDisposition headerOfFilePart = filePart.getContentDisposition();
//把表单内容转换成流
InputStream fileInputStream = filePart.getValueAs(InputStream.class);
FormDataContentDisposition formDataContentDisposition = filePart.getFormDataContentDisposition();
String source = formDataContentDisposition.getFileName();
String result = new String(source.getBytes("ISO8859-1"), "UTF-8");
System.out.println("formDataContentDisposition.getFileName()result " + result);
String filePath = ARTICLE_IMAGES_PATH + result;
File file = new File(filePath);
System.out.println("file " + file.getAbsolutePath());
try {
//保存文件
FileUtils.copyInputStreamToFile(fileInputStream, file);
// saveFile(fileInputStream, file);
} catch (IOException ex) {
Logger.getLogger(UploadImageResource.class.getName()).log(Level.SEVERE, null, ex);
}
System.out.println("" + "images/" + result);
response.setCharacterEncoding("UTF-8");
return "images/" + result;
}
/**
*
* 不从web服务器去读图片,在磁盘某个目录的文件可以通过流的方式去获取 ,通过 response.getOutputStream()放回数据
*
* @param imageName image-name
* @param type extension of image
* @param response {@link HttpServletResponse}
* @throws IOException
*/
@GET
@Path("/images/{name}.{type}")
public void showImg(@PathParam("name") String imageName,
@PathParam("type") String type,
@Context HttpServletResponse response)
throws IOException {
System.out.println("showImg");
try (InputStream in = new FileInputStream(ARTICLE_IMAGES_PATH
+ imageName + "." + type)) {
FileUtils.copyFile(new File(ARTICLE_IMAGES_PATH + imageName + "." + type), response.getOutputStream());
// FileCopyUtils.copy(in, response.getOutputStream());
}
}
// 保存文件信息到磁盘
private void saveFile(InputStream uploadedInputStream, File file) {
System.out.println("------saveFile-----");
try {
OutputStream outpuStream = new FileOutputStream(file);
int read = 0;
byte[] bytes = new byte[1024];
// outpuStream = new FileOutputStream(new File(serverLocation));
while ((read = uploadedInputStream.read(bytes)) != -1) {
outpuStream.write(bytes, 0, read);
}
outpuStream.flush();
outpuStream.close();
} catch (IOException e) {
e.printStackTrace();
}
}
}
2 当然要测试你也许还需要准备一个带有form表单的jsp文件
<form action="${pageContext.request.contextPath}/upload/uploadimage2" method="post" enctype="multipart/form-data">
<p>
文件 :<input type="file" name="file"/><br />
用户名: <input type="text" name="username"/><br />
</p>
<input type="submit" value="上传" />
</form>
结果如下


以上就是本文的全部内容,希望对大家实现jersey文件上传有所帮助。
加载全部内容