想了解Flex3 界面布局教程的相关内容吗,在本文为您仔细讲解Flex3 界面布局的相关知识和一些Code实例,欢迎阅读和指正,我们先划重点:Flex3,界面布局,下面大家一起来学习吧。
对于一个拥有丰富组件的
GUI设计工具来说,界面的布局技术成为界面美化的一个重要方面。
Flex从控件的功能上大致提供了两种方法:容器(控制布局),组件(提供
GUI实质功能处理)。使用容器分层次管理GUI是当前的趋势,Flex也使用了此种方式,主观上我们认为它把我们界面上的组件通过容器进行了分组或分类布局管理。

接下来,我将通过简单的示例逐个介绍各种界面布局的设计。
Canvas的界面布局,它定义了一个矩形框架的区域,用来放置用户的容器和控件。不像其他的组件,你不能放任Flex的控件。你必须指定absolute或者constraint-based来指定组件的位置。Absolute模式必须指定x,y坐标。 Constrain-based必须指定side, baseline,或者center anchors. 接下来具体介绍两种布局方式:
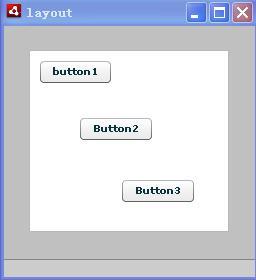
Absolute模式:你可以指定x,y坐标来指定每个组件的在容器的位置。坐标的是相对canvas 容器的左上角来设计的。即容器的左上角坐标为(0,0). X.y可以为正负值,如果是负值的话,组件就会放在超出容器可是范围的位置。当然可以利用Actionscript来完成移动的操作,这就涉及到的event事件。
|
<?xml version="1.0" encoding="utf-8"?>
<mx:WindowedApplication xmlns:mx="http://www.adobe.com/2006/mxml" width="219" height="230">
    <mx:Canvas id="mycanvas" height="182" width="200"
     borderStyle="solid" backgroundColor="white">
        <mx:Button x="10" y="10" label="button1"/>
        <mx:Button x="50" y="67" label="Button2"/>
        <mx:Button x="92" y="129" label="Button3"/>
    </mx:Canvas>
</mx:WindowedApplication>
|
效果如下图:
constraint-based模式:这个分别介绍canvas 的Vbox以及Hbox的两种组合。Canvas通常有x,y指定组件的位置,x,y默认的应该是0.所以你如果不指定x,那么将把组件放在x=0,的位置。这样有可能出现重叠现象。当然也可以指定其他模式的布局,比如Vbox,或者Hbox。这样就可以不指定x,y了。
|
<?xml version="1.0" encoding="utf-8"?>
<mx:WindowedApplication xmlns:mx="http://www.adobe.com/2006/mxml">
<mx:Canvas
width="340" height="247"
backgroundColor="#FFFFFF">
<mx:VBox id="vb"
     left="10"
       right="248"
       y="26"
       height="153"
       backgroundColor="#A9C0E7">
        <mx:Button label="button1" width="74"/>
       <mx:Button label="Button2"/>
       <mx:Button label="Button3"/>
       </mx:VBox>
<mx:HBox id="hBox2"
       left="100"
       right="27"
       y="26"
       height="153"
       backgroundColor="#A9C0E7">
       <mx:Button label="button4" />
       <mx:Button label="Button5"/>
       <mx:Button label="Button6"/>
   </mx:HBox>
   <mx:Button label="Button8" y="200"/>
   <mx:Button label="Button7" y="190"/>
 </mx:Canvas>

</mx:WindowedApplication>
|
效果如下图: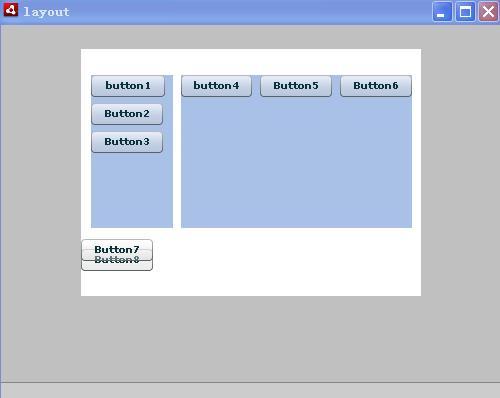
Vbox或者Hbox 布局
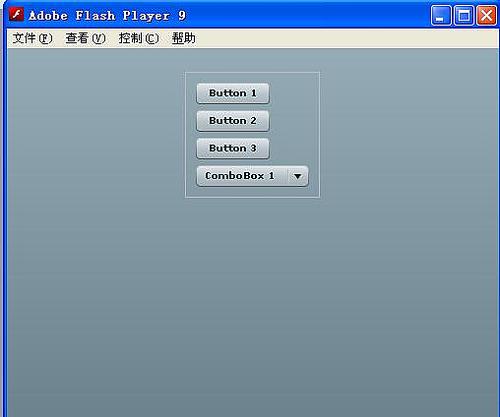
前面介绍的把Vbox或者Hbox嵌入Canvas。其实他们本身都是一个容器,可以独立使用的。效果跟上面图中显示的是一样的。所以关于VBox,HBox就不再加以介绍了。举个例子好了:
|
<?xml version="1.0"?>
<!-- containers\layouts\VBoxSimple.mxml -->
<mx:Application xmlns:mx="http://www.adobe.com/2006/mxml">
    <mx:VBox borderStyle="solid"
      paddingTop="10"
      paddingBottom="10"
      paddingLeft="10"
      paddingRight="10">
    <mx:Button id="fname" label="Button 1"/>
   <mx:Button id="lname" label="Button 2"/>
   <mx:Button id="addr1" label="Button 3"/>
   <mx:ComboBox id="state">
  <mx:ArrayCollection>
   <mx:String>ComboBox 1</mx:String>
  </mx:ArrayCollection>
 </mx:ComboBox>
 </mx:VBox>
</mx:Application>
|
效果图如下:
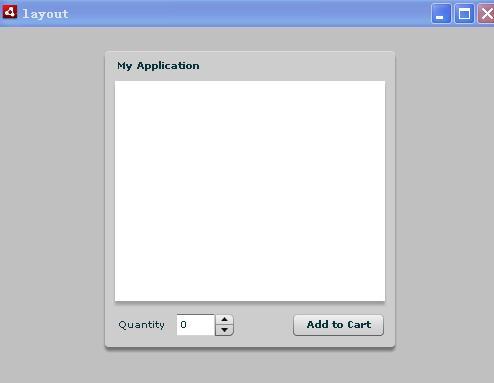
你可以把controlbar和panel 或者titlewindow容器组合起来使用。这样做的好处容器里的组件可以被panel或者titlewindow里的组件共用。(原文:You use the ControlBar container with a Panel or TitleWindow container to hold components that can be shared by the other children in the Panel or TitleWindow container.)举个例子:
|
<?xml version="1.0" encoding="utf-8"?>
<mx:WindowedApplication xmlns:mx="http://www.adobe.com/2006/mxml">
<mx:Script>
<![CDATA[
private function addToCart():void {
// Handle event.
}
]]>
</mx:Script>
  <mx:Panel title="My Application"
      paddingTop="10" paddingBottom="10"
      paddingLeft="10" paddingRight="10">
  <mx:HBox width="250" height="200">
   <!-- Area for your catalog. -->
  </mx:HBox>
  <mx:ControlBar width="250">
   <mx:Label text="Quantity"/>
 <mx:NumericStepper/>
  <!-- Use Spacer to push Button control to the right. -->
  <mx:Spacer width="100%"/>
    <mx:Button label="Add to Cart"
    click="addToCart();"/>
  </mx:ControlBar>
 </mx:Panel>
</mx:WindowedApplication>
|
效果图:
这个主要用来做界面顶部的导航条。这个容器menubar, combox button等组件。举个例子:
|
<?xml version="1.0"?>
<!-- containers\layouts\AppCBarSimple.mxml -->
<mx:Application xmlns:mx="http://www.adobe.com/2006/mxml">
<mx:Script>
<![CDATA[
import mx.controls.Alert;
]]>
</mx:Script>
<mx:XMLList id="menuXML">
<menuitem label="File">
<menuitem label="New" data="New"/>
<menuitem label="Open" data="Open"/>
<menuitem label="Save" data="Save"/>
<menuitem label="Exit" data="Exit"/>
</menuitem>
<menuitem label="Edit">
<menuitem label="Cut" data="Cut"/>
<menuitem label="Copy" data="Copy"/>
<menuitem label="Paste" data="Paste"/>
</menuitem>
<menuitem label="View"/>
</mx:XMLList>
<mx:Array id="cmbDP">
<mx:String>Item 1</mx:String>
<mx:String>Item 2</mx:String>
<mx:String>Item 3</mx:String>
</mx:Array>
<mx:ApplicationControlBar id="dockedBar"
dock="true">
<mx:MenuBar height="100%"
dataProvider="{menuXML}"
labelField="@label"
showRoot="true"/>
<mx:HBox paddingBottom="5"
paddingTop="5">
<mx:ComboBox dataProvider="{cmbDP}"/>
<mx:Spacer width="100%"/>
<mx:TextInput id="myTI" text=""/>
<mx:Button id="srch1"
label="Search"
click="Alert.show('Searching')"/>
</mx:HBox>
</mx:ApplicationControlBar>
<mx:TextArea width="300" height="200"/>
</mx:Application>
|
效果图:
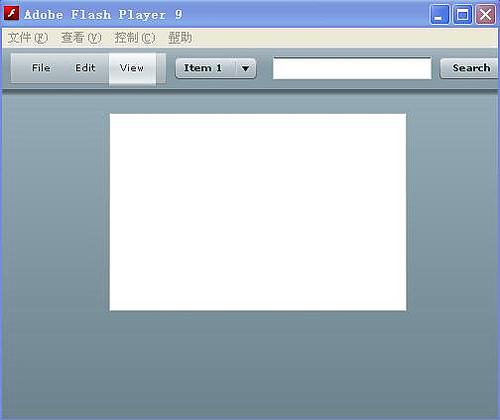
其实呢,DividedBox,与Box 是非常类似的,唯一不同的在于它子Box板块自建加入了一条分隔条,用户可以更具自己需要来调整各个子Box板块的大小。子Box板块的分布可以分成两种,水平以及垂直的。比如: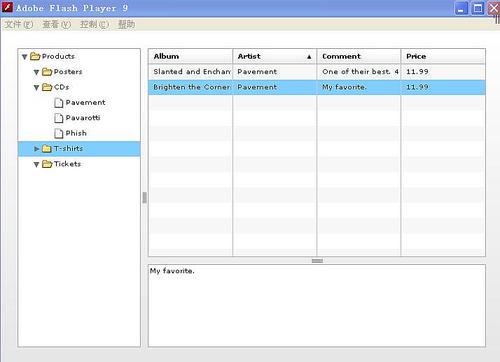
实现的代码如下:
|
<?xml version="1.0"?>
<!-- containers\layouts\HDivBoxSimple.mxml -->
<mx:Application xmlns:mx="http://www.adobe.com/2006/mxml"
backgroundColor="white">
<mx:Script>
<![CDATA[
private function myGrid_initialize():void {
myGrid.dataProvider = [
{Artist:'Pavement', Album:'Slanted and Enchanted',
Price:11.99, Comment:'One of their best. 4 Stars.'},
{Artist:'Pavement', Album:'Brighten the Corners',
Price:11.99, Comment:'My favorite.'}
];
}
]]>
</mx:Script>
<mx:HDividedBox width="100%" height="100%">
<mx:Tree id="tree1"
width="30%" height="100%"
labelField="@label"
showRoot="true">
<mx:XMLList>
<menuitem label="Products">
<menuitem label="Posters" isBranch="true"/>
<menuitem label="CDs">
<menuitem label="Pavement"/>
<menuitem label="Pavarotti"/>
<menuitem label="Phish"/>
</menuitem>
<menuitem label="T-shirts" isBranch="true"/>
<menuitem label="Tickets" isBranch="true"/>
</menuitem>
</mx:XMLList>
</mx:Tree>
<mx:VDividedBox width="70%" height="100%">
<mx:DataGrid id="myGrid"
width="100%" height="100%"
initialize="myGrid_initialize();"
change="currentMessage.text=
event.currentTarget.selectedItem.Comment;"/>
<mx:TextArea id="currentMessage"
width="100%"
height="60"
text="One of their best. 4 Stars."/>
</mx:VDividedBox>
</mx:HDividedBox>
</mx:Application>
|


