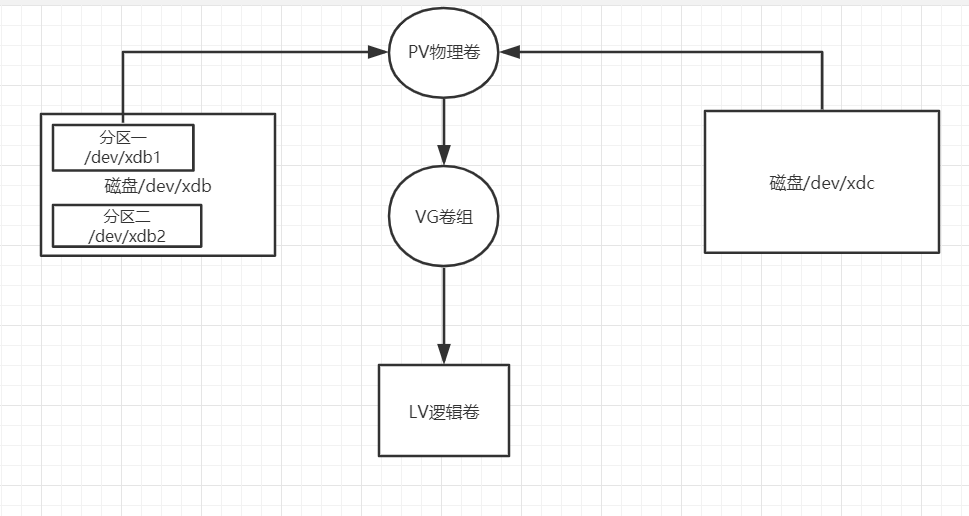
记一次阿里云LVM扩容与 LVM 相关知识学习
自由早晚乱余生 人气:2一、lvm 扩容

问题: 我们阿里云服务器有一个磁盘容量为 1T ,但是最近由于业务的扩增,磁盘容量已经不够了,需要增大磁盘的容量。磁盘挂载在 /home,使用的是 LVM。我们现在需要对磁盘进行扩容。
- 通过增加新的磁盘,然后将磁盘添加到卷组(VG),然后再将逻辑卷(LV)扩容。
- 扩容原有的磁盘。然后再将逻辑卷(LV)扩容。
1.1、方式一(增加新的磁盘)
增加新的磁盘和 原有硬盘做了分区基本一致。
实际操作
# 我们增加了一块硬盘,https://img.qb5200.com/download-x/dev/vdc
# 创建分区
[root@djx ~]# fdisk https://img.qb5200.com/download-x/dev/vdc
Welcome to fdisk (util-linux 2.23.2).

Changes will remain in memory only, until you decide to write them.
Be careful before using the write command.

Device does not contain a recognized partition table
Building a new DOS disklabel with disk identifier 0xd9ed71fb.

Command (m for help): n
Partition type:
   p   primary (0 primary, 0 extended, 4 free)
   e   extended
Select (default p): p
Partition number (1-4, default 1):
First sector (2048-1824522239, default 2048):
Using default value 2048
Last sector, +sectors or +size{K,M,G} (2048-1824522239, default 1824522239):
Using default value 1824522239
Partition 1 of type Linux and of size 870 GiB is set

Command (m for help): w
The partition table has been altered!

Calling ioctl() to re-read partition table.
Syncing disks.
# 将磁盘加入到 VG卷组。
[root@djx ~]# vgextend sdr_vg  https://img.qb5200.com/download-x/dev/vdc1
  Physical volume "https://img.qb5200.com/download-x/dev/vdc1" successfully created.
  Volume group "sdr_vg" successfully extended
# 扩容逻辑卷  https://img.qb5200.com/download-x/dev/sdr_vg/lv_data,-l 指定的是PE数量 -L +800GB
[root@djx ~]# lvextend  -l +222719 https://img.qb5200.com/download-x/dev/sdr_vg/lv_data
  Size of logical volume sdr_vg/lv_data changed from <1024.00 GiB (262143 extents) to <1.85 TiB (484862 extents).
  Logical volume sdr_vg/lv_data successfully resized.
# 修改文件系统的大小,xfs 文件系统使用xfs_growfs。
[root@djx ~]# xfs_growfs  https://img.qb5200.com/download-x/dev/sdr_vg/lv_data
meta-data=https://img.qb5200.com/download-x/dev/mapper/sdr_vg-lv_data isize=512    agcount=4, agsize=67108608 blks
         =                       sectsz=512   attr=2, projid32bit=1
         =                       crc=1        finobt=0 spinodes=0
data     =                       bsize=4096   blocks=268434432, imaxpct=25
         =                       sunit=0      swidth=0 blks
naming   =version 2              bsize=4096   ascii-ci=0 ftype=1
log      =internal               bsize=4096   blocks=131071, version=2
         =                       sectsz=512   sunit=0 blks, lazy-count=1
realtime =none                   extsz=4096   blocks=0, rtextents=0
data blocks changed from 268434432 to 496498688
# 查看磁盘是否扩容了。
[root@djx ~]# df -h
Filesystem                  Size  Used Avail Use% Mounted on
https://img.qb5200.com/download-x/dev/vda1                    40G  5.6G   32G  15% /
devtmpfs                     16G     0   16G   0% https://img.qb5200.com/download-x/dev
tmpfs                        16G   12K   16G   1% https://img.qb5200.com/download-x/dev/shm
tmpfs                        16G  540K   16G   1% /run
tmpfs                        16G     0   16G   0% /sys/fs/cgroup
https://img.qb5200.com/download-x/dev/mapper/sdr_vg-lv_data  1.9T  965G  929G  51% /home
tmpfs                       3.2G     0  3.2G   0% /run/user/1007
1.2、方式二(扩容原有的磁盘)
原有硬盘做了分区
假设原有的磁盘为 https://img.qb5200.com/download-x/dev/xdc ,已有分区 https://img.qb5200.com/download-x/dev/xdc1,我们对磁盘 https://img.qb5200.com/download-x/dev/xdc 扩容了。
fdisk  https://img.qb5200.com/download-x/dev/xdc   # 依次输入 n  --》 p --> 默认 --》 默认 --》 w   这样就将新加的磁盘空间到一个新的分区https://img.qb5200.com/download-x/dev/xdc2,
# 我们将该分区加入到卷组。

vgextend  卷组的名称  https://img.qb5200.com/download-x/dev/xdc2

vgdisplay  # 查看卷组的空闲空间。

# 将扩容的空间添加到逻辑卷
lvextend -l +2558 https://img.qb5200.com/download-x/dev/vg_test/lv_test  # -l 指定的是PE数,我们可以使用 -L 来指定实际容量。 lvextend -L +9.99G https://img.qb5200.com/download-x/dev/vg_test/lv_test

# 修改文件系统的大小
## ext* 使用的命令

resize2fs  https://img.qb5200.com/download-x/dev/vg_test/lv_test
## xfs 使用的命令
xfs_growfs https://img.qb5200.com/download-x/dev/vg_test/lv_test
原有硬盘未做分区
我们在阿里云选择磁盘扩容,并选择在线扩容(限制条件见阿里云官网文档)。扩容好了,我们可以在服务端进行使用 fidisk -l 查看,我们可以发现磁盘已经变大了。但是我们的物理卷没有变化。
# pv 物理卷扩容后重新识别大小。
pvresize  https://img.qb5200.com/download-x/dev/xdb
pvdisplay # 在 Free PE 就可以查看到我们的新增加的空间大小

# 将扩容的空间添加到逻辑卷

lvextend -l +2558 https://img.qb5200.com/download-x/dev/vg_test/lv_test  # -l 指定的是PE数,我们可以使用 -L 来指定实际容量。 lvextend -L +9.99G https://img.qb5200.com/download-x/dev/vg_test/lv_test

# 修改文件系统的大小
## ext* 使用的命令

resize2fs  https://img.qb5200.com/download-x/dev/vg_test/lv_test
## xfs 使用的命令
xfs_growfs https://img.qb5200.com/download-x/dev/vg_test/lv_test
二、扩展
LVM 的常用命令
待补充
LVM 的扩展限制
- 磁盘LV大小限制
- PE 数量限制
本部分内容来自 lvm 扩展限制 :https://www.cnblogs.com/kerrycode/p/8662780.html
创建VG时, LVM卷组(VG)的物理扩展单元(Physical Extends 缩写PE)大小是固定的, 在Linux命令行中,vgcreate 命令的选项-s表示显式设置卷组(VG)上物理卷(PV)上PE的大小。
如果你没有明确设置PE的大小的话,PE大小默认为4MB,但是,一旦这个值设定了,如果不重建VG的话, PE大小是无法修改的。这将涉及逻辑卷上的数据备份和数据恢复。
就目前的LVM2而言 - LVM版本号 2.02.06(2006-05-12),库版本为1.02.07(2006-05-11),驱动程序版本4.5.0 - 没有LVM命令或工具,甚至在HPUX中使用vgmodify,也无法动态或在线模式下调整或更改现有VG的LVM PE大小!
因此,建议在创建LVM卷组之前正确计划,例如,如果逻辑卷存储的数据很有可能在不久的将来超过300G大小的话, 那么你在创建VG的时候,就不能设定PE大小为4MB。
为了限制Linux内核内存使用量,每个逻辑卷(LV)有65,536个物理盘区(PE)的限制。因此,LVM中PE大小将直接决定逻辑卷(LV)的最大大小!例如,4MB PE大小(默认PE大小)将单个逻辑卷(LV)限制为256GB,16MB PE大小将限制单个LV增长超过1TB,等等。
除PE大小因素外,单个LV的最大尺寸也受CPU架构和Linux内核版本的限制:
Linux内核版本2.4.x将最大LV大小限制为2TB。
在2.4.x之前的一些较早的Linux内核中,最大LV大小限制为1TB(由块层中的整数签名问题引起 caused by the integer signedness problems in the block layer)。
32位CPU和Linux内核版本2.6.x的组合,逻辑卷大小的限制在16TB时最大化。
对于在64位CPU上运行的Linux内核2.6.x,最大LV大小为8EB(此时非常恐怖的大容量存储!)
翻译完成,下面是我Google搜索到关于内核版本和CPU架构对逻辑卷的大小限制的描述资料。仅供参考。


·         For 2.4 based kernels, the maximum LV size is 2TB. For some older kernels, however, the limit was 1TB due to signedness problems in the block layer. Red Hat Enterprise Linux 3 Update 5 has fixes to allow the full 2TB LVs. Consult your distribution for more information in this regard.

·

·         For 32-bit CPUs on 2.6 kernels, the maximum LV size is 16TB.

·

·         For 64-bit CPUs on 2.6 kernels, the maximum LV size is 8EB. (Yes, that is a very large number.)
有一次创建了一个LV超过265G,但是PE Size为4M,这个让我非常困惑,后面查了一下资料发现,以前有每个逻辑卷(LV)有65,536个物理盘区(PE)的限制,但是从LVM 2开始,没有限制PE的数量。
Those limits (65536 LE per LV) does not apply to LVM 2 and 2.6 kernel.
Your LV can have much more LE (I dont know if there is even reachable
limit  for  this).  One  and only feedback (if you can notice this) is
that  userspace  programs for managing LVM works _little_ slower, when
there is enormous number od LE to administrate.
I tested it with 4GB LV on 16MB LE (but I didnt see difference)
我在上面进行扩容的时候,一直担心有限制,但是在实际操作的时候是没有发现限制的,因为我的内核版本也是比较新的,lvm 版本也是大的。
加载全部内容