MyBatis Generator使用 MyBatis Generator的简单使用方法示例
转行当司机 人气:0想了解MyBatis Generator的简单使用方法示例的相关内容吗,转行当司机在本文为您仔细讲解MyBatis Generator使用的相关知识和一些Code实例,欢迎阅读和指正,我们先划重点:mybatis,generator使用,mybatis详细教程,mybatis,generator使用方法,下面大家一起来学习吧。
添加配置文件
在项目resource目录下创建mybatis-generator文件夹

在文件夹下创建generatorConfig.xml,配置需要生成代码的数据表
<?xml version="1.0" encoding="UTF-8"?>
<!DOCTYPE generatorConfiguration
  PUBLIC "-//mybatis.org//DTD MyBatis Generator Configuration 1.0//EN"
  "http://mybatis.org/dtd/mybatis-generator-config_1_0.dtd">
<generatorConfiguration>
 <properties resource="mybatis-generator/generator.properties"/>
 <!-- 连接数据库jar包的路径-->
 <!--<classPathEntry location="d:/java/JavaTools/mysql-connector-java-5.1.48/mysql-connector-java-5.1.48-bin.jar"/>-->
 <context id="DB2Tables" targetRuntime="MyBatis3">
  <commentGenerator>
   <property name="suppressDate" value="true"/>
   <!-- 是否去除自动生成的注释 true:是 : false:否 -->
   <property name="suppressAllComments" value="true"/>
  </commentGenerator>

  <!--数据库连接参数 -->
  <jdbcConnection
    driverClass="${driverClassName}"
    connectionURL="${url}"
    userId="${username}"
    password="${password}">
  </jdbcConnection>

  <javaTypeResolver>
   <property name="forceBigDecimals" value="false"/>
  </javaTypeResolver>

  <!-- 实体类的包名和存放路径 -->
  <javaModelGenerator targetPackage="com.shop.order.bean" targetProject="src/main/java">
   <property name="enableSubPackages" value="true"/>
   <property name="trimStrings" value="true"/>
  </javaModelGenerator>

  <!-- 生成映射文件*.xml的位置-->
  <sqlMapGenerator targetPackage="mapper" targetProject="src/main/resources">
   <property name="enableSubPackages" value="true"/>
  </sqlMapGenerator>

  <!-- 生成DAO的包名和位置 -->
  <javaClientGenerator type="XMLMAPPER" targetPackage="com.shop.order.mapper" targetProject="src/main/java">
   <property name="enableSubPackages" value="true"/>
  </javaClientGenerator>

  <!-- tableName:数据库中的表名或视图名;domainObjectName:生成的实体类的类名-->
  <table tableName="book" domainObjectName="Book"
    enableCountByExample="false"
    enableUpdateByExample="false"
    enableDeleteByExample="false"
    enableSelectByExample="false"
    selectByExampleQueryId="false"/>
  <!-- 可以添加多个需要生产代码的实体-->
  <!--
    <table tableName="xxx" domainObjectName="xxx"
      enableCountByExample="false"
      enableUpdateByExample="false"
      enableDeleteByExample="false"
      enableSelectByExample="false"
      selectByExampleQueryId="false"/>
    ...
    <table tableName="xxx" domainObjectName="xxx"
      enableCountByExample="false"
      enableUpdateByExample="false"
      enableDeleteByExample="false"
      enableSelectByExample="false"
      selectByExampleQueryId="false"/>
  -->
 </context>
</generatorConfiguration>
在文件夹下创建generator.properties配置文件
driverClassName=com.mysql.jdbc.Driver
url=jdbc:mysql://localhost:3306/store?useUnicode=true&characterEncoding=UTF-8&relaxAutoCommit=true&zeroDateTimeBehavior=convertToNull
username=root
password=root
配置Maven
pom.xml中引入依赖
<build>
    <plugins>
      <plugin>
        <groupId>org.mybatis.generator</groupId>
        <artifactId>mybatis-generator-maven-plugin</artifactId>
        <version>1.3.5</version>
        <configuration>
          <configurationFile>src/main/resources/mybatis-generator/generatorConfig.xml</configurationFile>
          <verbose>true</verbose>
          <overwrite>true</overwrite>
        </configuration>
        <executions>
          <execution>
            <id>Generate MyBatis Artifacts</id>
            <goals>
              <goal>generate</goal>
            </goals>
          </execution>
        </executions>
        <dependencies>
          <dependency>
            <groupId>org.mybatis.generator</groupId>
            <artifactId>mybatis-generator-core</artifactId>
            <version>1.3.5</version>
          </dependency>
          <dependency>
            <groupId>mysql</groupId>
            <artifactId>mysql-connector-java</artifactId>
            <version>5.1.30</version>
          </dependency>
        </dependencies>
      </plugin>
    </plugins>
  </build>
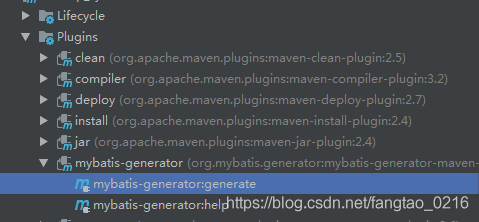
执行Maven插件
双击运行mybatis-generator:generate

控制台输出结果,生产mapper和bean文件

总结
加载全部内容