VisualStudio2019 配置点云库 PCL1.11.0 Win10 系统下VisualStudio2019 配置点云库 PCL1.11.0的图文教程
点云侠 人气:0一、下载PCL1.11.0
Github下载地址:https://github.com/PointCloudLibrary/pcl/releases
下载红框内的两个文件

二、安装PCL1.11.0
2.1 安装“PCL-1.11.0-AllInOne-msvc2019-win64.exe”。
(1)选择第二个,自动添加系统变量
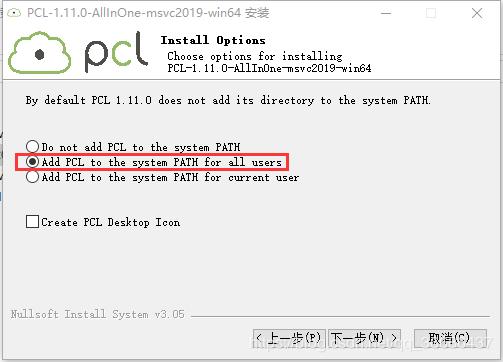
(2)安装路径选择D盘,系统会自动新建PCL 1.11.0文件夹。
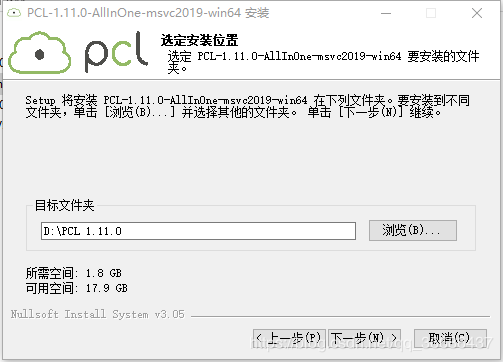
2.2 安装完成之后打开文件夹 D:\PCL 1.11.0\3rdParty\OpenNI2
双击OpenNI-Windows-x64-2.2 选择路径(D:\PCL 1.11.0\3rdParty\OpenNI2)安装即可。

2.3 全部安装完成后,将pcl-1.11.0-pdb-msvc2019-win64.zip解压后的.pdb文件拷贝到(D:\PCL 1.11.0\bin)中。
2.4 设置环境变量:右击计算机—属性—高级系统设置—高级—环境变量—用户变量—Path—编辑!
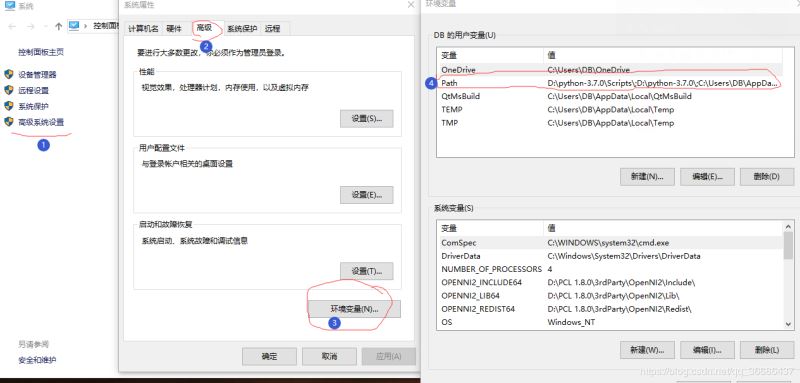
如下图所示,设置完成后重启电脑。
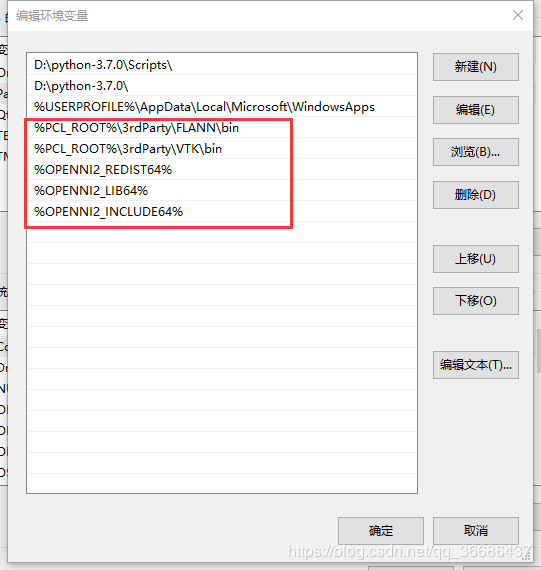
在这里直接给出,防止出现错误(依次添加):
%PCL_ROOT%\3rdParty\FLANN\bin
%PCL_ROOT%\3rdParty\VTK\bin
%OPENNI2_REDIST64%
%OPENNI2_LIB64%
%OPENNI2_INCLUDE64%
到此,环境变量的配置完成。
三、VS2019相关设置
3.1 新建空项目
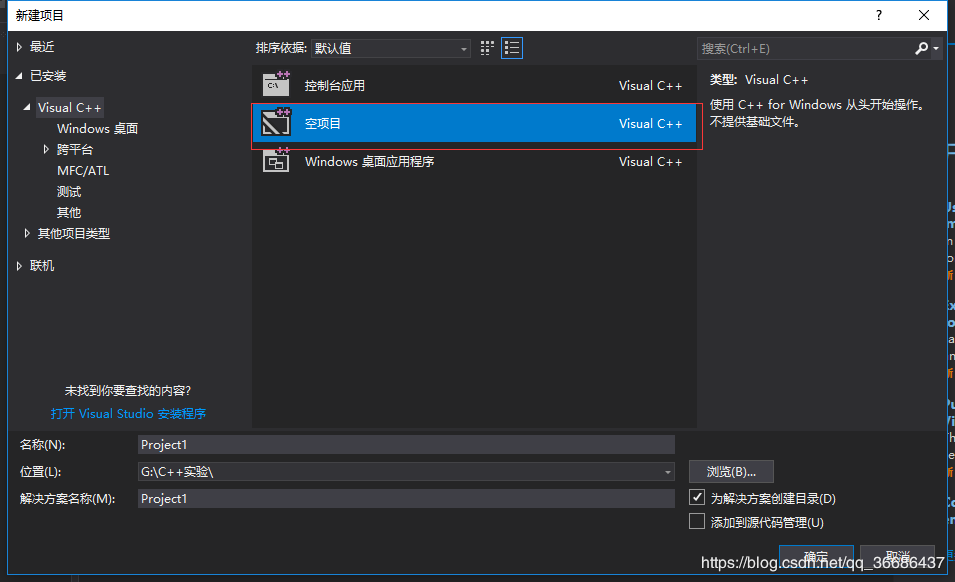
解决方案配置选择Debug,解决方案平台选择x64。

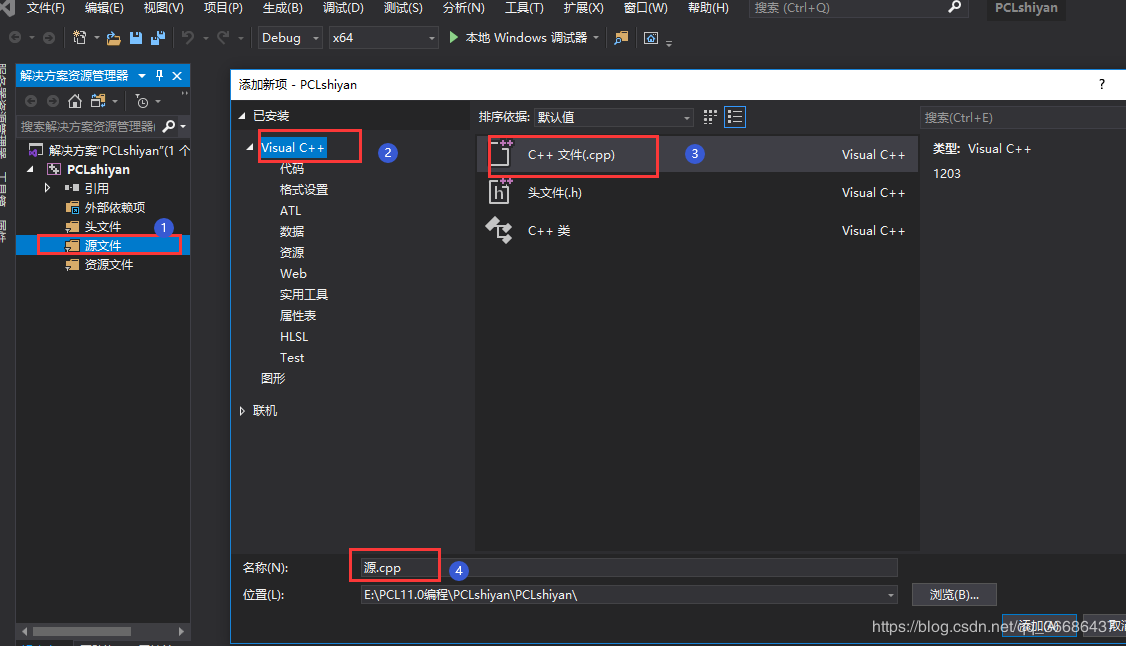
3.2 新建一个C++源文件
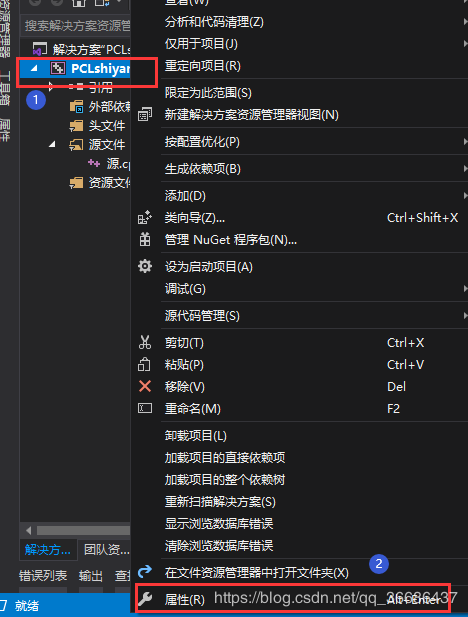
3.3 右击新建的项目—属性:打开属性表
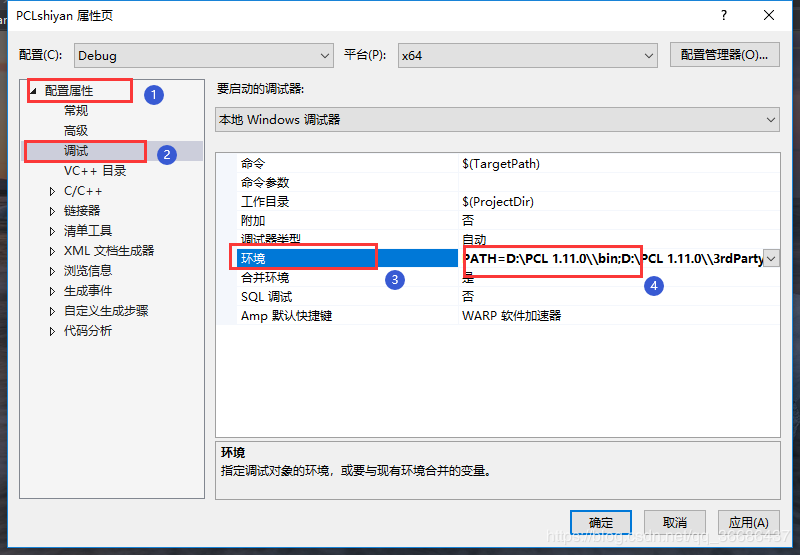
3.4 配置属性—调试—环境—添加:
PATH=D:\PCL 1.11.0\\bin;D:\PCL 1.11.0\\3rdParty\FLANN\bin;D:\PCL 1.11.0\\3rdParty\VTK\bin;D:\PCL 1.11.0\\3rdParty\OpenNI2\Tools
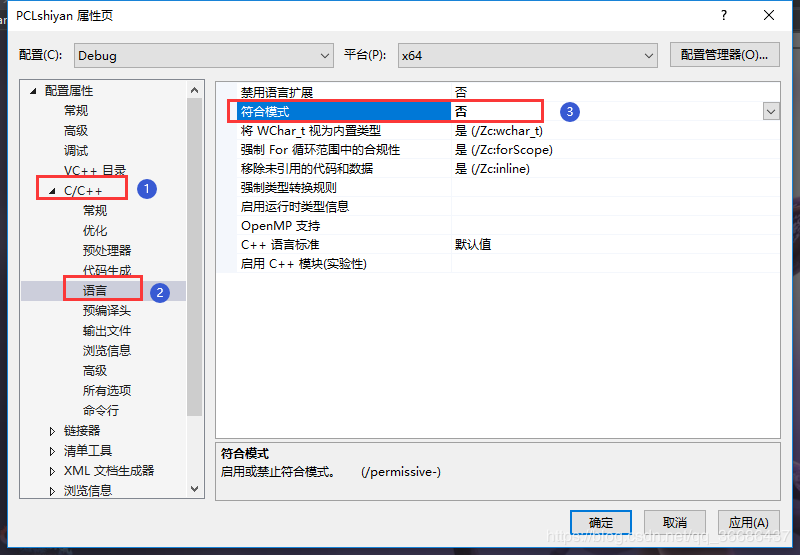
3.5 C/C++—语言—符合模式:否
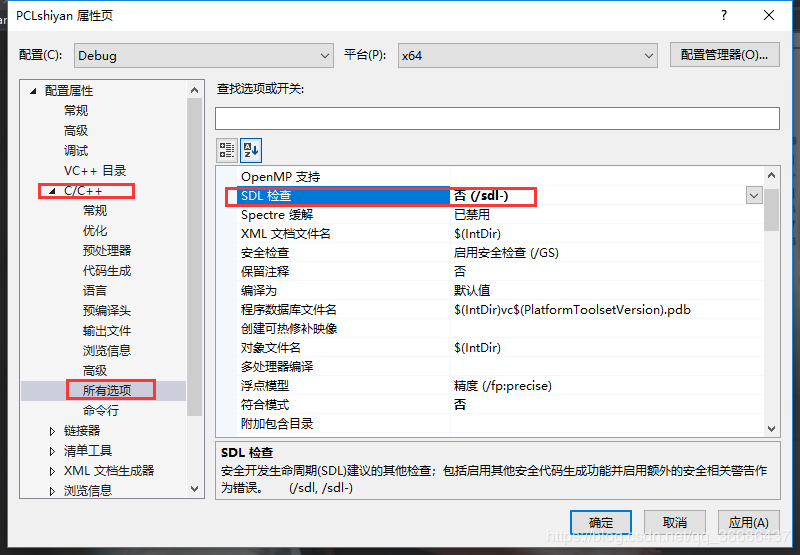
3.6 C/C++—常规—SDL检查:否
四、配置PCL1.11.0
为了使用方便,这里使用添加属性表的形式
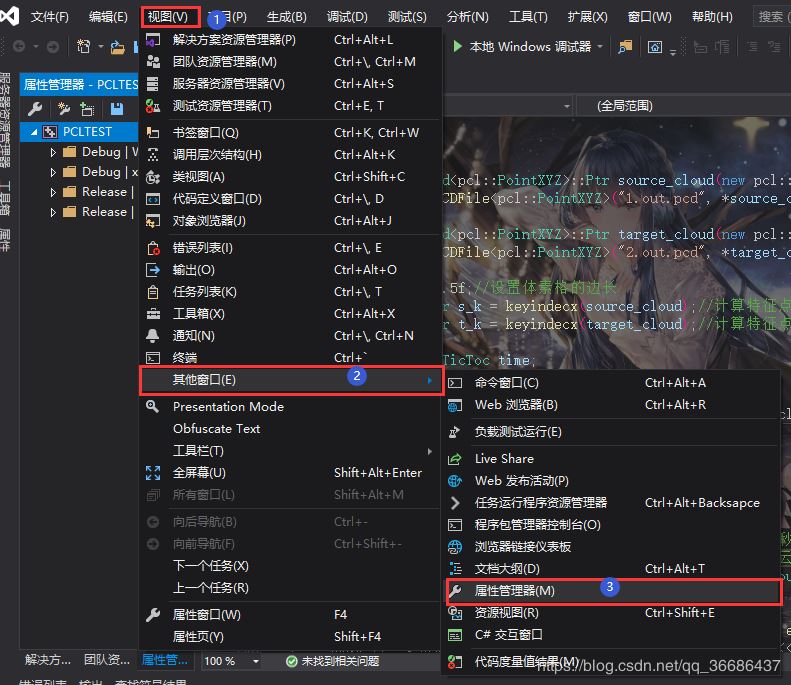
4.1 视图—其他窗口—属性管理器
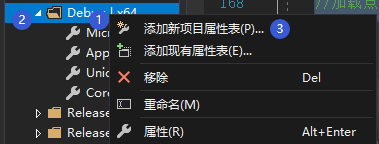
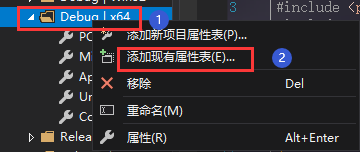
4.2 打开属性管理器之后,选择Debug|X64—单击Debug|X64左侧倒三角—右击选择 添加型项目属性表
4.3 项目属性表命名
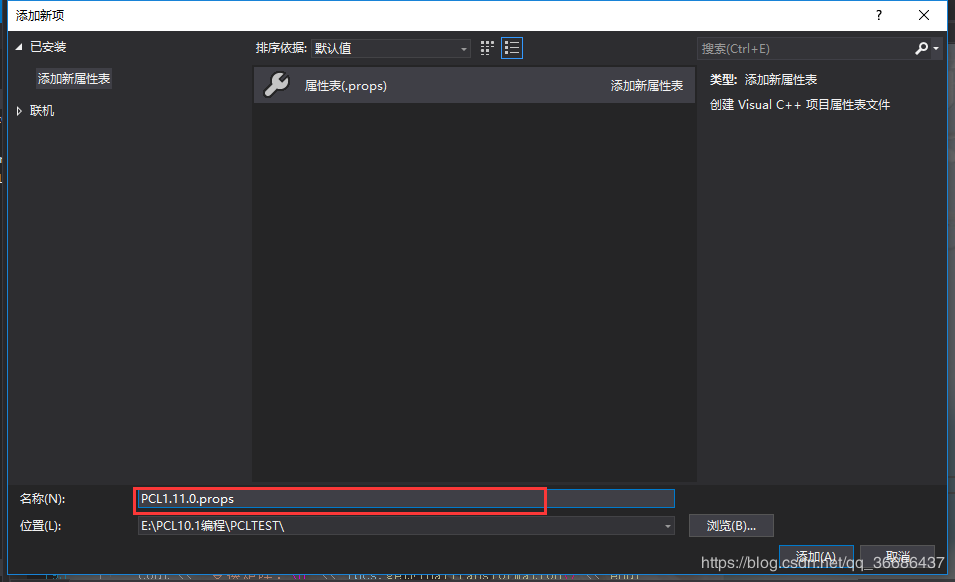
4.4 双击新添加的属性表—VC++目录—包含目录,添加7个include路径
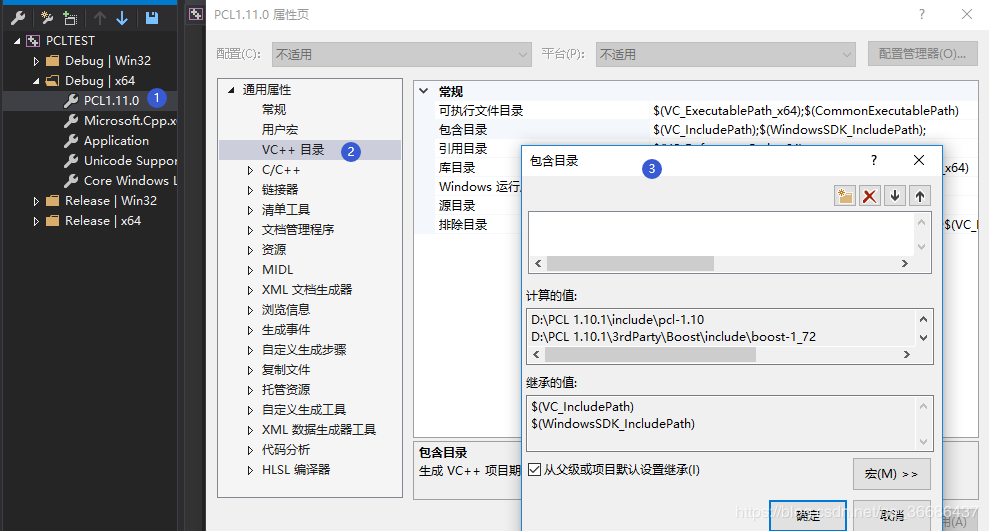
具体添加的include路径如下:
D:\PCL 1.11.0\include\pcl-1.11
D:\PCL 1.11.0\3rdParty\Boost\include\boost-1_73
D:\PCL 1.11.0\3rdParty\Eigen\eigen3
D:\PCL 1.11.0\3rdParty\FLANN\include
D:\PCL 1.11.0\3rdParty\Qhull\include
D:\PCL 1.11.0\3rdParty\VTK\include\vtk-8.2
D:\PCL 1.11.0\3rdParty\OpenNI2\Include
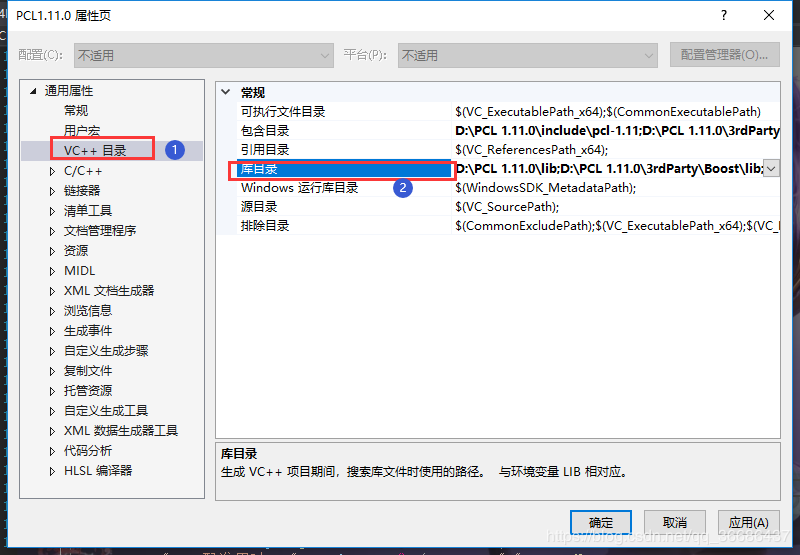
4.5 VC++目录—包含目录,添加6个lib路径
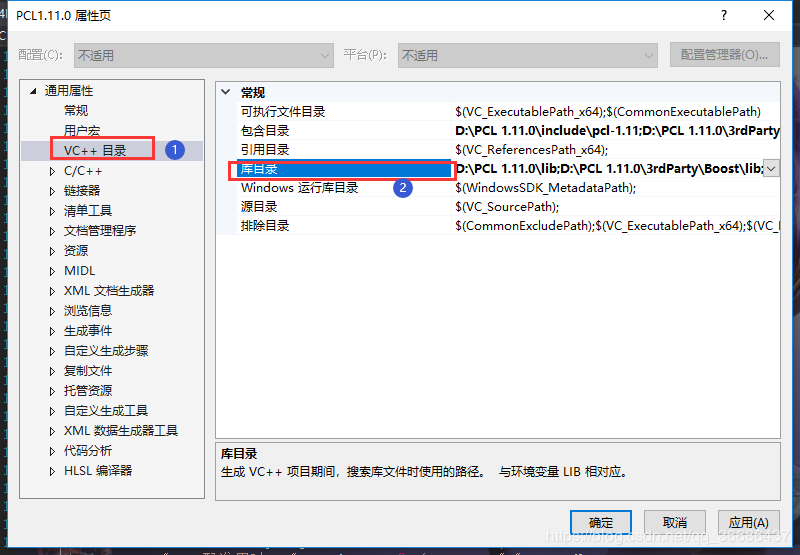
具体添加的lib路径如下:
D:\PCL 1.11.0\lib
D:\PCL 1.11.0\3rdParty\Boost\lib
D:\PCL 1.11.0\3rdParty\FLANN\lib
D:\PCL 1.11.0\3rdParty\Qhull\lib
D:\PCL 1.11.0\3rdParty\OpenNI2\Lib
D:\PCL 1.11.0\3rdParty\VTK\lib
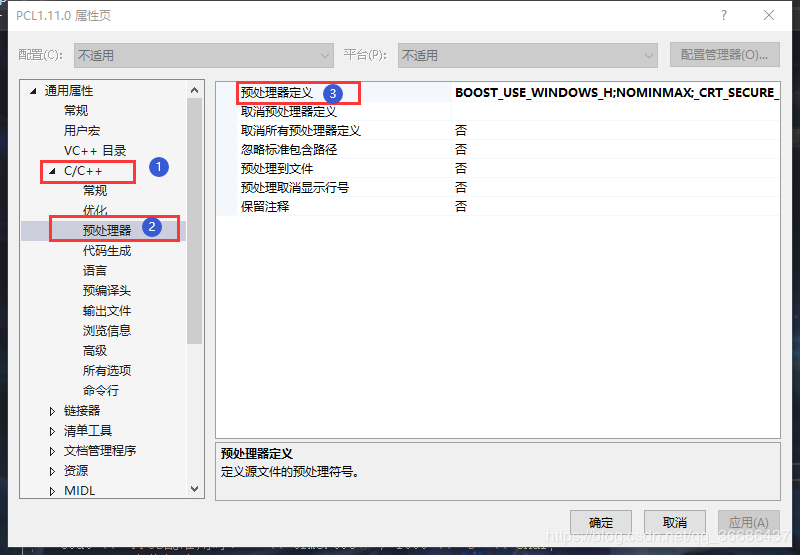
4.6 C/C++—预处理器—预处理器定义—添加:
BOOST_USE_WINDOWS_H
NOMINMAX
_CRT_SECURE_NO_DEPRECATE
4.7 链接器—输入—附加依赖项——添加PCL和VTK的相关lib文件。我用的Debug版本。
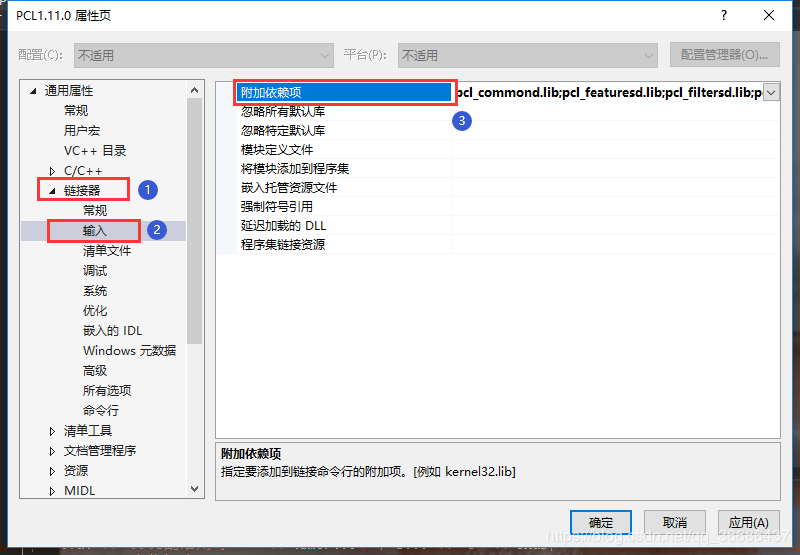
附加依赖项具体添加内容如下:(内容略多,放在PCL1.11.0附加依赖项里边了。文章末尾 附录中 给出批量获取附加依赖项的方法)
输入到属性表里边的时候必须一行对应一个lib才能成功。
Debug版本
4.8保存属性表
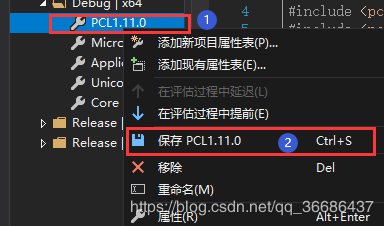
下一次需要创建新项目的时候,只需进行第三步 VS2019相关设置 的操作,然后打开属性管理器,添加现有属性表,找到之前保存的属性表添加进去即可。
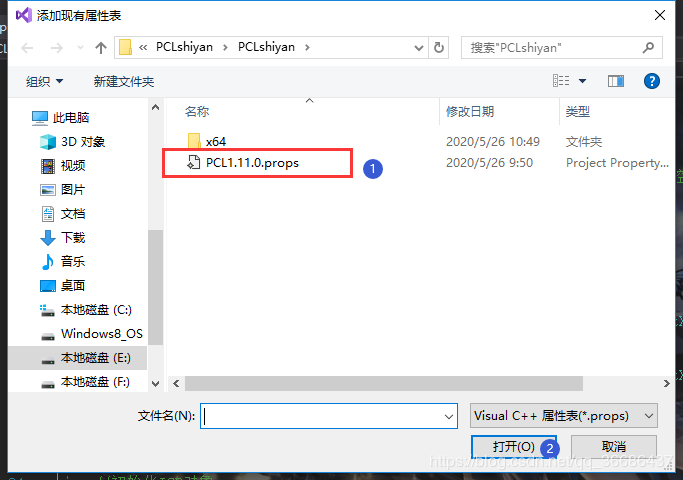
五、测试代码
#include <iostream>
#include <vector>
#include <ctime>
#include <pcl/point_cloud.h>
#include <pcl/octree/octree.h>
#include <boost/thread/thread.hpp>
#include <pcl/visualization/pcl_visualizer.h>
using namespace std;
int
main(int argc, char** argv)
{
	srand((unsigned int)time(NULL));
	pcl::PointCloud<pcl::PointXYZ>::Ptr cloud(new pcl::PointCloud<pcl::PointXYZ>);
	// 创建点云数据
	cloud->width = 1000;
	cloud->height = 1;
	cloud->points.resize(cloud->width * cloud->height);
	for (size_t i = 0; i < cloud->points.size(); ++i)
	{
		cloud->points[i].x = 1024.0f * rand() / (RAND_MAX + 1.0f);
		cloud->points[i].y = 1024.0f * rand() / (RAND_MAX + 1.0f);
		cloud->points[i].z = 1024.0f * rand() / (RAND_MAX + 1.0f);
	}

	pcl::octree::OctreePointCloudSearch<pcl::PointXYZ> octree(0.1);
	octree.setInputCloud(cloud);
	octree.addPointsFromInputCloud();
	pcl::PointXYZ searchPoint;
	searchPoint.x = 1024.0f * rand() / (RAND_MAX + 1.0f);
	searchPoint.y = 1024.0f * rand() / (RAND_MAX + 1.0f);
	searchPoint.z = 1024.0f * rand() / (RAND_MAX + 1.0f);

	//半径内近邻搜索
	vector<int>pointIdxRadiusSearch;
	vector<float>pointRadiusSquaredDistance;
	float radius = 256.0f * rand() / (RAND_MAX + 1.0f);
	cout << "Neighbors within radius search at (" << searchPoint.x
		<< " " << searchPoint.y
		<< " " << searchPoint.z
		<< ") with radius=" << radius << endl;
	if (octree.radiusSearch(searchPoint, radius, pointIdxRadiusSearch, pointRadiusSquaredDistance) > 0)
	{
		for (size_t i = 0; i < pointIdxRadiusSearch.size(); ++i)
			cout << "  " << cloud->points[pointIdxRadiusSearch[i]].x
			<< " " << cloud->points[pointIdxRadiusSearch[i]].y
			<< " " << cloud->points[pointIdxRadiusSearch[i]].z
			<< " (squared distance: " << pointRadiusSquaredDistance[i] << ")" << endl;
	}
	// 初始化点云可视化对象
	boost::shared_ptr<pcl::visualization::PCLVisualizer>viewer(new pcl::visualization::PCLVisualizer("显示点云"));
	viewer->setBackgroundColor(0, 0, 0); //设置背景颜色为黑色
	// 对点云着色可视化 (red).
	pcl::visualization::PointCloudColorHandlerCustom<pcl::PointXYZ>target_color(cloud, 255, 0, 0);
	viewer->addPointCloud<pcl::PointXYZ>(cloud, target_color, "target cloud");
	viewer->setPointCloudRenderingProperties(pcl::visualization::PCL_VISUALIZER_POINT_SIZE, 1, "target cloud");

	// 等待直到可视化窗口关闭
	while (!viewer->wasStopped())
	{
		viewer->spinOnce(100);
		boost::this_thread::sleep(boost::posix_time::microseconds(1000));
	}

	return (0);
}
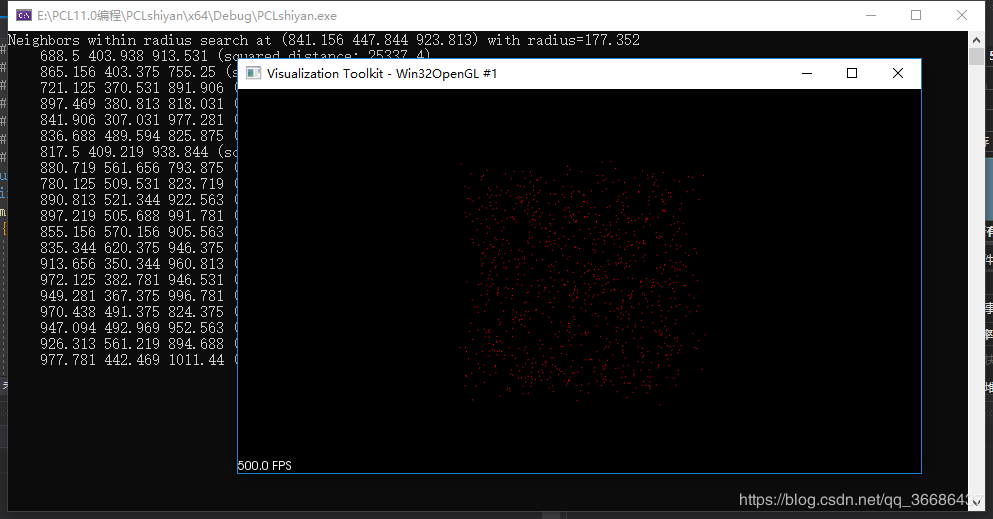
输出下图(数字可能不同),则表示安装成功!
六、附录—获取自己的链接库列表
win+r调出“运行”窗口并输出cmd
输入:cd /d D:\PCL 1.11.0\3rdParty\VTK\lib 回车 (填自己的路径)
输入:dir /b *.lib *>0.txt 回车
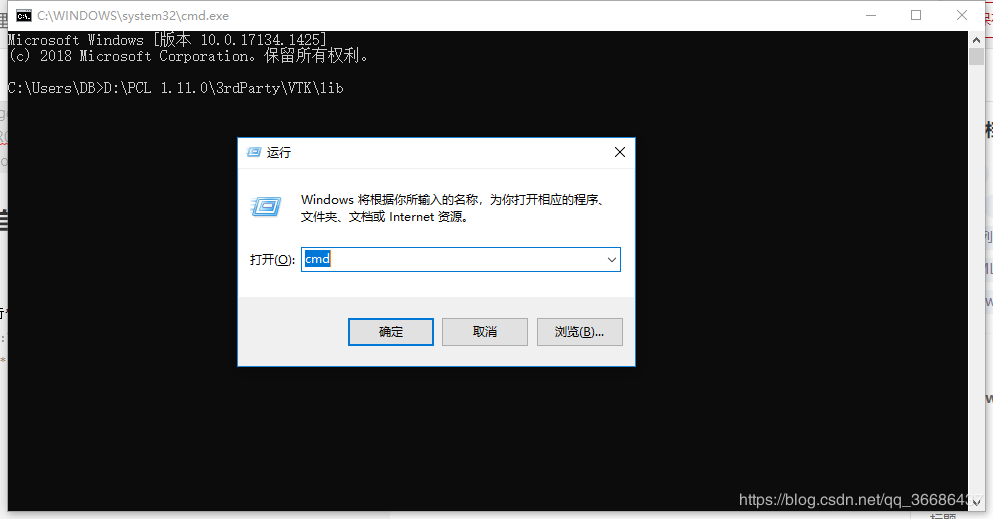
这时打开你对应路劲的目录,多了一个0.txt文件,里面存了你这个文件夹里所有链接库名字。
由于每一个Debug版本和Release版本的链接库是挨在一起的。写一个读取文档并对其分别保存就行了。
具体代码如下:(主要功能是读取一个txt文件,将其中奇数行和偶数行单独输出到新的txt文档。)
#include <iostream>
#include <string>
#include <fstream>
#include <iostream>
using namespace std;

int main()
{
	ifstream txtfile;//打开读取的文件
	ofstream txt01;//保存的文件
	ofstream txt02;//保存的文件
	string temp;
	int index = 0;//用于判断奇偶

	txtfile.open("0.txt", ios::in);

	while (!txtfile.eof())      // 若未到文件结束一直循环
	{

		getline(txtfile, temp);//一行一行读取
		if (index%2==0)//判断除以2的余数,即为奇偶的判断
		{
			txt01.open("1.txt", ios::app);
			txt01 << temp;
			txt01 << endl;
			txt01.close();
		}
		else
		{
			txt02.open("2.txt", ios::app);
			txt02 << temp;
			txt02 << endl;
			txt02.close();
		}
		index++;
	}
	txtfile.close();  //关闭文件
	txtfile.close();
	txt01.close();
	txt02.close();

	return 0;
}
加载全部内容