搞定SpringBoot多数据源(2):动态数据源
Mason技术记录 人气:1目录
- 1. 引言
- 2. 动态数据源流程说明
- 3. 实现动态数据源
- 3.1 说明及数据源配置
- 3.1.1 包结构说明
- 3.1.2 数据库连接信息配置
- 3.1.3 数据源配置
- 3.2 动态数据源设置
- 3.2.1 动态数据源配置
- 3.2.2 动态选择数据源
- 3.2.3 动态数据源使用
- 3.3 使用 AOP 选择数据源
- 3.3.1 定义数据源注解
- 3.3.2 定义数据源切面
- 3.3.3 使用 AOP 进行数据源切换
- 3.1 说明及数据源配置
- 4. 再思考一下
- 5. 总结
- 参考资料
- 往期文章
一句话概括:使用动态数据源对多个数据库进行操作,灵活,简洁。
1. 引言
对于多个数据库的处理,上一篇文章《搞定SpringBoot多数据源(1):多套源策略》已有提及,有多套数据源、动态数据源、参数化变更数据源等方式,本文是第二篇:“动态数据源”。动态数据源可以解决多套数据源的处理不够灵活、占用资源多等问题。用户可以根据实际的业务需要,统一操作逻辑,只要在需要切换数据源的进行处理即可。何为动态,其实是批切换数据源的时机可以动态选择,在需要的地方进行切换即可。
本文延续上一篇文章的示例,以主从场景为示例,结合代码,对动态数据源的实现进行讲解,内容包括搭建动态数据源原理、动态数据源配置、动态数据源使用,AOP 注解方式切换数据源等。
本文所涉及到的示例代码:https://github.com/mianshenglee/my-example/tree/master/multi-datasource,读者可结合一起看。
2. 动态数据源流程说明
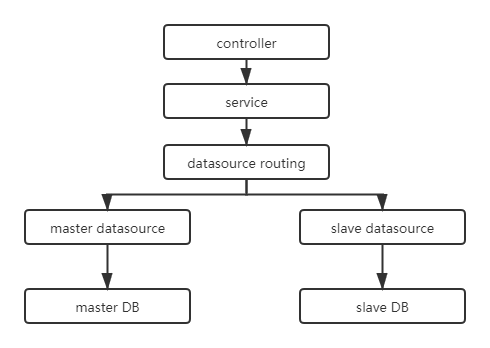
Spring Boot 的动态数据源,本质上是把多个数据源存储在一个 Map 中,当需要使用某个数据源时,从 Map 中获取此数据源进行处理。而在 Spring 中,已提供了抽象类 AbstractRoutingDataSource 来实现此功能。因此,我们在实现动态数据源的,只需要继承它,实现自己的获取数据源逻辑即可。动态数据源流程如下所示:

用户访问应用,在需要访问不同的数据源时,根据自己的数据源路由逻辑,访问不同的数据源,实现对应数据源的操作。本示例中的两数据库的分别有一个表 test_user,表结构一致,为便于说明,两个表中的数据是不一样的。两个表结构可在示例代码中的 sql 目录中获取。
3. 实现动态数据源
3.1 说明及数据源配置
3.1.1 包结构说明
本示例中,主要有以下几个包:
├─annotation ---- // 自定义注解
├─aop ----------- // 切面
├─config -------- // 数据源配置
├─constants ----- // 常用注解
├─context ------- // 自定义上下文
├─controller ---- // 访问接口
├─entity -------- // 实体
├─mapper -------- // 数据库dao操作
├─service ------- // 服务类
└─vo ------------ // 视图返回数据
3.1.2 数据库连接信息配置
Spring Boot 的默认配置文件是 application.properties ,由于有两个数据库配置,独立配置数据库是好的实践,因此添加配置文件 jbdc.properties ,添加以下自定义的主从数据库配置:
# master
spring.datasource.master.driver-class-name=com.mysql.cj.jdbc.Driver
spring.datasource.master.jdbc-url=jdbc:mysql://localhost:3306/mytest?useSSL=false&serverTimezone=GMT%2B8&characterEncoding=UTF-8
spring.datasource.master.username=root
spring.datasource.master.password=111111

# slave
spring.datasource.slave.driver-class-name=com.mysql.cj.jdbc.Driver
spring.datasource.slave.jdbc-url=jdbc:mysql://localhost:3306/my_test1?useSSL=false&serverTimezone=GMT%2B8&characterEncoding=UTF-8
spring.datasource.slave.username=root
spring.datasource.slave.password=111111
3.1.3 数据源配置
根据连接信息,把数据源注入到 Spring 中,添加 DynamicDataSourceConfig 文件,配置如下:
@Configuration
@PropertySource("classpath:config/jdbc.properties")
@MapperScan(basePackages = "me.mason.demo.dynamicdatasource.mapper")
public class DynamicDataSourceConfig {
    @Bean(DataSourceConstants.DS_KEY_MASTER)
    @ConfigurationProperties(prefix = "spring.datasource.master")
    public DataSource masterDataSource() {
        return DataSourceBuilder.create().build();
    }

    @Bean(DataSourceConstants.DS_KEY_SLAVE)
    @ConfigurationProperties(prefix = "spring.datasource.slave")
    public DataSource slaveDataSource() {
        return DataSourceBuilder.create().build();
    }
}
注意:
- 此处使用
PropertySource指定配置文件,ConfigurationProperties指定数据源配置前缀- 使用
MapperScan指定包,自动注入相应的 mapper 类。- 把数据源常量写在
DataSourceConstants类中- 从此配置可以看到,已经把 SqlSessionFactory 这个配置从代码中擦除,直接使用 Spring Boot 自动配置的 SqlSessionFactory 即可,无需我们自己配置。
3.2 动态数据源设置
前面的配置已把多个数据源注入到 Spring 中,接着对动态数据源进行配置。
3.2.1 动态数据源配置
** (1) 添加jdbc依赖 **
<dependency>
    <groupId>org.springframework.boot</groupId>
    <artifactId>spring-boot-starter-jdbc</artifactId>
<https://img.qb5200.com/download-x/dependency>
** (2) 添加动态数据源类 **
public class DynamicDataSource extends AbstractRoutingDataSource {
    @Override
    protected Object determineCurrentLookupKey() {
        // 此处暂时返回固定 master 数据源, 后面按动态策略修改
        return DataSourceConstants.DS_KEY_MASTER;
    }
}
注意:
- 继承抽象类
AbstractRoutingDataSource,需要实现方法determineCurrentLookupKey,即路由策略。- 动态路由策略下一步实现,当前策略直接返回 master 数据源
(3) 设置动态数据源为主数据源
在前面的数据源配置文件 DynamicDataSourceConfig 中,添加以下代码:
@Bean
@Primary
public DataSource dynamicDataSource() {
    Map<Object, Object> dataSourceMap = new HashMap<>(2);
    dataSourceMap.put(DataSourceConstants.DS_KEY_MASTER, masterDataSource());
    dataSourceMap.put(DataSourceConstants.DS_KEY_SLAVE, slaveDataSource());
    //设置动态数据源
    DynamicDataSource dynamicDataSource = new DynamicDataSource();
    dynamicDataSource.setTargetDataSources(dataSourceMap);
    dynamicDataSource.setDefaultTargetDataSource(masterDataSource());

    return dynamicDataSource;
}
- 使用 Map 保存多个数据源,并设置到动态数据源对象中。
- 设置默认的数据源是 master 数据源
- 使用注解
Primary优先从动态数据源中获取
同时,需要在 DynamicDataSourceConfig 中,排除 DataSourceAutoConfiguration 的自动配置,否则 会出现The dependencies of some of the beans in the application context form a cycle的错误。
@EnableAutoConfiguration(exclude = { DataSourceAutoConfiguration.class })3.2.2 动态选择数据源
(1) 数据源 key 的上下文
前面固定写了一个数据源路由策略,总是返回 master,显然不是我们想要的。我们想要的是在需要的地方,想切换就切换。因此,需要有一个动态获取数据源 key 的地方(我们称为上下文),对于 web 应用,访问以线程为单位,使用 ThreadLocal 就比较合适,如下:
public class DynamicDataSourceContextHolder {
    /**
     * 动态数据源名称上下文
     */
    private static final ThreadLocal<String> DATASOURCE_CONTEXT_KEY_HOLDER = new ThreadLocal<>();
    /**
     * 设置/切换数据源
     */
    public static void setContextKey(String key){
        DATASOURCE_CONTEXT_KEY_HOLDER.set(key);
    }
    /**
     * 获取数据源名称
     */
    public static String getContextKey(){
        String key = DATASOURCE_CONTEXT_KEY_HOLDER.get();
        return key == null?DataSourceConstants.DS_KEY_MASTER:key;
    }

    /**
     * 删除当前数据源名称
     */
    public static void removeContextKey(){
        DATASOURCE_CONTEXT_KEY_HOLDER.remove();
    }
以 DATASOURCE_CONTEXT_KEY_HOLDER 存储需要使用数据源 key
getContextKey 时,若 key 为空,默认返回 master
(2) 设置动态数据 DynamicDataSource 路由策略
我们需要达到的路由策略是,当设置数据源 key 到上下文,则从上下文中得到此数据源 key ,从而知道使用此对应的数据源。因此,修改前面 DynamicDataSource 的 determineCurrentLookupKey 方法如下:
@Override
protected Object determineCurrentLookupKey() {
    return DynamicDataSourceContextHolder.getContextKey();
}
3.2.3 动态数据源使用
有了上面的动态路由选择,则不需要像之前的多套数据源那样,mapper、entity、service等都写一套相同逻辑的代码,因为是主从,一般来说数据库结构是一致的,只需要一套entity、mapper、service即可,在需要在不同的数据源进行操作时,直接对上下文进行设置即可。如下:
@RestController
@RequestMapping("/user")
public class TestUserController {

    @Autowired
    private TestUserMapper testUserMapper;

    /**
     * 查询全部
     */
    @GetMapping("/listall")
    public Object listAll() {
        int initSize = 2;
        Map<String, Object> result = new HashMap<>(initSize);
        //默认master查询
        QueryWrapper<TestUser> queryWrapper = new QueryWrapper<>();
        List<TestUser> resultData = testUserMapper.selectAll(queryWrapper.isNotNull("name"));
        result.put(DataSourceConstants.DS_KEY_MASTER, resultData);

        //切换数据源,在slave查询
        DynamicDataSourceContextHolder.setContextKey(DataSourceConstants.DS_KEY_SLAVE);
        List<TestUser> resultDataSlave = testUserMapper.selectList(null);
        result.put(DataSourceConstants.DS_KEY_SLAVE, resultDataSlave);
        //恢复数据源
        DynamicDataSourceContextHolder.removeContextKey();
        //返回数据
        return ResponseResult.success(result);
    }

}
- 默认是使用 master 数据源查询
- 使用上下文的 setContextKey 来切换数据源,使用完后使用 removeContextKey 进行恢复
3.3 使用 AOP 选择数据源
经过上面的动态数据源配置,可以实现动态数据源切换,但我们会发现,在进行数据源切换时,都需要做 setContextKey 和 removeContextKey 操作,如果需要切换的方法比多,就会发现很多重复的代码,如何消除这些重复的代码,就需要用到动态代理了,如果不了解动态代理,可以参考一下我的这篇文章《java开发必学知识:动态代理》。在 Spring 中,AOP 的实现也是基于动态代理的。此处,我们希望通过注解的方式指定函数需要的数据源,从而消除数据源切换时产品的模板代码。
3.3.1 定义数据源注解
在annotation包中,添加数据源注解 DS,此注解可以写在类中,也可以写在方法定义中,如下所示:
@Target({ElementType.METHOD,ElementType.TYPE})
@Retention(RetentionPolicy.RUNTIME)
public @interface DS {
    /**
     * 数据源名称
     */
    String value() default DataSourceConstants.DS_KEY_MASTER;
}
3.3.2 定义数据源切面
定义数据源切面,此切面可以针对使用了 DS 注解的方法或者类,进行数据源切换。
(1)添加aop依赖
<dependency>
    <groupId>org.springframework.boot</groupId>
    <artifactId>spring-boot-starter-aop</artifactId>
<https://img.qb5200.com/download-x/dependency>
(2) 定义切面
@Aspect
@Component
public class DynamicDataSourceAspect {
    @Pointcut("@annotation(me.mason.demo.dynamicdatasource.annotation.DS)")
    public void dataSourcePointCut(){

    }

    @Around("dataSourcePointCut()")
    public Object around(ProceedingJoinPoint joinPoint) throws Throwable {
        String dsKey = getDSAnnotation(joinPoint).value();
        DynamicDataSourceContextHolder.setContextKey(dsKey);
        try{
            return joinPoint.proceed();
        }finally {
            DynamicDataSourceContextHolder.removeContextKey();
        }
    }

    /**
     * 根据类或方法获取数据源注解
     */
    private DS getDSAnnotation(ProceedingJoinPoint joinPoint){
        Class<?> targetClass = joinPoint.getTarget().getClass();
        DS dsAnnotation = targetClass.getAnnotation(DS.class);
        // 先判断类的注解,再判断方法注解
        if(Objects.nonNull(dsAnnotation)){
            return dsAnnotation;
        }else{
            MethodSignature methodSignature = (MethodSignature)joinPoint.getSignature();
            return methodSignature.getMethod().getAnnotation(DS.class);
        }
    }
}
- 注解 Pointcut 使用
annotation指定注解- 注解 Around 使用环绕通知处理,使用上下文进行对使用注解
DS的值进行数据源切换,处理完后,恢复数据源。
3.3.3 使用 AOP 进行数据源切换
在service层,我们定义一个 TestUserService ,里面有两个方法,分别是从 master 和 slave 中获取数据,使用了注解DS,如下:
/**
 * 查询master库User
 */
@DS(DataSourceConstants.DS_KEY_MASTER)
public List<TestUser> getMasterUser(){
    QueryWrapper<TestUser> queryWrapper = new QueryWrapper<>();
    return testUserMapper.selectAll(queryWrapper.isNotNull("name"));
}

/**
 * 查询slave库User
 */
@DS(DataSourceConstants.DS_KEY_SLAVE)
public List<TestUser> getSlaveUser(){ return testUserMapper.selectList(null); }
这样定义后,在 controller 层的处理就可以变成:
@GetMapping("/listall")
public Object listAll() {
    int initSize = 2;
    Map<String, Object> result = new HashMap<>(initSize);
    //默认master数据源查询
    List<TestUser> masterUser = testUserService.getMasterUser();
    result.put(DataSourceConstants.DS_KEY_MASTER, masterUser);
    //从slave数据源查询
    List<TestUser> slaveUser = testUserService.getSlaveUser();
    result.put(DataSourceConstants.DS_KEY_SLAVE, slaveUser);
    //返回数据
    return ResponseResult.success(result);
}
由此可见,已经把数据库切换的模板代码消除,只需要关注业务逻辑处理即可。这就是AOP的好处。
4. 再思考一下
经过上面的动态数据源及 AOP 选择数据源的讲解,我们可以看到动态数据源已经很灵活,想切换只需在上下文中进行设置数据源即可,也可以直接在方法或类中使用注解来完成。现在我们是手动编码实现的,其实,对于MyBatis Plus ,它也提供了一个动态数据源的插件,有兴趣的小伙伴也可以根据它的官方文档进行实验使用。
对于动态数据源,还有哪些地方需要考虑或者说值得改进的地方呢?
- 事务如何处理?其实在开发中应该尽量避免跨库事务,但如果避免不了,则需要使用分布式事务。
- 对于当前的动态数据源,相对来说还是固定的数据源(如一主一从,一主多从等),即在编码时已经确定的数据库数量,只是在具体使用哪一个时进行动态处理。如果数据源本身并不确定,或者说需要根据用户输入来连接数据库,这时,如何处理呢?这种情况出现得比较多的是在对多个数据库进行管理时的处理。这种情况,我将在下一篇文章中进行讲解,我把它叫做"参数化变更数据源"。
5. 总结
本文对动态数据源的实现进行了讲解,主要是动态数据源的配置、实现、使用,另外还使用 AOP 消除切换数据源时的模板代码,使我们开发专注于业务代码,最后对动态数据源的进行了一下扩展思考。希望小伙伴们可以掌握动态数据源的处理。
本文配套的示例,示例代码,有兴趣的可以运行示例来感受一下。
参考资料
- Spring主从数据库的配置和动态数据源切换原理:
https://www.liaoxuefeng.com/article/1182502273240832 - 多数据源与动态数据源的权衡:
https://juejin.im/post/5b790a866fb9a019ea01f38c - 谈谈Spring Boot 数据源加载及其多数据源简单实现:
https://juejin.im/post/5cb0023d5188250df17d4ffc - Spring Boot 和 MyBatis 实现多数据源、动态数据源切换:
https://juejin.im/post/5a927d23f265da4e7e10d740
往期文章
- 搞定SpringBoot多数据源(1):多套源策略
- java开发必学知识:动态代理
- 2019 读过的好书推荐
- springboot+apache前后端分离部署https
- springboot+logback 日志输出企业实践(下)
- springboot+logback 日志输出企业实践(上)
我的公众号(搜索Mason技术记录),获取更多技术记录:

加载全部内容