Mybatis 逆向工程的三种方法详解
lytao123 人气:0Mybatis 逆向工程
逆向工程通常包括由数据库的表生成 Java 代码 和 通过 Java 代码生成数据库表。而Mybatis 逆向工程是指由数据库表生成 Java 代码。
Mybaits 需要程序员自己编写 SQL 语句,但是 Mybatis 官方提供逆向工程可以针对单表自动生成 Mybaits 执行所需要的代码,包括 POJO、Mapper.java、Mapper.xml …。
一、通过 Eclipse 插件完成 Mybatis 逆向工程
1. 在线安装 Eclipse 插件
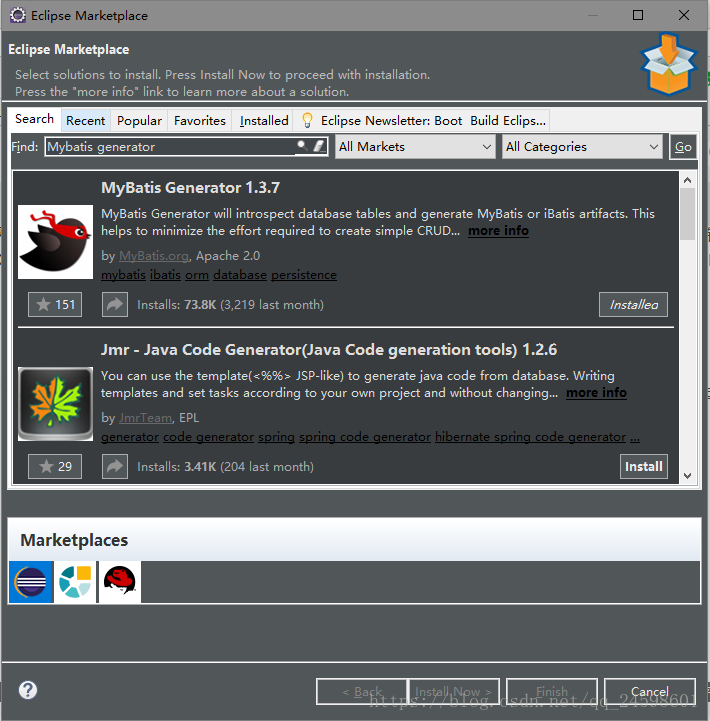
操作步骤:打开Eclipse => Help => Eclipse Marketplace => 搜索 Mybatis Generator => 选择 Mybatis Generator 的版本 => Install => 重启。
2. 新建一个 Java Project 项目
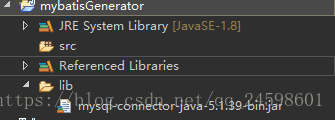
新建一个叫 mybatisGenerator 的 Java 项目,导入 MySQL 的驱动包,如果是 Oracle 数据库就导入 Oracle 的驱动包,我这里是 MySQL 数据库,所以导入的是 MySQL 的。
3. 编写配置文件
逆向工程需要用到 xml 配置文件,编写配置文件(generatorConfig.xml)如下:
<?xml version="1.0" encoding="UTF-8"?>
<!DOCTYPE generatorConfiguration
 PUBLIC "-//mybatis.org//DTD MyBatis Generator Configuration 1.0//EN"
 "http://mybatis.org/dtd/mybatis-generator-config_1_0.dtd">

<generatorConfiguration>
	<context id="testTables" targetRuntime="MyBatis3">
		<commentGenerator>
			<!-- 是否去除自动生成的注释 true:是 : false:否 -->
			<property name="suppressAllComments" value="false" />
		</commentGenerator>
		<!--数据库连接的信息:驱动类、连接地址、用户名、密码 -->
		<jdbcConnection driverClass="com.mysql.jdbc.Driver"
			connectionURL="jdbc:mysql://localhost:3306/mybatis" userId="root"
			password="123456">
		</jdbcConnection>
		<!-- <jdbcConnection driverClass="oracle.jdbc.OracleDriver"
			connectionURL="jdbc:oracle:thin:@localhost:1521:mybatis"
			userId=""
			password="">
		</jdbcConnection> -->

		<!-- 默认false,把JDBC DECIMAL 和 NUMERIC 类型解析为 Integer,为 true时把JDBC DECIMAL 和
			NUMERIC 类型解析为java.math.BigDecimal -->
		<javaTypeResolver>
			<property name="forceBigDecimals" value="false" />
		</javaTypeResolver>

		<!-- targetProject:生成PO类的位置 -->
		<javaModelGenerator targetPackage="com.ssm.po"
			targetProject="mybatisGenerator">
			<!-- enableSubPackages:是否让schema作为包的后缀 -->
			<property name="enableSubPackages" value="false" />
			<!-- 从数据库返回的值被清理前后的空格 -->
			<property name="trimStrings" value="true" />
		</javaModelGenerator>
  <!-- targetProject:mapper映射文件生成的位置 -->
		<sqlMapGenerator targetPackage="com.ssm.mapper"
			targetProject="mybatisGenerator">
			<!-- enableSubPackages:是否让schema作为包的后缀 -->
			<property name="enableSubPackages" value="false" />
		</sqlMapGenerator>
		<!-- targetPackage:mapper接口生成的位置 -->
		<javaClientGenerator type="XMLMAPPER"
			targetPackage="com.ssm.mapper"
			targetProject="mybatisGenerator">
			<!-- enableSubPackages:是否让schema作为包的后缀 -->
			<property name="enableSubPackages" value="false" />
		</javaClientGenerator>
		<!-- 指定数据库表 -->
		<!--
			tableName:要生成的表名
  		domainObjectName:生成后的实例名
	  enableCountByExample:Count语句中加入where条件查询,默认true开启
	  enableUpdateByExample:Update语句中加入where条件查询,默认true开启
	  enableDeleteByExample:Delete语句中加入where条件查询,默认true开启
	  enableSelectByExample:Select多条语句中加入where条件查询,默认true开启
	  selectByExampleQueryId:Select单个对象语句中加入where条件查询,默认true开启
		 -->
		<table tableName="items">
			<!--
				常用:
				property:将所有字段逆向生成为类属性,默认全部
				ignoreColumn:生成时忽略列字段
			 -->
		</table>
		<table tableName="orders"></table>
		<table tableName="orderdetail"></table>
		<table tableName="user"></table>


	</context>
</generatorConfiguration>
注意:targetProject="mybatisGenerator"
4. 使用插件运行
操作步骤:右击 generatorConfig.xml 文件 => Run as => Run Mybatis Generator => 刷新工程。
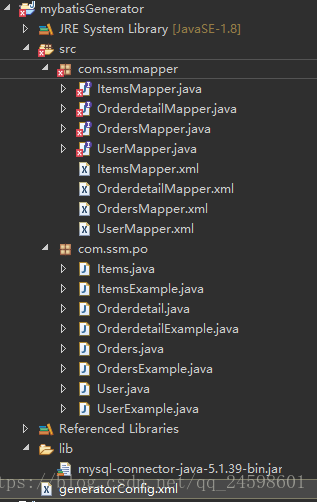
有报错是因为没有导入 Mybatis 相关的包。最后将生成的文件拷入相关的工程当中。
二、通过 Java 代码完成 Mybatis 逆向工程
1. 新建一个 Java Project 项目
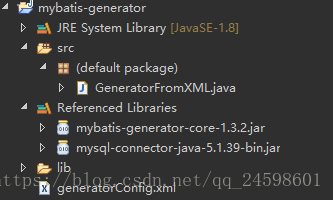
新建一个 Java 项目,导入Mybatis逆向工程包mybatis-generator-core-1.3.2.jar和数据库驱动包mysql-connector-java-5.1.39-bin.jar。
2. 编写配置文件
编写配置文件,和前一种方法的配置文件差不多,区别在于这里的 targetProject 不一样,这种方式的是targetProject="./src",生成的文件也会在这个下面。
<?xml version="1.0" encoding="UTF-8"?>
<!DOCTYPE generatorConfiguration
 PUBLIC "-//mybatis.org//DTD MyBatis Generator Configuration 1.0//EN"
 "http://mybatis.org/dtd/mybatis-generator-config_1_0.dtd">

<generatorConfiguration>
	<context id="testTables" targetRuntime="MyBatis3">
		<commentGenerator>
			<!-- 是否去除自动生成的注释 true:是 : false:否 -->
			<property name="suppressAllComments" value="false" />
		</commentGenerator>
		<!--数据库连接的信息:驱动类、连接地址、用户名、密码 -->
		<jdbcConnection driverClass="com.mysql.jdbc.Driver"
			connectionURL="jdbc:mysql://localhost:3306/mybatis" userId="root"
			password="123456">
		</jdbcConnection>
		<!-- <jdbcConnection driverClass="oracle.jdbc.OracleDriver"
			connectionURL="jdbc:oracle:thin:@localhost:1521:mybatis"
			userId=""
			password="">
		</jdbcConnection> -->

		<!-- 默认false,把JDBC DECIMAL 和 NUMERIC 类型解析为 Integer,为 true时把JDBC DECIMAL 和
			NUMERIC 类型解析为java.math.BigDecimal -->
		<javaTypeResolver>
			<property name="forceBigDecimals" value="false" />
		</javaTypeResolver>

		<!-- targetProject:生成PO类的位置 -->
		<javaModelGenerator targetPackage="com.ssm.po"
			targetProject="./src">
			<!-- enableSubPackages:是否让schema作为包的后缀 -->
			<property name="enableSubPackages" value="false" />
			<!-- 从数据库返回的值被清理前后的空格 -->
			<property name="trimStrings" value="true" />
		</javaModelGenerator>
  <!-- targetProject:mapper映射文件生成的位置 -->
		<sqlMapGenerator targetPackage="com.ssm.mapper"
			targetProject="./src">
			<!-- enableSubPackages:是否让schema作为包的后缀 -->
			<property name="enableSubPackages" value="false" />
		</sqlMapGenerator>
		<!-- targetPackage:mapper接口生成的位置 -->
		<javaClientGenerator type="XMLMAPPER"
			targetPackage="com.ssm.mapper"
			targetProject="./src">
			<!-- enableSubPackages:是否让schema作为包的后缀 -->
			<property name="enableSubPackages" value="false" />
		</javaClientGenerator>
		<!-- 指定数据库表 -->
		<!--
			tableName:要生成的表名
  		domainObjectName:生成后的实例名
	  enableCountByExample:Count语句中加入where条件查询,默认true开启
	  enableUpdateByExample:Update语句中加入where条件查询,默认true开启
	  enableDeleteByExample:Delete语句中加入where条件查询,默认true开启
	  enableSelectByExample:Select多条语句中加入where条件查询,默认true开启
	  selectByExampleQueryId:Select单个对象语句中加入where条件查询,默认true开启
		 -->
		<table tableName="items">
			<!--
				常用:
				property:将所有字段逆向生成为类属性,默认全部
				ignoreColumn:生成时忽略列字段
			 -->
		</table>
		<table tableName="orders"></table>
		<table tableName="orderdetail"></table>
		<table tableName="user"></table>


	</context>
</generatorConfiguration>
3. 编写生成代码程序
最后编写一个简单的 Java 运行程序,运行后刷新工程就可以了。
<?xml version="1.0" encoding="UTF-8"?>
<!DOCTYPE generatorConfiguration
 PUBLIC "-//mybatis.org//DTD MyBatis Generator Configuration 1.0//EN"
 "http://mybatis.org/dtd/mybatis-generator-config_1_0.dtd">

<generatorConfiguration>
	<context id="testTables" targetRuntime="MyBatis3">
		<commentGenerator>
			<!-- 是否去除自动生成的注释 true:是 : false:否 -->
			<property name="suppressAllComments" value="false" />
		</commentGenerator>
		<!--数据库连接的信息:驱动类、连接地址、用户名、密码 -->
		<jdbcConnection driverClass="com.mysql.jdbc.Driver"
			connectionURL="jdbc:mysql://localhost:3306/mybatis" userId="root"
			password="123456">
		</jdbcConnection>
		<!-- <jdbcConnection driverClass="oracle.jdbc.OracleDriver"
			connectionURL="jdbc:oracle:thin:@localhost:1521:mybatis"
			userId=""
			password="">
		</jdbcConnection> -->

		<!-- 默认false,把JDBC DECIMAL 和 NUMERIC 类型解析为 Integer,为 true时把JDBC DECIMAL 和
			NUMERIC 类型解析为java.math.BigDecimal -->
		<javaTypeResolver>
			<property name="forceBigDecimals" value="false" />
		</javaTypeResolver>

		<!-- targetProject:生成PO类的位置 -->
		<javaModelGenerator targetPackage="com.ssm.po"
			targetProject="./src">
			<!-- enableSubPackages:是否让schema作为包的后缀 -->
			<property name="enableSubPackages" value="false" />
			<!-- 从数据库返回的值被清理前后的空格 -->
			<property name="trimStrings" value="true" />
		</javaModelGenerator>
  <!-- targetProject:mapper映射文件生成的位置 -->
		<sqlMapGenerator targetPackage="com.ssm.mapper"
			targetProject="./src">
			<!-- enableSubPackages:是否让schema作为包的后缀 -->
			<property name="enableSubPackages" value="false" />
		</sqlMapGenerator>
		<!-- targetPackage:mapper接口生成的位置 -->
		<javaClientGenerator type="XMLMAPPER"
			targetPackage="com.ssm.mapper"
			targetProject="./src">
			<!-- enableSubPackages:是否让schema作为包的后缀 -->
			<property name="enableSubPackages" value="false" />
		</javaClientGenerator>
		<!-- 指定数据库表 -->
		<!--
			tableName:要生成的表名
  		domainObjectName:生成后的实例名
	  enableCountByExample:Count语句中加入where条件查询,默认true开启
	  enableUpdateByExample:Update语句中加入where条件查询,默认true开启
	  enableDeleteByExample:Delete语句中加入where条件查询,默认true开启
	  enableSelectByExample:Select多条语句中加入where条件查询,默认true开启
	  selectByExampleQueryId:Select单个对象语句中加入where条件查询,默认true开启
		 -->
		<table tableName="items">
			<!--
				常用:
				property:将所有字段逆向生成为类属性,默认全部
				ignoreColumn:生成时忽略列字段
			 -->
		</table>
		<table tableName="orders"></table>
		<table tableName="orderdetail"></table>
		<table tableName="user"></table>


	</context>
</generatorConfiguration>
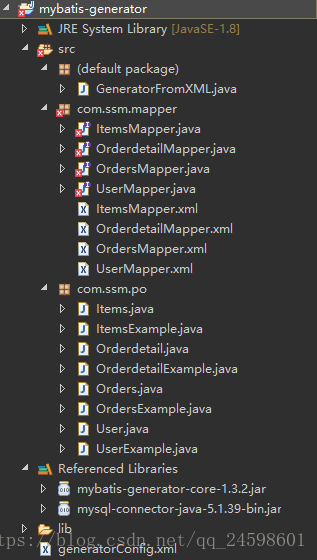
建议在这个项目中加入日志,这样能直观得看出其运行过程。
加入日志配置文件log4j.properties。
# Global logging configuration
log4j.rootLogger=DEBUG, stdout
# MyBatis logging configuration...
log4j.logger.org.mybatis.example.BlogMapper=TRACE
# Console output...
log4j.appender.stdout=org.apache.log4j.ConsoleAppender
log4j.appender.stdout.layout=org.apache.log4j.PatternLayout
log4j.appender.stdout.layout.ConversionPattern=%5p [%t] - %m%n
运行 GeneratorFromXML.java 时产生的日志记录:
DEBUG [main] - Retrieving column information for table "items"
DEBUG [main] - Found column "id", data type 4, in table "mybatis..items"
DEBUG [main] - Found column "name", data type 12, in table "mybatis..items"
DEBUG [main] - Found column "price", data type 7, in table "mybatis..items"
DEBUG [main] - Found column "detail", data type -1, in table "mybatis..items"
DEBUG [main] - Found column "pic", data type 12, in table "mybatis..items"
DEBUG [main] - Found column "createtime", data type 93, in table "mybatis..items"
DEBUG [main] - Retrieving column information for table "orders"
DEBUG [main] - Found column "id", data type 4, in table "mybatis..orders"
DEBUG [main] - Found column "user_id", data type 4, in table "mybatis..orders"
DEBUG [main] - Found column "number", data type 12, in table "mybatis..orders"
DEBUG [main] - Found column "createtime", data type 93, in table "mybatis..orders"
DEBUG [main] - Found column "note", data type 12, in table "mybatis..orders"
DEBUG [main] - Retrieving column information for table "orderdetail"
DEBUG [main] - Found column "id", data type 4, in table "mybatis..orderdetail"
DEBUG [main] - Found column "orders_id", data type 4, in table "mybatis..orderdetail"
DEBUG [main] - Found column "items_id", data type 4, in table "mybatis..orderdetail"
DEBUG [main] - Found column "items_num", data type 4, in table "mybatis..orderdetail"
DEBUG [main] - Retrieving column information for table "user"
DEBUG [main] - Found column "ID", data type 4, in table "mybatis..user"
DEBUG [main] - Found column "USERNAME", data type 12, in table "mybatis..user"
DEBUG [main] - Found column "SEX", data type 12, in table "mybatis..user"
DEBUG [main] - Found column "birthday", data type 91, in table "mybatis..user"
DEBUG [main] - Found column "address", data type 12, in table "mybatis..user"
三、通过 Maven 完成 Mybatis 逆向工程
1. 新建一个 Maven Project 项目
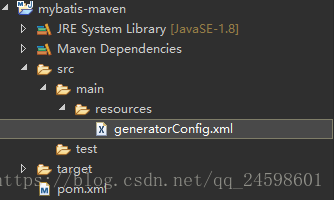
新建一个 Maven 项目,然后新建文件夹 /mybatis-maven/src/main/resources,在文件夹下新建文件 generatorConfig.xml。
2. 配置 pom.xml 文件
配置 pom.xml 文件,在 pom.xml 文件的 project 标签里加入代码:
<build>
	<plugins>
		<plugin>
			<groupId>org.mybatis.generator</groupId>
			<artifactId>mybatis-generator-maven-plugin</artifactId>
			<version>1.3.2</version>
			<dependencies>
				<dependency>
		   <groupId>mysql</groupId>
		   <artifactId>mysql-connector-java</artifactId>
		   <version>5.1.38</version>
		  </dependency>
			</dependencies>
			<configuration>
				<overwrite>true</overwrite>
			</configuration>
		</plugin>
	</plugins>
</build>
配置插件 generator 版本是 1.3.2 并配置 Mysql 驱动是 5.1.38。
3. 配置文件 generatorConfig.xml
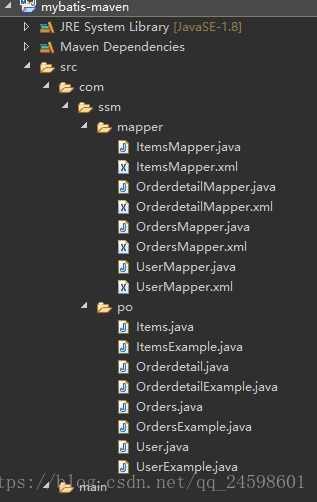
generatorConfig.xml 是在目录 src 下的 main 下的 resources 下。注意这里的targetProject="./src" 生成的文件也会在这个下面。
<?xml version="1.0" encoding="UTF-8"?>
<!DOCTYPE generatorConfiguration
 PUBLIC "-//mybatis.org//DTD MyBatis Generator Configuration 1.0//EN"
 "http://mybatis.org/dtd/mybatis-generator-config_1_0.dtd">

<generatorConfiguration>
	<context id="testTables" targetRuntime="MyBatis3">
		<commentGenerator>
			<!-- 是否去除自动生成的注释 true:是 : false:否 -->
			<property name="suppressAllComments" value="false" />
		</commentGenerator>
		<!--数据库连接的信息:驱动类、连接地址、用户名、密码 -->
		<jdbcConnection driverClass="com.mysql.jdbc.Driver"
			connectionURL="jdbc:mysql://localhost:3306/mybatis" userId="root"
			password="123456">
		</jdbcConnection>
		<!-- <jdbcConnection driverClass="oracle.jdbc.OracleDriver"
			connectionURL="jdbc:oracle:thin:@localhost:1521:mybatis"
			userId=""
			password="">
		</jdbcConnection> -->

		<!-- 默认false,把JDBC DECIMAL 和 NUMERIC 类型解析为 Integer,为 true时把JDBC DECIMAL 和
			NUMERIC 类型解析为java.math.BigDecimal -->
		<javaTypeResolver>
			<property name="forceBigDecimals" value="false" />
		</javaTypeResolver>

		<!-- targetProject:生成PO类的位置 -->
		<javaModelGenerator targetPackage="com.ssm.po"
			targetProject="./src">
			<!-- enableSubPackages:是否让schema作为包的后缀 -->
			<property name="enableSubPackages" value="false" />
			<!-- 从数据库返回的值被清理前后的空格 -->
			<property name="trimStrings" value="true" />
		</javaModelGenerator>
  <!-- targetProject:mapper映射文件生成的位置 -->
		<sqlMapGenerator targetPackage="com.ssm.mapper"
			targetProject="./src">
			<!-- enableSubPackages:是否让schema作为包的后缀 -->
			<property name="enableSubPackages" value="false" />
		</sqlMapGenerator>
		<!-- targetPackage:mapper接口生成的位置 -->
		<javaClientGenerator type="XMLMAPPER"
			targetPackage="com.ssm.mapper"
			targetProject="./src">
			<!-- enableSubPackages:是否让schema作为包的后缀 -->
			<property name="enableSubPackages" value="false" />
		</javaClientGenerator>
		<!-- 指定数据库表 -->
		<!--
			tableName:要生成的表名
  		domainObjectName:生成后的实例名
	  enableCountByExample:Count语句中加入where条件查询,默认true开启
	  enableUpdateByExample:Update语句中加入where条件查询,默认true开启
	  enableDeleteByExample:Delete语句中加入where条件查询,默认true开启
	  enableSelectByExample:Select多条语句中加入where条件查询,默认true开启
	  selectByExampleQueryId:Select单个对象语句中加入where条件查询,默认true开启
		 -->
		<table tableName="items">
			<!--
				常用:
				property:将所有字段逆向生成为类属性,默认全部
				ignoreColumn:生成时忽略列字段
			 -->
		</table>
		<table tableName="orders"></table>
		<table tableName="orderdetail"></table>
		<table tableName="user"></table>


	</context>
</generatorConfiguration>
4. 运行 Maven
运行命令mybatis-generator:generate。
操作步骤:选中项目右击 => Run As => Maven build… =>在 Goals 中输入mybatis-generator:generate => Run =>刷新工程。
加载全部内容