使用eslint和githooks统一前端风格的技巧
dragonnahs 人气:0本文着重讲解了使用eslint和githooks统一前端风格,文中会用代码示例为大家做详细介绍,希望能够帮助到您,欢迎大家阅读和收藏
前端团队开发时,是必须要有一个统一的前端规范的,用一套统一的规范来规范开发者,可以有效的避免在提交和拉取代码时造成的代码错乱问题,这边文章主要讲下我们团队的代码规范使用,eslint结合vscode保存时自动修复不规范代码,githooks提交代码时的eslint校验和信息规范。
添加eslint
vue-cli3构建一个新项目(包含eslint模块),完成后添加 .eslintrc.js 配置如下:
module.exports = {
 root: true,
 parserOptions: {
 parser: 'babel-eslint',
 sourceType: 'module'
 },
 env: {
 browser: true
 },
 // https://github.com/standard/standard/blob/master/docs/RULES-en.md
 extends: [
 'plugin:vue/base'
 ],
 // required to lint *.vue files
 plugins: [
 'vue'
 ],
 // add your custom rules here
 'rules': {
 // allow paren-less arrow functions
 'indent': [2, 2], // 两个空格的缩进
 'quotes': [2, 'single'], // js必须使用单引号
 'linebreak-style': [2, 'unix'], // 换行风格 unix/windows
 'semi': [2, 'never'], // 语句强制分号结尾
 // 'no-console': [1], // 不允许console语句
 'no-unused-vars': [1], // 声明了变量但是没有使用检测
 'space-unary-ops': [1, { 'words': true, 'nonwords': false }], // 一元运算符的前/后要不要加空格
 'brace-style': [2, '1tbs', { 'allowSingleLine': false }], // 大括号风格
 'comma-spacing': [2, { 'before': false, 'after': true }], // 逗号后有空格,前没有空格
 'comma-style': [2, 'last'], // 逗号跟在结尾
 'key-spacing': [2, { 'beforeColon': false, 'afterColon': true }], // 对象字面量中冒号的前后空格
 'lines-around-comment': [ // 行前/行后备注
  2, {
  'beforeBlockComment': false, // 段注释的前后
  'beforeLineComment': false, // 行注释的前面
  'afterBlockComment': false, // 块注释的后面
  'afterLineComment': false, // 行注释的后面
  'allowBlockStart': true,
  'allowObjectStart': true,
  'allowArrayStart': true
  }],
 'max-depth': [2, 4], // 代码最多允许4层嵌套
 'max-len': [1, 1000, 2],
 'max-nested-callbacks': [2, 3], // 回调嵌套深度
 'max-params': [2, 5], // 函数最多只能有5个参数
 'max-statements': [1, 80], // 单个函数最多80条语句
 'no-array-constructor': [2], // 禁止使用数组构造器
 'no-lonely-if': 2, // // 禁止else语句内只有if语句
 'no-multiple-empty-lines': [2, { 'max': 3, 'maxEOF': 1 }], // 空行最多不能超过2行
 'no-nested-ternary': 2, // 不使用嵌套的三元表达式
 'no-spaced-func': 2, // 函数调用时 函数名与()之间不能有空格
 'no-trailing-spaces': 2, // 一行结束后面不要有空格
 'no-unneeded-ternary': 2, // 禁止不必要的嵌套 var isYes = answer === 1 ? true : false;简单的判断用三元表达式代替
 'object-curly-spacing': [2, 'always', { // 大括号内是否允许不必要的空格 always始终允许;never始终不允许
  'objectsInObjects': false,
  'arraysInObjects': false
 }],
 'arrow-spacing': 2, // =>的前/后括号
 'block-scoped-var': 2, // 块语句中使用var
 'no-dupe-class-members': 2,
 // 'no-var': 1, // 禁用var,用let和const代替
 'object-shorthand': [1, 'always'], // 强制对象字面量缩写语法
 'array-bracket-spacing': [2, 'never'], // 是否允许非空数组里面有多余的空格
 'operator-linebreak': [2, 'after'], // 换行时运算符在行尾还是行首
 // 'semi-spacing': [2, { 'before': false, 'after': false }], // 分号前后空格
 'keyword-spacing': ['error'],
 'space-before-blocks': 2, // 不以新行开始的块{前面要不要有空格
 'block-spacing': [2, 'always'],
 'space-before-function-paren': [2, 'never'], // 函数定义时括号前面要不要有空格
 'space-in-parens': [2, 'never'], // 小括号里面要不要有空格
 'spaced-comment': [1, 'always',
  {
  'exceptions': ['-', '*', '+']
  }], // 注释风格要不要有空格什么的
 'arrow-parens': 0,
 // allow async-await
 'generator-star-spacing': 0,
 // allow debugger during development
 'no-debugger': process.env.NODE_ENV === 'production' ? 2 : 0
 },
 globals: {
 '$': false,
 'jquery': false,
 'ActiveXObject': false,
 'arbor': true,
 'layer': false
 }
}
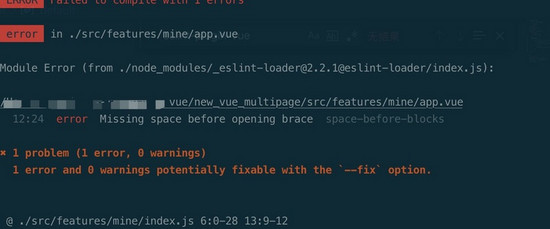
运行 npm run lint 会给出报错,运行 npm run serve 也会对项目进行eslint校验,无法通过校验就会报错

可以结合vscode的eslint插件快速修复无法通过验证的代码,首先下载插件,然后更改setting.json配置文件,具体如下:
"eslint.validate": [
 "javascript",
 "javascriptreact",
 "vue-html"
],
"eslint.run": "onSave",
"editor.codeActionsOnSave": {
 "source.fixAll.eslint": true
}
配置完成之后重启vscode,在编辑代码的时候如果未符合eslint的校验,保存时会自动修复代码。
添加git hooks
前端团队开发中如果没有做正确的校验就提交了代码,拉取代码时会导致很多地方爆红不符合定制的开发规范,因此可以在提交代码时做些限制.在 git 提交代码时,会触发一些列的钩子函数,可以通过 husky 这个git hooks的工具来进行代码提交校验,需要先安装依赖包 cnpm i -D husky lint-staged @commitlint/config-conventional @commitlint/cli .然后在package.json中添加如下代码:
// package.json
"husky": {
 "hooks": {
 "pre-commit": "lint-staged",// 在pre-commit阶段运行下面配置的校验功能
 "commit-msg": "commitlint -E HUSKY_GIT_PARAMS" // 这个是规范提交的信息的,结合commitlint.config.js使用
 }
},
"lint-staged": {
 "src/**/*.{js,vue}": [
 "npm run lint",
 "git add ."
 ]
}
// commitlint.config.js
// 参考的官方配置,提交的信息必须按照下面规范书写,类似`git commit -m 'feat: 添加eslint'`
module.exports = {
 parserPreset: 'conventional-changelog-conventionalcommits',
 rules: {
 'body-leading-blank': [1, 'always'],
 'body-max-line-length': [2, 'always', 100],
 'footer-leading-blank': [1, 'always'],
 'footer-max-line-length': [2, 'always', 100],
 'header-max-length': [2, 'always', 100],
 'scope-case': [2, 'always', 'lower-case'],
 'subject-case': [
  2,
  'never',
  ['sentence-case', 'start-case', 'pascal-case', 'upper-case']
 ],
 'subject-empty': [2, 'never'],
 'subject-full-stop': [2, 'never', '.'],
 'type-case': [2, 'always', 'lower-case'],
 'type-empty': [2, 'never'],
 'type-enum': [
  2,
  'always',
  [
  'build',
  'chore',
  'ci',
  'docs',
  'feat',
  'fix',
  'perf',
  'refactor',
  'revert',
  'style',
  'test'
  ]
 ]
 }
}
接下来修改文件提交代码,最后commit的时候就会对已修改文件进行校验,如果eslint校验不通过,或者commit信息不符合规范都是不能提交代码的,以上步骤已经可以很好的改善代码和提交信息规范,这对于团队项目开发能够很大对提高代码质量。
总结
加载全部内容