SpringBoot中使用Cookie实现记住登录的代码实例
Asurplus、 人气:3本文着重讲解了SpringBoot中使用Cookie实现记住登录的代码实例,文中通过代码实例讲解的非常细致,对大家的工作和学习具有一定的参考学习价值,需要的朋友们下面随着小编来一起学习学习吧
最近在做项目,甲方提出每次登录都要输入密码,会很麻烦,要求实现一个记住登录状态的功能,于是便使用 Cookie 实现该功能
一、Cookie 简介
Cookie,一种储存在用户本地终端上的数据,有时也用其复数形式 Cookies。类型为“小型文本文件”,是某些网站为了辨别用户身份,进行 Session 跟踪而储存在用户本地终端上的数据(通常经过加密),由用户客户端计算机暂时或永久保存的信息。
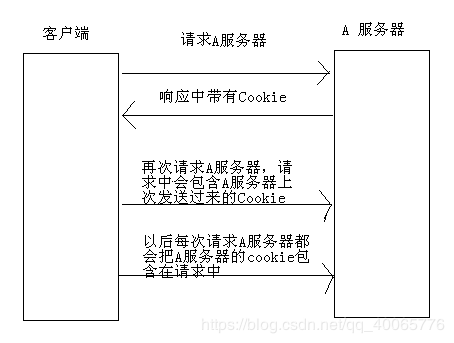
其实 Cookie 就是一个键和一个值构成的,随着服务器端的响应发送给客户端浏览器。然后客户端浏览器会把 Cookie 保存起来,当下一次再访问服务器时把 Cookie 再发送给服务器。
1、Cookie 是 HTTP 协议的规范之一,它是服务器和客户端之间传输的小数据
2、首先由服务器通过响应头把 Cookie 传输给客户端,客户端会将 Cookie 保存起来
3、当客户端再次请求同一服务器时,客户端会在请求头中添加该服务器保存的 Cookie,发送给服务器
4、Cookie 就是服务器保存在客户端的数据
5、Cookie 就是一个键值对

二、Cookie 使用
1、创建 Cookie
// Cookie 为键值对数据格式
Cookie cookie_username = new Cookie("cookie_username", username);
2、设置 Cookie 持久时间
// 即:过期时间,单位是:秒(s)
cookie_username.setMaxAge(30 * 24 * 60 * 60);
3、设置 Cookie 共享路径
// 表示当前项目下都携带这个cookie
cookie_username.setPath(request.getContextPath());
4、向客户端发送 Cookie
// 使用 HttpServletResponse 对象向客户端发送 Cookie
response.addCookie(cookie_username);
5、销毁 Cookie
// 根据 key 将 value 置空
Cookie cookie_username = new Cookie("cookie_username", "");
// 设置持久时间为0
cookie_username.setMaxAge(0);
// 设置共享路径
cookie_username.setPath(request.getContextPath());
// 向客户端发送 Cookie
response.addCookie(cookie_username);
三、进入正题
上面我们已经了解了 Cookie 是什么,并且知道了 Cookie 的创建以及销毁的方法,下面,我们就使用 Cookie 实现记住登录状态的功能,整个项目基于 SpringBoot 实现
1、注册拦截器
/**
* 注册拦截器
*/
@Configuration
public class WebConfigurer implements WebMvcConfigurer {

  @Autowired
  private LoginInterceptor loginHandlerInterceptor;

  @Override
  public void addInterceptors(InterceptorRegistry registry) {
    InterceptorRegistration ir = registry.addInterceptor(loginHandlerInterceptor);
    // 拦截路径
    ir.addPathPatterns("/*");
    // 不拦截路径
    List<String> irs = new ArrayList<String>();
    irs.add("/api/*");
    irs.add("/wechat/*");
    irs.add("/oauth");
    ir.excludePathPatterns(irs);
  }
}
我们拦截了所有的请求路径,放开了 api、wechat 等请求路径
这里可能会有一个疑问,为什么不放开请求登录界面的 api 请求路径呢,原因是我们拦截登录请求,当我们请求登录界面时,我们已经登录过,那么我们就无需进入登录界面,直接到主界面
我们使用了自定义的一个登录拦截:LoginInterceptor,在第二步我们会详细讲解其中的实现原理
2、登录拦截
/**
* 未登录拦截器
*/
@Component
public class LoginInterceptor implements HandlerInterceptor {

  @Autowired
  private LoginDao dao;

  @Override
  public boolean preHandle(HttpServletRequest request, HttpServletResponse response, Object handler) throws Exception {
    // 获得cookie
    Cookie[] cookies = request.getCookies();
    // 没有cookie信息,则重定向到登录界面
    if (null == cookies) {
      response.sendRedirect(request.getContextPath() + "/login");
      return false;
    }
    // 定义cookie_username,用户的一些登录信息,例如:用户名,密码等
    String cookie_username = null;
    // 获取cookie里面的一些用户信息
    for (Cookie item : cookies) {
      if ("cookie_username".equals(item.getName())) {
        cookie_username = item.getValue();
        break;
      }
    }
    // 如果cookie里面没有包含用户的一些登录信息,则重定向到登录界面
    if (StringUtils.isEmpty(cookie_username)) {
      response.sendRedirect(request.getContextPath() + "/login");
      return false;
    }
    // 获取HttpSession对象
    HttpSession session = request.getSession();
    // 获取我们登录后存在session中的用户信息,如果为空,表示session已经过期
    Object obj = session.getAttribute(Const.SYSTEM_USER_SESSION);
    if (null == obj) {
			// 根据用户登录账号获取数据库中的用户信息
    	UserInfo dbUser = dao.getUserInfoByAccount(cookie_username);
      // 将用户保存到session中
      session.setAttribute(Const.SYSTEM_USER_SESSION, dbUser);
    }
    // 已经登录
    return true;
  }
}
3、登录请求
控制层
/**
 * 执行登录
 */
 @PostMapping("login")
 @ResponseBody
 public String login(String username, String password, HttpSession session, HttpServletRequest request, HttpServletResponse response) {
   return service.doLogin(username.trim(), password.trim(), session, request, response).toJSONString();
 }
业务层
/**
 * 执行登录
 */
public JSONObject doLogin(String username, String password, HttpSession session, HttpServletRequest request, HttpServletResponse response) {
	// 最终返回的对象
  JSONObject res = new JSONObject();
  res.put("code", 0);
  if (StringUtils.isEmpty(username) || StringUtils.isEmpty(password)) {
    res.put("msg", "请输入手机号或密码");
    return res;
  }
  UserInfo dbUser = dao.getUserInfoByAccount(username);
  if (null == dbUser) {
    res.put("msg", "该账号不存在,请检查后重试");
    return res;
  }
  // 验证密码是否正确
  String newPassword = PasswordUtils.getMd5(password, username, dbUser.getSalt());
  if (!newPassword.equals(dbUser.getPassword())) {
    res.put("msg", "手机号或密码错误,请检查后重试");
    return res;
  }
  // 判断账户状态
  if (1 != dbUser.getStatus()) {
    res.put("msg", "该账号已被冻结,请联系管理员");
    return res;
  }
  // 将登录用户信息保存到session中
  session.setAttribute(Const.SYSTEM_USER_SESSION, dbUser);
  // 保存cookie,实现自动登录
  Cookie cookie_username = new Cookie("cookie_username", username);
  // 设置cookie的持久化时间,30天
  cookie_username.setMaxAge(30 * 24 * 60 * 60);
  // 设置为当前项目下都携带这个cookie
  cookie_username.setPath(request.getContextPath());
  // 向客户端发送cookie
  response.addCookie(cookie_username);
  res.put("code", 1);
  res.put("msg", "登录成功");
  return res;
}
4、注销登录
/**
 * 退出登录
 */
@RequestMapping(value = "logout")
public String logout(HttpSession session, HttpServletRequest request, HttpServletResponse response) {
  // 删除session里面的用户信息
  session.removeAttribute(Const.SYSTEM_USER_SESSION);
  // 保存cookie,实现自动登录
  Cookie cookie_username = new Cookie("cookie_username", "");
  // 设置cookie的持久化时间,0
  cookie_username.setMaxAge(0);
  // 设置为当前项目下都携带这个cookie
  cookie_username.setPath(request.getContextPath());
  // 向客户端发送cookie
  response.addCookie(cookie_username);
  return "login";
}
注销登录时,我们需要删除 session 里面的用户信息,删除 cookie 里面的用户信息,然后请求到登录界面
四、总结
以上就是 SpringBoot 中使用 Cookie 实现记住登录功能,在项目中还算是比较实用的功能,希望能对正在阅读的你一点点帮助和启发,更多相关SpringBoot Cookie记住登录内容请搜索以前的文章或继续浏览下面的相关文章希望大家以后多多支持!
加载全部内容