微信小程序在线客服自动回复功能(基于node)
熊猫猫超人 人气:0前言
我们知道H5页面经常需要将用户导流到APP,通过下载安装包或者跳转至应用宝市场/Appstore等方式进行导流。但是由于小程序嵌套webview时需要校验域名,因此跳转到第三方应用市场和Appstroe无法实现导流。那怎么办呢?
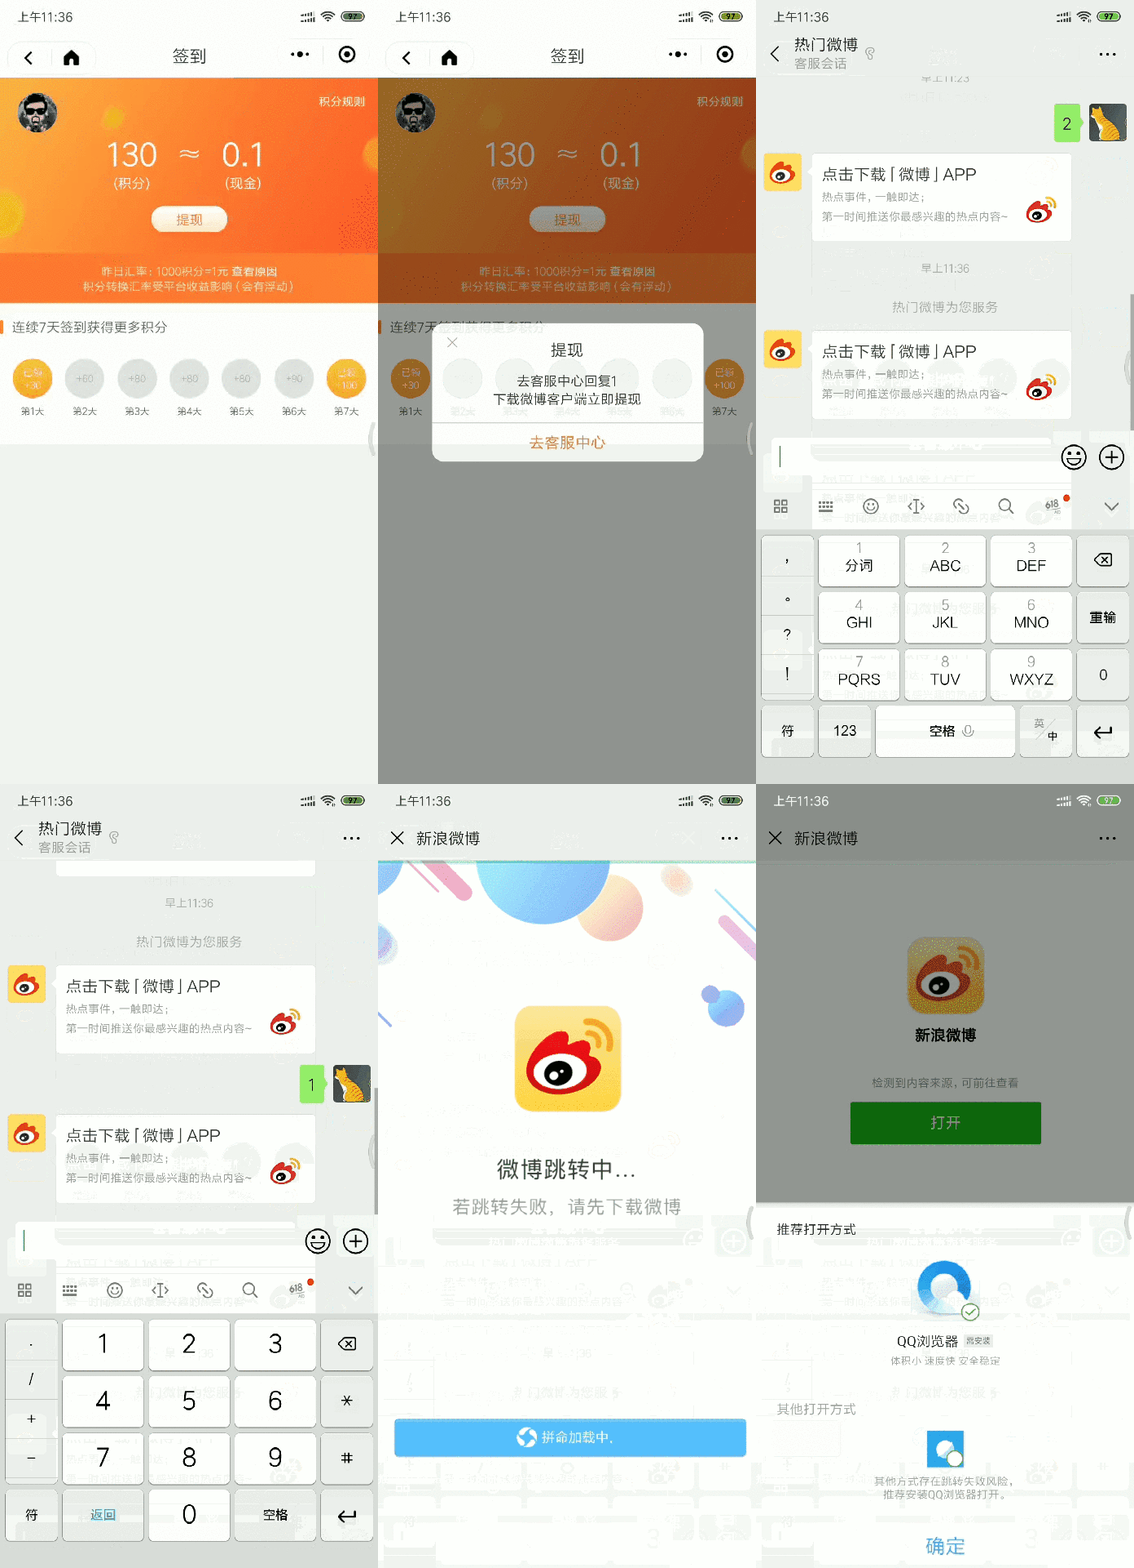
只能说道高一尺魔高一丈,看看微博小程序是怎么导流的:

曲线救国的方式,利用小程序的在线功能可以打开H5的方式,去进行下载引导。
于是,就引出了这次文档的主题,小程序在线客服自动回复功能。
阅读本文档之前,最好已经了解过小程序客服信息官方的相关文档:
这次开发做在线客服功能也踩了不少坑,网上也查阅不少资料,但大部分的后台都是基于php或者python,java开发,node.js开发的较少,因此将这次开发的流程记录一下,供大家参考,避免大家踩坑。可能会有一些错误地方欢迎指正交流。
另外,我们用的node框架是基于koa自行封装的,在一些细节实现上和其他框架会有区别,不必纠结。
需求描述
小程序中点按钮跳转在线客服界面,根据关键词自动回复
客服回复判断条件,支持cms配置key,及 respond
respond 支持配置以下类型,及回复内容:
| type | 内容 |
|---|---|
| text | text=文本回复内容 |
| link | title=标题 description=描述 url=跳转链接 thumb_url=图片地址 |
| image | imageurl=图片地址 |
- 配置后用户需要精准匹配回复条件才可收到自动回复
- 可支持配置多个key,及对应respond
- 除了配置的key以外的回复,可配置默认的自动回复
开发流程
写个跳转客服的按钮吧
index.wxml
<button open-type="contact">转在线客服</button>
后台配置
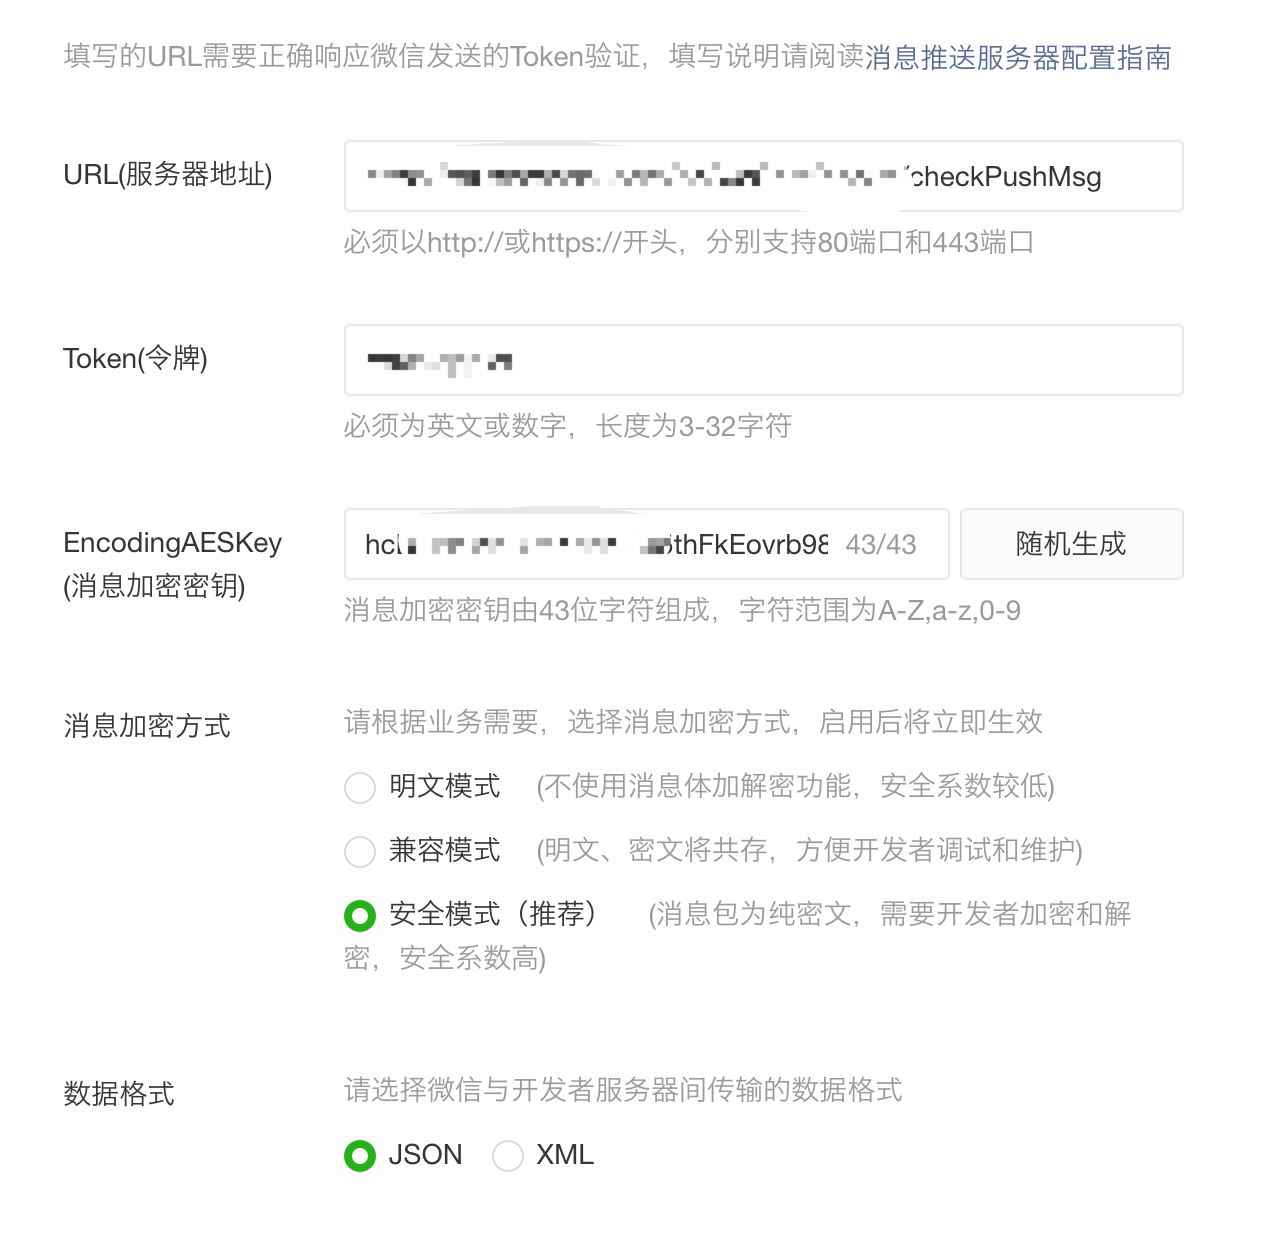
登录小程序后台后,在「开发」-「开发设置」-「消息推送」中,管理员扫码启用消息服务,填写服务器地址(URL)、令牌(Token) 和 消息加密密钥(EncodingAESKey)等信息。

1.URL服务器地址
URL: 开发者用来接收微信消息和事件的接口 URL。开发者所填写的URL 必须以 http:// 或 https:// 开头,分别支持 80 端口和 443 端口。
务必要记住,服务器地址必须是线上地址,因为需要微信服务器去访问。localhost,IP,内网地址都不行的。
不然会提示 '解析失败,请检查信息是否填写正确'。
那么问题来了,不同的公司都有一套上线流程,总不能为了调试URL是否可用要上到线上去测试,成本太大,也不方便。
这就要引出内网穿透了,简单来说就是配置一个线上域名,但是这个域名可以穿透到你配置的本地开发地址上,这样可以方便你去调试看日志。
推荐一个可以实现内网穿透的工具。(非广告)
NATAPP 具体不详细介绍,免得广告嫌疑。
简单说,NATAPP有免费和付费两种模式,免费的是域名不定时更换,对于微信的推送消息配置一个月只有3次更改机会来说,有点奢侈。不定什么时候配置的域名就不能访问,得重新配置。而付费的则是固定域名,映射的内网地址也可以随时更改。楼主从免费切到付费模式,一个月的VIP使用大概十几块钱吧。

2.Token
Token自己随便写就行了,但是要记住它,因为你在接口中要用的。
3.EncodingAESKey
随机生成即可。
4.加密方式和数据格式
根据自己喜欢选择,楼主选择的安全模式和JSON格式。
不同的模式和数据格式,在开发上会有不同,自己衡量。
既然这些配置都清楚,那开始码代码。
验证消息的确来自微信服务器
配置提交前,需要把验证消息来自微信服务器的接口写好。
server.js
  /*
   * https:/https://img.qb5200.com/download-x/developers.weixin.qq.com/miniprogramhttps://img.qb5200.com/download-x/dev/framework/server-ability/message-push.html
   * 验证消息的确来自微信服务器
   * 开发者通过检验 signature 对请求进行校验(下面有校验方式)。
   * 若确认此次 GET 请求来自微信服务器,请原样返回 echostr 参数内容,
   * 则接入生效,成为开发者成功,否则接入失败。加密/校验流程如下:
   * 将token、timestamp、nonce三个参数进行字典序排序
   * 将三个参数字符串拼接成一个字符串进行sha1加密
   * 开发者获得加密后的字符串可与signature对比,标识该请求来源于微信
   */
   const crypto = require('crypto');
   async wxCallbackAction(){
    const ctx = this.ctx;
    const method = ctx.method;
    //微信服务器签名验证,确认请求来自微信
    if(method === 'GET') {
      // 1.获取微信服务器Get请求的参数 signature、timestamp、nonce、echostr
      const {
        signature,
        timestamp,
        nonce,
        echostr
      } = ctx.query;

      // 2.将token、timestamp、nonce三个参数进行字典序排序
      let array = ['yourToken', timestamp, nonce];
      array.sort();

      // 3.将三个参数字符串拼接成一个字符串进行sha1加密
      const tempStr = array.join('');
      const hashCode = crypto.createHash('sha1'); //创建加密类型
      const resultCode = hashCode.update(tempStr, 'utf8').digest('hex');

      // 4.开发者获得加密后的字符串可与signature对比,标识该请求来源于微信
      if (resultCode === signature) {
        console.log('验证成功,消息是从微信服务器转发过来');
        return this.json(echostr);
      }else {
        console.log('验证失败!!!');
        return this.json({
          status: -1,
          message: "验证失败"
        });
      }

    }
   }
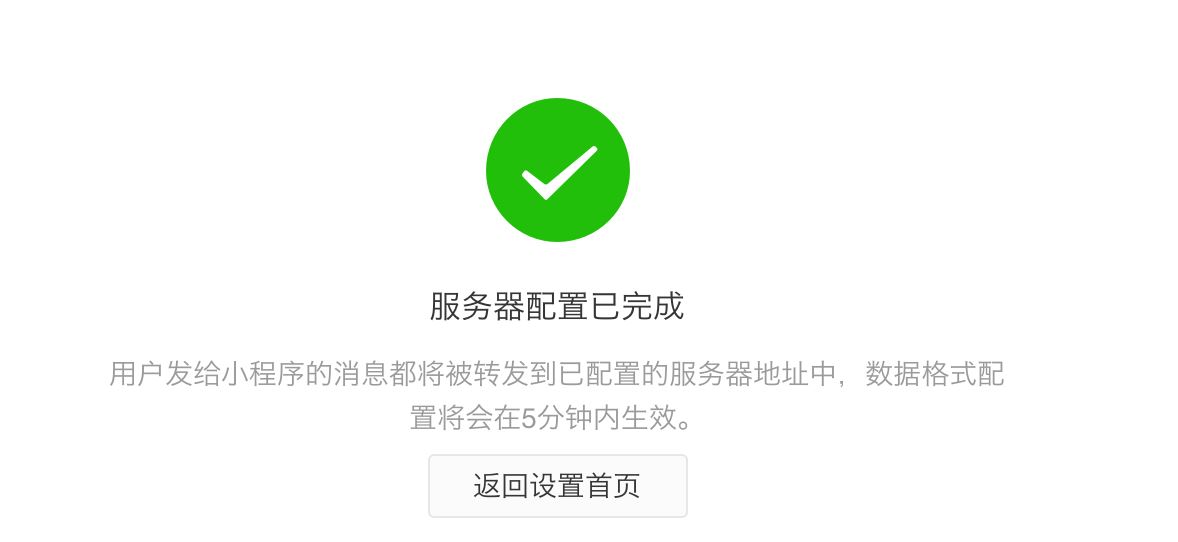
验证接口开发完毕,后台配置可以去点提交了。配置成功会提示如下:

接收消息和推送消息
当用户在客服会话发送消息、或由某些特定的用户操作引发事件推送时,微信服务器会将消息或事件的数据包发送到开发者填写的 URL。开发者收到请求后可以使用 发送客服消息 接口进行异步回复。
本文以接收文本消息为例开发:
server.js
  const WXDecryptContact = require('./WXDecryptContact');
  async wxCallbackAction(){
    const ctx = this.ctx;
    const method = ctx.method;
    //接收信息时 为POST请求;(完整代码自行与上面验证时的合并即可)
    if(method === 'POST'){
      const { Encrypt } = ctx.request.body;
      //配置时选的安全模式 因此需要解密
      if(!Encrypt){
        return this.json('success');
      }
      const decryptData = WXDecryptContact(Encrypt);
      await this._handleWxMsg(decryptData);
      return this.json('success');
    }else{
      return this.json('success');
    }
  }

  //处理微信回调消息的总入口 (只处理了文本类型,其他类型自行添加)
  async _handleWxMsg(msgJson){
    if(!msgJson){
      return this.json('success');
    }

    const { MsgType } = msgJson;
    if(MsgType === 'text'){
      await this._sendTextMessage(msgJson);
    }
  }

  //微信文本信息关键字自动回复
  async _sendTextMessage(msgJson){
    //获取CMS客服关键词回复配置
    const result = await this.callService('cms.getDataByName', 'wxApplet.contact');

    let keyWordObj = result.data || {};

    //默认回复default
    let options = keyWordObj.default;
    for(let key in keyWordObj){
      //查看是否命中配置的关键词
      if(msgJson.Content === key){
        //CMS配置项
        options = keyWordObj[key];
        }
      }
    }

    //获取access_token
    const accessToken = await this._getAccessToken();

    /*
    * 先判断配置回复的消息类型是不是image类型
    * 如果是 则需要先通过 新增素材接口 上传图片文件获得 media_id
    */

    let media_id = '';
    if(options.type === 'image'){
      //获取图片地址(相对路径)
      let url = options.url;
      const file = fs.createReadStream(url);

      //调用微信 uploadTempMedia接口 具体实现见 service.js
      const mediaResult = await this.callService('wxApplet.uploadTempMedia',
        {
          access_token: accessToken,
          type: 'image'
        },
        {
          media: file
        }
      );

      if(mediaResult.status === 0){
        media_id = mediaResult.data.media_id;
      }else {
        //如果图片id获取失败 则按默认处理
        options = keyWordObj.default;
      }
    }

    //回复信息给用户
    const sendMsgResult = await this.callService('wxApplet.sendMessageToCustomer',
      {
        access_token: accessToken,
        touser: msgJson.FromUserName,
        msgtype: options.type || 'text',
        text: {
          content: options.description || '',
        },
        link: options.type === "link" ?
          {
            title: options.title,
            description: options.description,
            url: options.url,
            thumb_url: options.thumb_url
          }
          :
          {},
        image: {
          media_id
        }
      }
    );
  }
service.js
const request = require('request');
/*
* 获取CMS客服关键词回复配置
* 这个接口只是为了回去CMS配置的字段回复关键字配置 返回的data数据结构如下
*/
async contact(){
  return {
    data: {
      "1": {
        "type": "link",
        "title": "点击下载[****]APP",
        "description": "注册领取领***元注册红包礼",
        "url": "https://m.renrendai.com/mo/***.html",
        "thumb_url": "https://m.we.com/***/test.png"
       },
       "2": {
        "url": "http://m.renrendai.com/cms/****/test.jpg",
        "type": "image"
       },
       "3": {
        "url": "/cms/***/test02.png",
        "type": "image"
       },
       "default": {
        "type": "text",
        "description": "再见"
       }
    }
  }
}

/*
 * 把媒体文件上传到微信服务器。目前仅支持图片。用于发送客服消息或被动回复用户消息。
 * https:/https://img.qb5200.com/download-x/developers.weixin.qq.com/miniprogramhttps://img.qb5200.com/download-x/dev/api-backend/open-api/customer-message/customerServiceMessage.uploadTempMedia.html
 */

 async uploadTempMedia(data,formData){
  const url = `https://api.weixin.qq.com/cgi-bin/media/upload?access_token=${data.access_token}&type=${data.type}`;
  return new Promise((resolve, reject) => {
    request.post({url, formData: formData}, (err, response, body) => {
      try{
        const out = JSON.parse(body);
        let result = {
          data: out,
          status: 0,
          message: "ok"
        }

        return resolve(result);

      }catch(err){
        return reject({
          status: -1,
          message: err.message
        });
      }
    });
  }
 }

 /*
 * 发送客服消息给用户
 * https:/https://img.qb5200.com/download-x/developers.weixin.qq.com/miniprogramhttps://img.qb5200.com/download-x/dev/api-backend/open-api/customer-message/customerServiceMessage.send.html
 */

 async sendMessageToCustomer(data){
  const url = `https://api.weixin.qq.com/cgi-bin/message/custom/send?access_token=${data.access_token}`;
  return new Promise((resolve, reject) => {
    request.post({url, data}, (err, response, body) => {
      ...
    });
  }
 }
WXDecryptContact.js
const crypto = require('crypto'); // 加密模块

const decodePKCS7 = function (buff) {
  let pad = buff[buff.length - 1];
  if (pad < 1 || pad > 32) {
    pad = 0;
  }
  return buff.slice(0, buff.length - pad);
};

// 微信转发客服消息解密
const decryptContact = (key, iv, crypted) => {
  const aesCipher = crypto.createDecipheriv('aes-256-cbc', key, iv);
  aesCipher.setAutoPadding(false);
  let decipheredBuff = Buffer.concat([aesCipher.update(crypted, 'base64'), aesCipher.final()]);
  decipheredBuff = decodePKCS7(decipheredBuff);
  const lenNetOrderCorpid = decipheredBuff.slice(16);
  const msgLen = lenNetOrderCorpid.slice(0, 4).readUInt32BE(0);
  const result = lenNetOrderCorpid.slice(4, msgLen + 4).toString();
  return result;
};

// 解密微信返回给配置的消息服务器的信息
const decryptWXContact = (wechatData) => {
  if(!wechatData){
    wechatData = '';
  }
  //EncodingAESKey 为后台配置时随机生成的
  const key = Buffer.from(EncodingAESKey + '=', 'base64');
  const iv = key.slice(0, 16);
  const result = decryptContact(key, iv, wechatData);
  const decryptedResult = JSON.parse(result);
  console.log(decryptedResult);
  return decryptedResult;
};
module.exports = decryptWXContact;
呼~ 代码终于码完,来看看效果:

总结
开发并不是一帆风顺的,也遇到了一些值得留意的坑,强调一下:
- 后台配置URL地址一定外网可访问(可以通过内网穿透解决)
- 文件上传接口uploadTempMedia media参数要用 FormData数据格式 (用node的request库很容易实现。urllib这个库有坑有坑 都是泪T_T)
- 切记接收消息不论成功失败都要返回success,不然即使成功接收返回消息,日志没有报错的情况下,还是出现IOS提示该小程序提供的服务出现故障 请稍后再试。
加载全部内容