微信小程序如何修改本地缓存key中单个数据的详解
lff1123 人气:0最近在做教师评教系统,有一个‘个人信息'页面中有个编辑修改邮箱的功能,本来想得很简单,结果进坑了,搞了好久才出来。
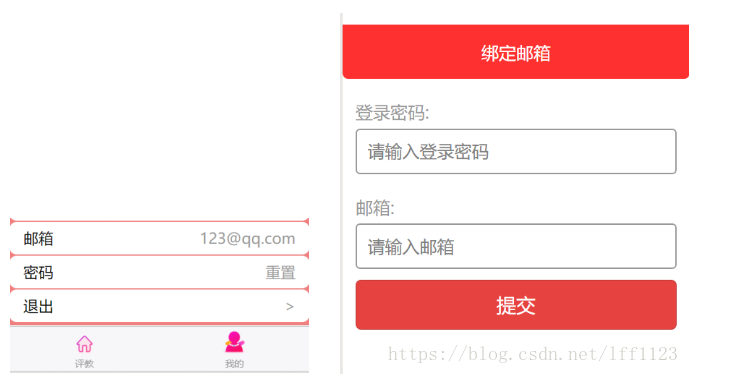
我想实现的效果是点击下图左侧邮箱,然后进入右侧页面,进行邮箱的修改,点击提交后跳转到左侧页面,同时邮箱也发生改变。

点击‘我的'时,我让它从控制台打印出student缓存中传过来的数据,如下:
{no: "1635050601", name: "张三", sex: "", email: "123@qq.com", classid: "100000-1602", …}
classid:"100000-1602"
classname:"16级PHP2"
departmentid:"100000"
departmentname:"软件学院"
name:"张三"
no:"1635050601"
sex:""
然后我添加邮箱后,后台接口写了方法让email的值直接存到student中,但是如果初次添加email的话可以实现,第二次修改email的话,就得想想该怎么从student里只修改email的值。
 //表单提交
 formSubmit: function (e) {
 console.log(e.detail.value);
 var pwd = e.detail.value.pwd;
 var email = e.detail.value.email;
 if (pwd == '') {
  wx.showToast({
  title: '密码不能为空',
  icon: 'none',
  duration: 1000,
  })
 }else if (email == '') {
  wx.showToast({
  title: '邮箱不能为空',
  icon: 'none',
  duration: 1000,
  })
 }else {
  //post方式提交
  wx.request({
  url: app.globalData.url.bindemail,
  method: "POST",
  data: {
   no: this.data.no,
   pwd: pwd,
   email: email
  },
  header: {
   "Content-Type": "application/x-www-form-urlencoded"
  },
  success: function (res) {
   // console.log(res);
   if(res.data.error == true){
   wx.showToast({
    title: res.data.msg,
    icon: 'none',
    duration: 1000,
   })
   }else{
   //修改email
   var _student = wx.getStorageSync('student');
   _student.email = email;
   wx.setStorageSync('student', _student);

   wx.showToast({
    title: res.data.msg,
    icon: 'success',
    duration: 2000,
    success: function () {
    setTimeout(function () {
     wx.reLaunch({
     url: '../myinfo/myinfo',
     })
    }, 2000)
    }
   })
   }
  },
  })
 }
 },
这里我们用下边方法从student里只修改email的值。
//修改email
   var _student = wx.getStorageSync('student');
   _student.email = email;
   wx.setStorageSync('student', _student);
wx.setStorageSync(KEY,DATA)
将 data 存储在本地缓存中指定的 key 中,会覆盖掉原来该 key 对应的内容,这是一个同步接口。
wx.getStorageSync(KEY)
从本地缓存中同步获取指定 key 对应的内容。
如有问题或补充,欢迎小伙伴们留言哦~期待与你一同学习,共同进步!!!
以上所述是小编给大家介绍的微信小程序如何修改本地缓存key中单个数据详解整合,希望对大家有所帮助,如果大家有任何疑问请给我留言,小编会及时回复大家的。在此也非常感谢大家对网站的支持!
加载全部内容