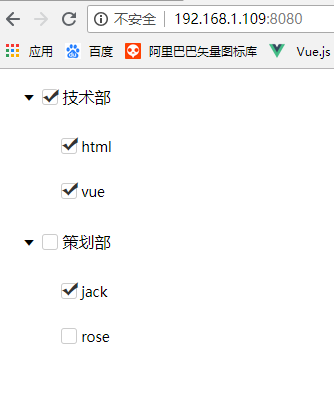
vue实现的树形结构加多选框示例
前端林三哥 人气:0本文实例讲述了vue实现的树形结构加多选框。分享给大家供大家参考,具体如下:
前面说了如何用递归组件来写vue树形结构,写了树形结构还要在前面加多选框,然后往数组里push选项,并在左边显示出来,然后左边进行拖拽排序,拖拽排序上一篇文章我已经介绍过了,在这我就不介绍了,如何用阿里巴巴矢量图标库我也有相关文章,也不介绍了,本节主要介绍vue树形结构加多选框,并实现一定的逻辑,比如全选,单选,全选和单选之间的联动
先看下目录结构

下面我直接贴下代码
首先是pages文件夹中tree.vue页面中引用组件
下面是tree.vue的代码
<template>
  <div class = "loginModuel">
    <Tree :menus = "menus" :depth = "depth" @selectItem = "selectItem" :actId = "actId" @checkItem = "checkItem"></Tree>
  </div>
</template>
<script src = "./index.js"></script>
<style lang = "scss" scoped src = "./index.scss"></style>
然后是tree.vue引入的index.js的代码
import Tree from '../../components/tree/tree';
import axios from 'axios';
export default{
  data(){
    return{
      msg:"这是登录页面",
      depth:0,
      menus:[],
      actId:"",
    }
  },
  components:{
    Tree
  },
  methods:{
    //用ajax获取数据
    getData(){
      return axios.get('/static/jsonhttps://img.qb5200.com/download-x/data.json');
    },
    // 调用ajax函数
    async getTree(){
      var last = await this.getData();
      if(last.data.code == 1){
        this.menus = last.data.data;
        //在每一项中添加selectArr和show
        this.addShow(this.menus);
      }
    },
    //递归函数在每一项中添加selectArr和show
    addShow(arr){
      for(var i = 0; i < arr.length;i++){
        this.$set(arr[i],"show",true);
        this.$set(arr[i],"selectArr",[]);
        if(arr[i].userList && arr[i].userList.length > 0){
          this.addShow(arr[i].userList)
        }
      }
    },
    //点击箭头使树展开收缩
    selectItem(data){
      if(data.userList && data.userList.length > 0){
        //如果此项下有userList且length大于0,则切换展开与折叠状态
        data.show = !data.show;
      }else{
        //如果此项下没有userList或length等于0,则将选中的id赋值给actId
        this.actId = data.id;
      }
    },
    //进行多选勾选
    checkItem(data){
      if(data.selectArr.length > 0){
        //如果这一项的selectArr有值,说明是被勾选状态,要把selectArr清空,清空勾选
        data.selectArr = [];
        //如果此选项清空勾选后,如果下面有userList的话,那么也同时要清空
        if(data.userList && data.userList.length > 0){
          this.clearChild(data.userList);
        }
        //如果此选项清空勾选后,要把所有的父元素,也全部清空勾选,因为它不勾选了,所有父元素的状态不可能还处于勾选状态,不管它勾选不勾选,我们都要清除一遍,以防万一
        this.clearFather(this.menus,data);
      }else{//如果这一项的selectArr为[],说明是未被勾选状态,在selectArr里加id值,添加勾选
        data.selectArr.push(data.id);
        //如果此选项清空勾选后,如果下面有userList的话,那么也同时勾选下面所有的孩子
        if(data.userList && data.userList.length > 0){
          this.addChild(data.userList);
        }
        //如果此选项勾选后,要判断所有的上级元素是不是应该全部打勾
        this.selectFather(this.menus,data);
      }
    },
    //定义函数清空所有孩子的勾选
    clearChild(arr){
      for(var i = 0; i < arr.length;i++){
        arr[i].selectArr = [];
        if(arr[i].userList && arr[i].userList.length > 0){
          this.clearChild(arr[i].userList);
        }
      }
    },
    //定义函数添加所有孩子的勾选
    addChild(arr){
      for(var i = 0; i < arr.length;i++){
        arr[i].selectArr.push(arr[i].id);
        if(arr[i].userList && arr[i].userList.length > 0){
          this.addChild(arr[i].userList);
        }
      }
    },
    //定义函数一层一层的往上寻找父元素的userList
    clearFather(father,data){
      for(var i = 0; i < father.length;i++){
        if(father[i].id == data.id){
          //找到data所在的userList为father,然后再通过这个userList找到拥有这个userList的父元素
          this.clearRealFather(this.menus,father);
        }else if(father[i].userList && father[i].userList.length > 0){
          this.clearFather(father[i].userList,data);
        }
      }
    },
    //定义函数根据找到的上层父元素的userList来寻找父元素,并将他们清除勾选
    clearRealFather(menus,arr){
      for(var i = 0; i < menus.length;i++){
        if(menus[i].userList == arr){
          //找到这个拥有userList的父元素后,将此selectArr清空
          menus[i].selectArr = [];
          //找到这个拥有userList的父元素后,再调用clearFather,再进行向上寻找父元素,知道没有父元素为止
          this.clearFather(this.menus,menus[i]);
        }else if(menus[i].userList && menus[i].userList.length > 0){
          this.clearRealFather(menus[i].userList,arr);
        }
      }
    },
    //定义函数一层一层的往上寻找父元素的userList
    selectFather(father,data){
      for(var i = 0; i < father.length;i++){
        if(father[i].id == data.id){
          var arr = [];
          for(var j = 0; j < father.length;j++){
            if(father[j].selectArr.length > 0){
              arr.push(father[i]);
            }
          }
          //判断此数组中是不是所有的selectArr都有值,如果有值,就执行selectRealFather,将上层父元素也勾选
          if(arr.length == father.length){
            this.selectRealFather(this.menus,father);
          }
        }else if(father[i].userList && father[i].userList.length > 0){
          this.selectFather(father[i].userList,data);
        }
      }
    },
    //定义函数根据找到的上层父元素的userList来寻找父元素,并将他们清除勾选
    selectRealFather(menus,arr){
      for(var i = 0; i < menus.length;i++){
        if(menus[i].userList == arr){
          //找到这个拥有userList的父元素后,给selectArr赋值,使其勾选
          menus[i].selectArr.push(menus[i].id);
          //找到这个拥有userList的父元素后,再调用clearFather,再进行向上寻找父元素,知道没有父元素为止
          this.clearFather(this.menus,menus[i]);
        }else if(menus[i].userList && menus[i].userList.length > 0){
          this.selectRealFather(menus[i].userList,arr);
        }
      }
    }
  },
  mounted(){
    this.getTree();
  }
}
然后是树形组件components文件夹中tree.vue的代码
1.tree.vue
<template>
  <ul class = "treeMoudel">
    <li v-for = "(item,index) in menus" :key = "index">
      <!-- 遍历menus,如果传过来的depth等于0,就添加topNode的class,如果不等于0,就添加noTopNode的class -->
      <div :class = "{'itemTree':true,'topNode':depth == 0,'noTopNode':depth != 0,'active':actId == item.id}">
        <!-- 判断如果含有name字段就显示name字段 -->
        <span :style = "transform" v-if = "item.name" :class = "{'topSpan':depth == 0,'noTopSpan':depth != 0}">
          <!-- 如果item有孩子且item.show为false,那么图标为折叠图标 -->
          <i class = "el-icon-caret-right" v-if = "item.userList && item.userList.length > 0 && !item.show" @click = "selectItem(item)"></i>
          <!-- 如果item有孩子且item.show为true,那么图标为展开图标 -->
          <i class = "el-icon-caret-bottom" v-if = "item.userList && item.userList.length > 0 && item.show" @click = "selectItem(item)"></i>
          <i class = "selectBox" @click = "checkItem(item)">
            <!-- 如果item的selectArr.length是大于0的,也就是里面有值的话就是勾选状态,否则就是不勾选状态 -->
            <i :class = "{'checkName iconfont':true, 'gouxuan5':item.selectArr.length > 0}" ></i>
          </i>
          {{item.name}}
        </span>
        <!-- 判断如果含有username字段就显示username字段 -->
        <span :style = "transform" v-if = "item.username" :class = "{'topSpan':depth == 0,'noTopSpan':depth != 0}">
          <!-- 如果item有孩子且item.show为false,那么图标为折叠图标 -->
          <i class = "el-icon-caret-right" v-if = "item.userList && item.userList.length > 0 && !item.show" @click = "selectItem(item)"></i>
          <!-- 如果item有孩子且item.show为true,那么图标为展开图标 -->
          <i class = "el-icon-caret-bottom" v-if = "item.userList && item.userList.length > 0 && item.show" @click = "selectItem(item)"></i>
          <i class = "selectBox" @click = "checkItem(item)">
            <!-- 如果item的selectArr.length是大于0的,也就是里面有值的话就是勾选状态,否则就是不勾选状态 -->
            <i :class = "{'checkUsername iconfont':true, 'gouxuan5':item.selectArr.length > 0}"></i>
          </i>
          {{item.username}}
        </span>
      </div>
      <el-collapse-transition>
        <!-- 递归组件就是自己调用自己,这里是在自己的组件内再次调用自己,但是务必要和pages中的tree页面中使用的一模一样才可以,否则树不会生效 -->
        <Tree v-if = "item.userList && item.userList.length > 0 && item.show" :menus = "item.userList" :depth = "depth+4" @selectItem = "selectItem" :actId = "actId" @checkItem = "checkItem"></Tree>
      </el-collapse-transition>
    </li>
  </ul>
</template>
<script src = "./index.js"></script>
<style src = "./index.scss" lang = "scss" scoped></style>
2.tree.vue中引入的index.js
export default{
  name:"Tree",
  props:["menus","depth","actId"],
  data(){
    return{
      msg:"这是二级菜单树",
    }
  },
  methods:{
    // 将selectItem方法暴露出去
    selectItem(item){
      this.$emit("selectItem",item);
    },
    // 将checkItem方法暴露出去
    checkItem(item){
      this.$emit("checkItem",item);
    }
  },
  computed:{
    //通过传过来的depth计算下级目录的偏移量,这里我用的transform
    transform(){
      return 'transform:translateX(' + this.depth*10 + 'px)';
    }
  }
}
3.tree.vue中引入的index.scss
.treeMoudel{
  li{
    .itemTree{
      width: 100%;
      padding-left:30px;
      position: relative;
      &:hover{
        background:#2B9EEE;
        color:#fff;
      }
      .selectBox{
        display: inline-block;
        width: 16px;
        height:16px;
        border:1px solid #ccc;
        border-radius: 3px;
        position: relative;
        background: #fff;
        top:2px;
        .checkName{
          position: absolute;
          top:-16px;
          left:0px;
          color:#333;
        }
        .checkUsername{
          position: absolute;
          top:-12px;
          left:0px;
          color:#333;
        }
      }
      span{
        display: inline-block;
        position: absolute;
        font-size:14px;
      }
      .topSpan{
        font-size:16px;
      }
      .noTopSpan{
        font-size:14px;
      }
    }
    .topNode{
      height:55px;
      line-height: 55px;
      font-size:16px;
      cursor: pointer;
    }
    .active{
      background:#2B9EEE;
      color:#fff;
    }
    .noTopNode{
      height:45px;
      line-height:45px;
      &:hover{
        background:#2B9EEE;
        cursor: pointer;
        color:#fff;
      }
    }
  }
}
看一下模拟数据的data.json长什么样子吧
{
  "code":1,
  "data":[
    {
      "id":"1.2",
      "name":"技术部",
      "userList":[
        {
          "id":"788d",
          "username":"html",
          "role":"主管"
        },
        {
          "id":"sda",
          "username":"vue",
          "role":"普通"
        }
      ]
    },
    {
      "id":"1.3",
      "name":"策划部",
      "userList":[
        {
          "id":"dsf",
          "username":"jack",
          "role":"主管"
        },
        {
          "id":"asdf",
          "username":"rose",
          "role":"普通"
        }
      ]
    }
  ]
}
至此,一个树形组件加多选框就做好了
下面看下效果图


ok,自此这一功能就实现啦,代码讲解我就不写了,注释里写的清清楚楚的,看注释就好啦!
希望本文所述对大家vue.js程序设计有所帮助。
加载全部内容