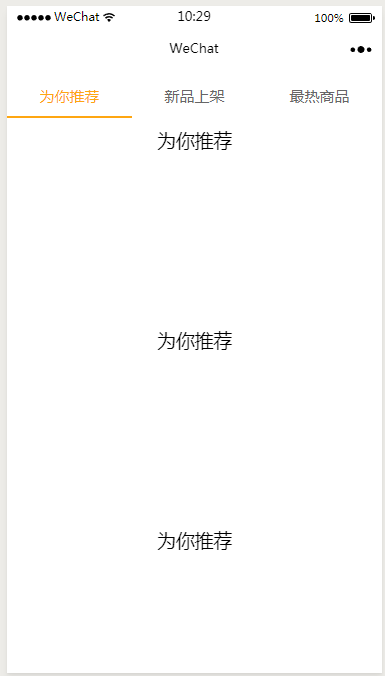
微信小程序实现swiper切换卡内嵌滚动条不显示的方法示例
CoKeny 人气:0本文实例讲述了微信小程序实现swiper切换卡内嵌滚动条不显示的方法。分享给大家供大家参考,具体如下:

index.wxml文件:
<view class="swiper-tab">
 <view class="swiper-tab-item {{currentTab==0 ? 'on' : ''}}" data-current="0" bindtap="swichNav">为你推荐</view>
 <view class="swiper-tab-item {{currentTab==1 ? 'on' : ''}}" data-current="1" bindtap="swichNav">新品上架</view>
 <view class="swiper-tab-item {{currentTab==2 ? 'on' : ''}}" data-current="2" bindtap="swichNav">最热商品</view>
</view>
<swiper current="{{currentTab}}" class="swiper-box" duration="300" style="height:{{clientHeight?clientHeight-'40'+'px':'auto'}}" bindchange="bindChange" >
 <swiper-item>
 <scroll-view scroll-y="{{true}}" style="height: {{clientHeight?clientHeight+'px':'auto'}}">
  <view style='height:200px'>为你推荐</view>
  <view style='height:200px'>为你推荐</view>
  <view style='height:200px'>为你推荐</view>
  <view style='height:200px'>为你推荐</view>
  <view style='height:200px'>为你推荐</view>
 </scroll-view>
 </swiper-item>
 <swiper-item>
  <view>新品上架</view>
 </swiper-item>
 <swiper-item>
  <view>最热商品</view>
 </swiper-item>
</swiper>
index.wxss文件:
/**index.wxss**/
.userinfo {
 display: flex;
 flex-direction: column;
 align-items: center;
}
.userinfo-avatar {
 width: 128rpx;
 height: 128rpx;
 margin: 20rpx;
 border-radius: 50%;
}
.userinfo-nickname {
 color: #aaa;
}
.usermotto {
 margin-top: 200px;
}
.swiper-tab {
 width: 100%;
 text-align: center;
 line-height: 80rpx;
 margin-top:10rpx;
 margin-bottom: 20rpx;
}
.swiper-tab-item {
 font-size: 30rpx;
 display: inline-block;
 width: 33.33%;
 color: #666;
}
.on {
 color: #FEA611;
 border-bottom: 5rpx solid #FEA611;
}
.swiper-box {
 display: block;
 height: 100%;
 width: 100%;
 overflow: hidden;
}
.swiper-box view {
 text-align: center;
}
index.js文件:
//获取应用实例
const app = getApp()
Page({
 data: {
  motto: 'Hello World',
  userInfo: {},
  hasUserInfo: false,
  canIUse: wx.canIUse('button.open-type.getUserInfo'),
  clientWidth: 0,
  clientHeight: 0,
  // tab切换
  currentTab: 0
 },
 //事件处理函数
 bindViewTap: function () {
  wx.navigateTo({
   url: '../logs/logs'
  })
 },
 onLoad: function () {
  var that = this;
  wx.getSystemInfo({
   success: function (res) {
    that.setData({
     clientHeight: res.windowHeight
    });
   }
  });
  if (app.globalData.userInfo) {
   this.setData({
    userInfo: app.globalData.userInfo,
    hasUserInfo: true
   })
  } else if (this.data.canIUse) {
   // 由于 getUserInfo 是网络请求,可能会在 Page.onLoad 之后才返回
   // 所以此处加入 callback 以防止这种情况
   app.userInfoReadyCallback = res => {
    this.setData({
     userInfo: res.userInfo,
     hasUserInfo: true
    })
   }
  } else {
   // 在没有 open-type=getUserInfo 版本的兼容处理
   wx.getUserInfo({
    success: res => {
     app.globalData.userInfo = res.userInfo
     this.setData({
      userInfo: res.userInfo,
      hasUserInfo: true
     })
    }
   })
  }
 },
 getUserInfo: function (e) {
  console.log(e)
  app.globalData.userInfo = e.detail.userInfo
  this.setData({
   userInfo: e.detail.userInfo,
   hasUserInfo: true
  })
 },
 bindChange: function (e) {
  var that = this;
  that.setData({ currentTab: e.detail.current });
 },
 swichNav: function (e) {
  var that = this;
  if (this.data.currentTab === e.target.dataset.current) {
   return false;
  } else {
   that.setData({
    currentTab: e.target.dataset.current
   })
  }
 }
})
希望本文所述对大家微信小程序开发有所帮助。
加载全部内容