使用ECharts实现状态区间图
Orange_J 人气:0需求背景
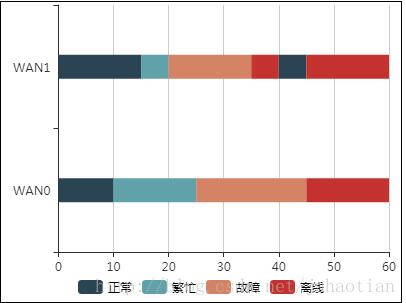
假如有如下图所示的图表需要显示多个网口在一段时间内的多个状态:y轴用于展示各网口,x轴用于展示时间(分钟),使用条形图的不同颜色来表示不同时间区间段的状态,使用深蓝、浅蓝、橙色、红色分别代表正常、繁忙、故障、离线四种状态。以WAN0为例,图中则表示了0~10分钟为正常,10~25分钟为繁忙,25~45分钟为故障,45~60分钟为离线。

根据此图,很容易想到可以用条形图试试。但后来发现,如果用堆叠条形图,则每种状态在每一个网口对应的图形中只能出现一次,这不能实现需求。于是继续查阅echart官网示例,终于在自定义类型图表中找到了一个相似的示例,地址
通过研究示例代码并进行一番改造,终于实现了上述需求。
在实现的过程中遇到了一个小问题,那就是使用自定义图表实现chart之后,图例不好处理。通过查看条形图的示例,找到了一种显示图例的方法,那就是使用空的条形图来显示图例,因为在series里面配置了条形图并配置name后,echart会自动根据name的值去legend的配置中匹配对应的图例名字并显示。
完整代码如下,保存于本地之后再自己去echart官网下载库文件(完整版)之后即可运行:
<!doctype html>
<html>
<head>
  <meta charset="utf-8">
</head>
<body>

  <div id="chart-box" style="width:400px;height:300px;border:1px solid black;"></div>

  <script src="./echarts.min.js"></script>
  <script>
    // 初始化echart
    var chart = echarts.init(document.getElementById('chart-box'));

    // 各状态的颜色
    var colors = ['#2f4554', '#61a0a8', '#d48265', '#c23531'];

    // 四种状态
    var state = ['正常', '繁忙', '故障', '离线'];

    // echart配置
    var opt = {
      color: colors,
      tooltip: {
        formatter: function (params) {
          return params.name + ':' + params.value[1] + '~' + params.value[2];
        }
      },
      legend: {
        data: state,
        bottom: '1%',
        selectedMode: false, // 图例设为不可点击
        textStyle: {
          color: '#000'
        }
      },
      grid: {
        left: '3%',
        right: '3%',
        top: '1%',
        bottom: '10%',
        containLabel: true
      },
      xAxis: {
        min: 0 // x轴零刻度对应的实际值
      },
      yAxis: {
        data: ['WAN0', 'WAN1']
      },
      series: [
        // 用空bar来显示四个图例
        {name: state[0], type: 'bar', data: []},
        {name: state[1], type: 'bar', data: []},
        {name: state[2], type: 'bar', data: []},
        {name: state[3], type: 'bar', data: []},
        {
          type: 'custom',
          renderItem: function (params, api) {
            var categoryIndex = api.value(0);
            var start = api.coord([api.value(1), categoryIndex]);
            var end = api.coord([api.value(2), categoryIndex]);
            var height = 24;

            return {
              type: 'rect',
              shape: echarts.graphic.clipRectByRect({
                x: start[0],
                y: start[1] - height / 2,
                width: end[0] - start[0],
                height: height
              }, {
                x: params.coordSys.x,
                y: params.coordSys.y,
                width: params.coordSys.width,
                height: params.coordSys.height
              }),
              style: api.style()
            };
          },
          encode: {
            x: [1, 2],
            y: 0
          },
          data: [
            {
              itemStyle: { normal: { color: colors[0] } },
              name: '正常',
              value: [0, 0, 10]
            },
            {
              itemStyle: { normal: { color: colors[1] } },
              name: '繁忙',
              value: [0, 10, 25]
            },
            {
              itemStyle: { normal: { color: colors[2] } },
              name: '故障',
              value: [0, 25, 45]
            },
            {
              itemStyle: { normal: { color: colors[3] } },
              name: '离线',
              value: [0, 45, 60]
            },
            {
              itemStyle: { normal: { color: colors[0] } },
              name: '正常',
              value: [1, 0, 15]
            },
            {
              itemStyle: { normal: { color: colors[1] } },
              name: '繁忙',
              value: [1, 15, 20]
            },
            {
              itemStyle: { normal: { color: colors[2] } },
              name: '故障',
              value: [1, 20, 35]
            },
            {
              itemStyle: { normal: { color: colors[3] } },
              name: '离线',
              value: [1, 35, 40]
            },
            {
              itemStyle: { normal: { color: colors[0] } },
              name: '正常',
              value: [1, 40, 45]
            },
            {
              itemStyle: { normal: { color: colors[3] } },
              name: '离线',
              value: [1, 45, 60]
            }
          ]
        }
      ]
    };
    chart.setOption(opt);
  </script>
</body>
</html>
对于自定义图表的data字段里数据项:
{
  itemStyle: { normal: { color: colors[0] } },
  name: '正常',
  value: [0, 0, 10]
}
- itemStyle: 所渲染的矩形的样式
- name: 该矩形的状态名
- value: 第0项代表类别标识,例如0就代表WAN0的,1就是WAN1的;第1和第2项代表该矩形区域对应的x坐标范围开始于0,结束于1。
加载全部内容