vue2中,根据list的id进入对应的详情页并修改title方法
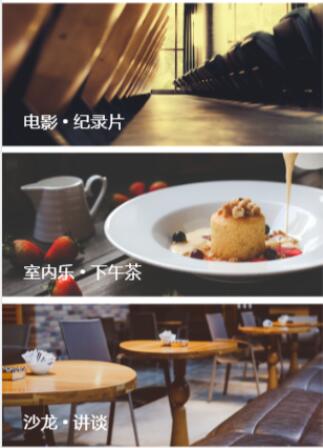
赵海辛 人气:0一般项目中,我们会遇到有个list。。。然后你随便点击一个,会进入他对应的详情页。。。正常,那个详情页是一个公共的组件,我们只需根据id传值来判断,这个页面显示的是哪个list的数据即可。如图:点击电影进入电影详情……以此类推


具体代码如下:
(有人会奇怪,我为什么不循环……这个是根据项目需求而定的,这个相当于入口,而进入里面分别对应的还是多个list,并且后台给的图片的url也不一样,我懒得v-if去写了,so,这三个我就用了通过了路由id过去。当然,后面有循环list。。两种不同的方式,大家根据自己的项目来选择就好微笑)
<template>
 <section class="club">
 <section class="img2_cont">
  <router-link to="/club/itemList/0">
  <section>
   <img :src="getContextPathSrc+movie_url">
   <p>电影 • 纪录片</p>
  </section>
  </router-link>
  <router-link to="/club/itemList/1">
  <section>
   <img :src="getContextPathSrc+music_url">
   <p>室内乐 • 下午茶</p>
  </section>
  </router-link>
  <router-link to="/club/itemList/2">
  <section>
   <img :src="getContextPathSrc+sport_url">
   <p>沙龙 • 讲谈</p>
  </section>
  </router-link>
 </section>
 </section>
</template>
<script>
 import api from './../fetch/api';
 import { mapGetters } from 'vuex';
 export default {
 name: 'club',
 data () {
  return {
  backMsg: {},
  movie_url: '',
  music_url: '',
  sport_url: '',
  }
 },
 computed: {
  ...mapGetters([
  'getContextPathSrc',
  'sessionId',
  'token'
  ])
 },
 created() {
 api.commonApi('后台接口url','params')
  .then(res => {
  this.backMsg = res.data;
 // 电影图片
 this.movie_url = res.data.IMG_LIST[0].IMG_URL;
 // 室内乐
 this.music_url = res.data.IMG_LIST[1].IMG_URL;
 // 体育图片
 this.sport_url = res.data.IMG_LIST[2].IMG_URL;
 })
 },
 }
</script>
而路由index.js里面需要如下写:
{
 path: 'itemList/:id',
 name: 'itemList',
 component: resolve => require(['components/club/itemList.vue'], resolve)
},
这样就完成了初步的列表进入对应的页面。有人会发现, 看我的截图,明显是有左右滑动的,这里是我把代码删掉了,因为那个不是我今天要巩固的= =。接下来,就是在对应页面是N个列表list,我们需要点击每个进入他所对应的详情页,而我也是用循环写的list(就是上面的第二张图片,推荐下的list太多了,不循环会死人的偷笑),具体代码如下:
<template>
 <div class="page-loadmore">
 <section class="Ctab">
  <p :class="{tActive:tActive}" @click="toRecommend()">推荐</p>
  <p :class="{lActive:lActive}" @click="toClassic()">经典</p>
 </section>
 <!-- 下拉加载更多产品列表 -->
 <load-more
  :bottom-method="loadBottom"
  :bottom-all-loaded="allLoaded"
  :bottomPullText='bottomText'
  :auto-fill="false"
  @bottom-status-change="handleBottomChange"
  ref="loadmore">
  <ul class="page-loadmore-list">
  <li v-for="(item,key) in backMsg" class="page-loadmore-listitem">
   <movie-type :item="item"></movie-type>
  </li>
  </ul>
  <div v-if="loading" slot="bottom" class="loading">
  <img src="./../../assets/main/uploading.gif">
  </div>
 </load-more>
 </div>
</template>
<script type="text/babel">
 import api from './../../fetch/api';
 import { mapGetters } from 'vuex';
 import LoadMore from './../common/loadmore.vue';
 import MovieType from './movieType.vue';
 export default {
 props:{
  TYPE: Number,
  backMsg: Array,
  dataType: String,
  loading: Boolean,
  allLoaded: Boolean,
  pageNo: Number,
 },
 data() {
  return {
  tActive: true,
  lActive: false,
  status: '',
  bottomText: '上拉加载更多...',
  };
 },
 computed: {
  ...mapGetters([
  'getContextPathSrc',
  'sessionId',
  'token'
  ]),
 },
 components: {
  LoadMore,
  MovieType
 },
 methods: {
  // 点击推荐按钮
  toRecommend: function() {
  this.tActive = true;
  this.lActive = false;
  this.$emit('toRecommend', {dataType: this.dataType, TYPE: this.TYPE});
  },
  // 点击经典按钮
  toClassic: function() {
  this.tActive = false;
  this.lActive = true;
  this.$emit('toClassic', {dataType: this.dataType, TYPE: this.TYPE});
  },
  // 加载更多的方法
  loadBottom: function() {
  alert(1)
  this.$emit('loadBottom', {dataType: this.dataType, TYPE: this.TYPE});
  },
  handleBottomChange(status) {
  this.bottomStatus = status;
  },
 },
 };
</script>
这里我把循环出的列表写了个单独的组件。movieType组件内容如下:
<template>
 <div class="page-loadmore">
 <router-link :to="'/club/itemDetail/'+item.ID">
  <section>
  <img :src="getContextPathSrc+item.IMG_URL" class="Pimg">
  <section>
   <h3>{{item.NAME}}</h3>
   <aside>
   <img src="../../assets/club/city.png">
   <span>{{item.CITY}}</span>
   </aside>
   <aside>
   <img src="../../assets/club/time.png">
   <span>{{item.START_DATE | movieTime}}-{{item.END_DATE | movieTime}}</span>
   </aside>
  </section>
  </section>
 </router-link>
 </div>
</template>
<script>
 import api from './../../fetch/api';
 import { mapGetters } from 'vuex';
 import LoadMore from './../common/loadmore.vue';
 export default {
 props:{
  item: Object,
 },
 data() {
  return {
  };
 },
 computed: {
  ...mapGetters([
  'getContextPathSrc',
  'sessionId',
  'token'
  ]),
 },
 };
</script>
当然,最重要的一步不能忘掉。。。我们需要修改路由index.js文件:
{
 path: 'itemDetail/:ID',
 name: 'itemDetail',
 component: resolve => require(['components/club/itemDetail.vue'], resolve)
},
这样就大功告成了。两种方法,喜欢哪种用哪种就好。。
以上这篇vue2中,根据list的id进入对应的详情页并修改title方法就是小编分享给大家的全部内容了,希望能给大家一个参考,也希望大家多多支持。
加载全部内容