基于vue-cli vue-router搭建底部导航栏移动前端项目
澹台宇鹏 人气:0vue.js学习 踩坑第一步
1.首先安装vue-cli脚手架
不多赘述,主要参考 Vue 爬坑之路(一)—— 使用 vue-cli 搭建项目
2.项目呈现效果

项目呈现网址:www.zhoupeng520.cn/index.html
项目中主要用了Flex布局,以及viewport相关知识,已达到适应各终端屏幕的目的
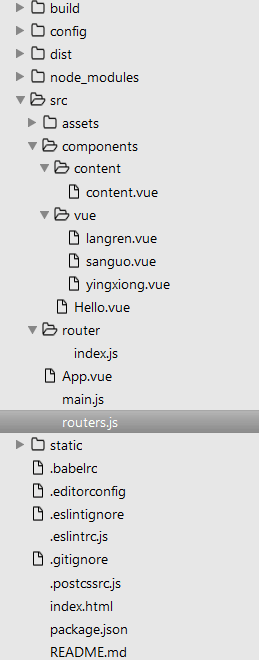
3.项目主要目录

4主要代码如下
(1)App.vue
<template>
 <div id="app">
 <router-view class="view"></router-view>
 <div class="nav">
  <router-link class="nav-item" to="/langren">狼人杀</router-link>
  <router-link class="nav-item" to="/sanguo">三国杀</router-link>
  <router-link class="nav-item" to="/yingxiong">英雄杀</router-link>
 </div>
 </div>
</template>
<script>
</script>
<style>
 #app{
 height: 100%;
 display: flex;
 flex-direction: column;
 flex: 1;
 }
 .nav{
 height: 80px;
 line-height: 80px;
 display: flex;
 text-align: center;
 }
 .nav-item{
 flex: 1;
 text-decoration: none;
 }
 .nav-item:link,.nav-item:visited{
 background-color: white;
 color: black;
 }
 .nav-item:hover,.nav-item:active{
 color: white;
 background-color: #C8C6C6;
 }
</style>
(2)main.js
// The Vue build version to load with the `import` command
// (runtime-only or standalone) has been set in webpack.base.conf with an alias.
import Vue from 'vue';
import VueRouter from 'vue-router';
import router from './router';
import App from './App';
Vue.config.productionTip = false;
Vue.use(VueRouter);
/* eslint-disable no-new */
new Vue({
 el: '#app',
 router,
 template: '</App>',
 render: h => h(App)
});
(3)index.js //这个就是路由的配置
这个可以直接写进main.js 也可像我一样在main.js中引入,各有各的好处
import Vue from 'vue';
import VueRouter from 'vue-router';
Vue.use(VueRouter);

const router = new VueRouter({
 routes: [{
  path: '/langren',
  component: require('../components/vue/langren.vue')
 }, {
  path: '/sanguo',
  component: require('../components/vue/sanguo.vue')
 }, {
  path: '/yingxiong',
  component: require('../components/vue/yingxiong.vue')
 }, {
  path: '/',
  component: require('../components/content/content.vue')
 }]
});
export default router;
也可以直接写一个routers.js放在src目录下
(4)router.js
import langren from './components/vue/langren.vue';
import sanguo from './components/vue/sanguo.vue';
import yingxiong from './components/vue/yingxiong.vue';
const routers = [
 {
  path: '/langren',
  component: langren
 },
 {
  path: '/sanguo',
  component: sanguo
 },
 {
  path: '/yingxiong',
  component: yingxiong
 }
];
export default routers;
(5)content.vue
<template>
 <div class="content"><p>我是content!</p></div>
</template>
<script type="text/ecmascript-6">
 export default {};
</script>
<style lang="stylus" rel="stylesheet/stylus">
 .content
  height:100%
  background:blue
  flex:1
  display:flex;
  justify-content:center
  align-items:center
</style>
langren.vue / sanguo.vue / yingxiong.vue 代码和这个一样只是颜色和p中字段改了下。
主要代码就这些了。
5.另外写一下主要遇到的报错以及解决方法
(1)由于是用来es6的语法,所以要遵循它 的一些语法规则,所以有的代码最后要多一行空行,有的要加分号,有的要加空格,根据报错来进行更改
(2)semi//indent//no-tabs报错,在.eslintrc.js更改代码如下,主要添加了最后几行。
// http://eslint.orghttps://img.qb5200.com/download-x/docs/user-guide/configuring
module.exports = {
 root: true,
 parser: 'babel-eslint',
 parserOptions: {
 sourceType: 'module'
 },
 env: {
 browser: true,
 },
 // https://github.com/feross/standard/blob/master/RULES.md#javascript-standard-style
 extends: 'standard',
 // required to lint *.vue files
 plugins: [
 'html'
 ],
 // add your custom rules here
 'rules': {
 // allow paren-less arrow functions
 'arrow-parens': 0,
 // allow async-await
 'generator-star-spacing': 0,
 // allow debugger during development
 'no-debugger': process.env.NODE_ENV === 'production' ? 2 : 0,
 'semi': ['error', 'always'],
 'indent': 0,
 'space-before-function-paren': 0,
 "no-tabs":"off"
 }
}
总结
以上所述是小编给大家介绍的基于vue-cli vue-router搭建底部导航栏移动前端项目,希望对大家有所帮助,如果大家有任何疑问请给我留言,小编会及时回复大家的。在此也非常感谢大家对网站的支持!
加载全部内容