Vue的Flux框架之Vuex状态管理器
osjj 人气:0学习vue之前,最重要是弄懂两个概念,一是“what”,要理解vuex是什么;二是“why”,要清楚为什么要用vuex。
Vuex是什么?
Vuex 类似 React 里面的 Redux 的状态管理器,用来管理Vue的所有组件状态。
为什么使用Vuex?
当你打算开发大型单页应用(SPA),会出现多个视图组件依赖同一个状态,来自不同视图的行为需要变更同一个状态。
遇到以上情况时候,你就应该考虑使用Vuex了,它能把组件的共享状态抽取出来,当做一个全局单例模式进行管理。这样不管你在何处改变状态,都会通知使用该状态的组件做出相应修改。
下面讲解如何使用Vuex
一个简单的Vuex示例
本文就讲解安装Vuex,直接通过代码讲解Vuex使用。
import Vue from 'vue';
import Vuex from 'vuex';
Vue.use(Vuex);

const store = new Vuex.Store({
  state: {
    count: 0
  },
  mutations: {
    increment (state) {
      state.count++
    }
  }
})
上面就是一个简单的Vuex示例,每一个Vuex应用就是一个store,在store中包含组件中的共享状态state和改变状态的方法(暂且称作方法)mutations。
需要注意的是只能通过mutations改变store的state的状态,不能通过store.state.count = 5;直接更改(其实可以更改,不建议这么做,不通过mutations改变state,状态不会被同步)。
使用store.commit方法触发mutations改变state:
store.commit('increment');

console.log(store.state.count) // 1
一个简简单单的Vuex应用就实现了。
在Vue组件使用Vuex
如果希望Vuex状态更新的时候,组件数据得到相应的更新,那么可以用计算属性computed获取state的更新状态。
const Counter = {
  template: `<div>{{ count }}</div>`,
  computed: {
    count () {
      return store.state.count;
    }
  }
}
每一个store.state都是全局状态,在使用Vuex时候需要在根组件或(入口文件)注入。
// 根组件
import Vue from 'vue';
import Vuex from 'vuex';

Vue.use(Vuex);
const app = new Vue({
  el: '#app',
  store,
  components: {
    Counter
  },
  template: `
    <div class="app">
      <counter></counter>
    </div>
  `
})
通过这种注入机制,就能在子组件Counter通过this.$store访问:
// Counter 组件
const Counter = {
  template: `<div>{{ count }}</div>`,
  computed: {
    count () {
      return this.$store.state.count
    }
  }
}
mapState函数
computed: {
  count () {
    return this.$store.state.count
  }
}
上面通过count计算属性获取同名state.count属性,如何每一次获取都要写一个这样的方法,是不显得重复又麻烦?可以使用mapState函数简化这个过程。
import { mapState } from 'vuex';

export default {
  computed: mapState ({
    count: state => state.count,
    countAlias: 'count',  // 别名 `count` 等价于 state => state.count
  })
}
还有更简单的使用方法:
computed: mapState([
 'count'
 // 映射 this.count 为 store.state.count
])
Getters对象
如果我们需要对state对象进行做处理计算,如下:
computed: {
  doneTodosCount () {
    return this.$store.state.todos.filter(todo => todo.done).length
  }
}
如果多个组件都要进行这样的处理,那么就要在多个组件中复制该函数。这样是很没有效率的事情,当这个处理过程更改了,还有在多个组件中进行同样的更改,这就更加不易于维护。
Vuex中getters对象,可以方便我们在store中做集中的处理。Getters接受state作为第一个参数:
const store = new Vuex.Store({
 state: {
  todos: [
   { id: 1, text: '...', done: true },
   { id: 2, text: '...', done: false }
  ]
 },
 getters: {
  doneTodos: state => {
   return state.todos.filter(todo => todo.done)
  }
 }
})
在Vue中通过store.getters对象调用:
computed: {
 doneTodos () {
  return this.$store.getters.doneTodos
 }
}
Getter也可以接受其他getters作为第二个参数:
getters: {
 doneTodos: state => {
   return state.todos.filter(todo => todo.done)
 },
 doneTodosCount: (state, getters) => {
  return getters.doneTodos.length
 }
}
mapGetters辅助函数
与mapState类似,都能达到简化代码的效果。mapGetters辅助函数仅仅是将store中的getters映射到局部计算属性:
import { mapGetters } from 'vuex'

export default {
 // ...
 computed: {
  // 使用对象展开运算符将 getters 混入 computed 对象中
  ...mapGetters([
   'doneTodosCount',
   'anotherGetter',
   // ...
  ])
 }
}
上面也可以写作:
computed: mapGetters([
   'doneTodosCount',
   'anotherGetter',
   // ...
  ])
所以在Vue的computed计算属性中会存在两种辅助函数:
import { mapState, mapGetters } from 'vuex';

export default {
  // ...
  computed: {
    ...mapGetters([ ... ]),
    ...mapState([ ... ])
  }
}
Mutations
之前也说过了,更改Vuex的store中的状态的唯一方法就是mutations。
每一个mutation都有一个事件类型type和一个回调函数handler。
调用mutation,需要通过store.commit方法调用mutation type:
store.commit('increment')
Payload 提交载荷
也可以向store.commit传入第二参数,也就是mutation的payload:
mutaion: {
  increment (state, n) {
    state.count += n;
  }
}

store.commit('increment', 10);
单单传入一个n,可能并不能满足我们的业务需要,这时候我们可以选择传入一个payload对象:
mutation: {
  increment (state, payload) {
    state.totalPrice += payload.price + payload.count;
  }
}

store.commit({
  type: 'increment',
  price: 10,
  count: 8
})
mapMutations函数
不例外,mutations也有映射函数mapMutations,帮助我们简化代码,使用mapMutations辅助函数将组件中的methods映射为store.commit调用。
import { mapMutations } from 'vuex'

export default {
 // ...
 methods: {
  ...mapMutations([
   'increment' // 映射 this.increment() 为 this.$store.commit('increment')
  ]),
  ...mapMutations({
   add: 'increment' // 映射 this.add() 为 this.$store.commit('increment')
  })
 }
}
Actions
注 Mutations必须是同步函数。
如果我们需要异步操作和提交多个Mutations,Mutations就不能满足我们需求了,这时候我们就需要Actions了。
Actions
Action 类似于 mutation,不同在于:
- Action 提交的是 mutation,而不是直接变更状态。
- Action 可以包含任意异步操作。
让我们来注册一个简单的 action:
var store = new Vuex.Store({
 state: {
  count: 0
 },
 mutations: {
  increment: function(state) {
   state.count++;
  }
 },
 actions: {
  increment: function(store) {
   store.commit('increment');
  }
 }
});
分发 Action
Action 函数接受一个与 store 实例具有相同方法和属性的 context 对象,因此你可以调用 context.commit 提交一个 mutation,或者通过 context.state 和 context.getters 来获取 state 和 getters。
分发 Action
Action 通过 store.dispatch 方法触发:
乍一眼看上去感觉多此一举,我们直接分发 mutation 岂不更方便?实际上并非如此,还记得 mutation必须同步执行这个限制么?Action就不受约束! 我们可以在 action 内部执行异步操作:
actions: {
 incrementAsync ({ commit }) {
  setTimeout(() => {
   commit('increment')
  }, 1000)
 }
}
Actions 支持同样的载荷方式和对象方式进行分发:
// 以载荷形式分发
store.dispatch('incrementAsync', {
 amount: 10
})

// 以对象形式分发
store.dispatch({
 type: 'incrementAsync',
 amount: 10
})
mapActions
同样地,action也有相对应的mapActions 辅助函数
mapActions
mapActions 辅助函数跟mapMutations一样都是组件的 methods 调用:
import { mapActions } from 'vuex'

export default {
 // ...
 methods: {
  ...mapActions([
   'increment' // 映射 this.increment() 为 this.$store.dispatch('increment')
  ]),
  ...mapActions({
   add: 'increment' // 映射 this.add() 为 this.$store.dispatch('increment')
  })
 }
}
mutation-types
关于mutation-types方面的讲解官方文档很少说明,但在实际的中大项目中,对==mutation-types==的配置是必不可少的,Vuex的文档只讲解了state,getters,mutation,actions四个核心概念,下面我简单补充下mutation-types的使用。
顾名思义,==mutation-types==其实就是mutation实例中各个方法的设定,一般要mutation方法前先在mutation-types用大写写法设定,再在mutation里引入使用,下面看看项目实际使用:
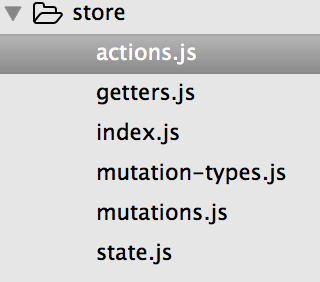
项目组织结构

在mutation-types定义好mutation的方法结构:
//SET_SINGER,SET_SONG 为mutation中要使用的方法名

export const SET_SINGER = 'SET_SINGER'

export const SET_SONG = 'SET_SONG'
在mutation中导入使用:
import * as types from ',/mutation-types.js'

const mutations = {
  [types.SET_SINGER](state, singer) {
    ....
  },
  [types.SET_SONG](state, song) {
    ....
  }
}
结语
看完上面对vuex的讲解相信你已经入门了,现在可以看看具体的项目加深理解,可以参考我的github一个购物车例子: https://github.com/osjj/vue-shopCart
加载全部内容