Java长轮询
赤耳小永 人气:1分析一下长轮询的实现方式
现在各大中间件都使用了长轮询的数据交互方式,目前比较流行的例如Nacos的配置中心,RocketMQ Pull(拉模式)消息等,它们都是采用了长轮询方的式实现。就例如Nacos的配置中心,如何做到服务端感知配置变化实时推送给客户端的呢?
长轮询与短轮询
说到长轮询,肯定存在和它相对立的,我们暂且叫它短轮询吧,我们简单介绍一下短轮询:
短轮询也是拉模式。是指不管服务端数据有无更新,客户端每隔定长时间请求拉取一次数据,可能有更新数据返回,也可能什么都没有。如果配置中心使用这样的方式,会存在以下问题:
由于配置数据并不会频繁变更,若是一直发请求,势必会对服务端造成很大压力。还会造成推送数据的延迟,比如:每10s请求一次配置,如果在第11s时配置更新了,那么推送将会延迟9s,等待下一次请求;
无法在推送延迟和服务端压力两者之间中和。降低轮询的间隔,延迟降低,压力增加;增加轮询的间隔,压力降低,延迟增高。
长轮询为了解决短轮询存在的问题,客户端发起长轮询,如果服务端的数据没有发生变更,会hold住请求,直到服务端的数据发生变化,或者等待一定时间超时才会返回。返回后,客户端再发起下一次长轮询请求监听。
这样设计的好处:
- 相对于低延时,客户端发起长轮询,服务端感知到数据发生变更后,能立刻返回响应给客户端。
- 服务端的压力减小,客户端发起长轮询,如果数据没有发生变更,服务端会hold住此次客户端的请求,hold住请求的时间一般会设置到30s或者60s,并且服务端hold住请求不会消耗太多服务端的资源。
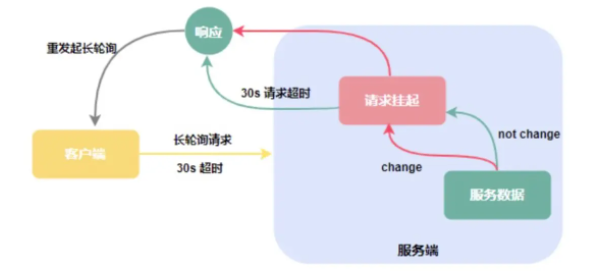
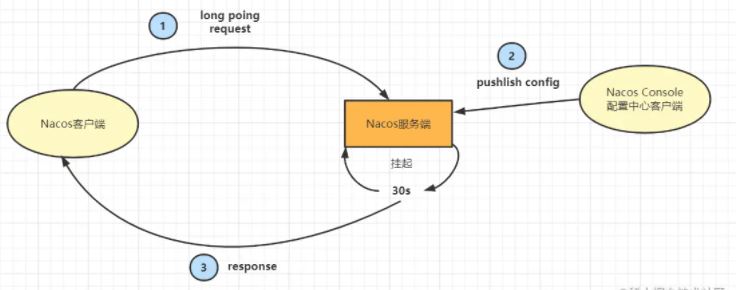
下面借用图片来说明一下流程:

- 首先客户端发起长轮询请求,服务端收到客户端的请求,这时会挂起客户端的请求,如果在服务端设计的30s之内都没有发生变更,服务端会响应回客户端数据没有变更,客户端会继续发送请求。
- 如果在30s之内服务数据发生了变更,服务端会推送变更的数据到客户端。
配置中心长轮询设计

上面我们已经介绍了整个思路,下面我们用代码实现一下:
- 首先客户端发送一个HTTP请求到服务端;服务端会开启一个异步线程,如果一直没有数据变更会挂起当前请求(一个 Tomcat 也就 200 个线程,长轮询也不应该阻塞 Tomcat 的业务线程,所以需要配置中心在实现长轮询时往往采用异步响应的方式来实现,而比较方便实现异步 HTTP 的常见手段便是 Servlet3.0 提供的 AsyncContext 机制。)
- 在服务端设置的超时时间内仍然没有数据变更,那就返回客户端一个没有变更的标识。例如响应304状态码;
- 在服务端设置的超时时间内有数据变更了,就返回客户端变更的内容;
配置中心长轮询实现
下面用代码实现长轮询:
客户端实现
@Slf4j
public class ConfigClientWorker {
private final CloseableHttpClient httpClient;
private final ScheduledExecutorService executorService;
public ConfigClientWorker(String url, String dataId) {
this.executorService = Executors.newSingleThreadScheduledExecutor(runnable -> {
Thread thread = new Thread(runnable);
thread.setName("client.worker.executor-%d");
thread.setDaemon(true);
return thread;
});
// ① httpClient 客户端超时时间要大于长轮询约定的超时时间
RequestConfig requestConfig = RequestConfig.custom().setSocketTimeout(40000).build();
this.httpClient = HttpClientBuilder.create().setDefaultRequestConfig(requestConfig).build();
executorService.execute(new LongPollingRunnable(url, dataId));
}
class LongPollingRunnable implements Runnable {
private final String url;
private final String dataId;
public LongPollingRunnable(String url, String dataId) {
this.url = url;
this.dataId = dataId;
}
@SneakyThrows
@Override
public void run() {
String endpoint = url + "?dataId=" + dataId;
log.info("endpoint: {}", endpoint);
HttpGet request = new HttpGet(endpoint);
CloseableHttpResponse response = httpClient.execute(request);
switch (response.getStatusLine().getStatusCode()) {
case 200: {
BufferedReader rd = new BufferedReader(new InputStreamReader(response.getEntity()
.getContent()));
StringBuilder result = new StringBuilder();
String line;
while ((line = rd.readLine()) != null) {
result.append(line);
}
response.close();
String configInfo = result.toString();
log.info("dataId: [{}] changed, receive configInfo: {}", dataId, configInfo);
break;
}
// ② 304 响应码标记配置未变更
case 304: {
log.info("longPolling dataId: [{}] once finished, configInfo is unchanged, longPolling again", dataId);
break;
}
default: {
throw new RuntimeException("unExcepted HTTP status code");
}
}
executorService.execute(this);
}
}
public static void main(String[] args) throws IOException {
new ConfigClientWorker("http://127.0.0.1:8080/listener", "user");
System.in.read();
}
}- httpClient 客户端超时时间要大于长轮询约定的超时时间,不然还没等到服务端返回,客户端自己就超时了。
- 304 响应码标记配置未变更;
- http://127.0.0.1:8080/listener 是服务端地址;
服务端实现
@RestController
@Slf4j
@SpringBootApplication
public class ConfigServer {
@Data
private static class AsyncTask {
// 长轮询请求的上下文,包含请求和响应体
private AsyncContext asyncContext;
// 超时标记
private boolean timeout;
public AsyncTask(AsyncContext asyncContext, boolean timeout) {
this.asyncContext = asyncContext;
this.timeout = timeout;
}
}
// guava 提供的多值 Map,一个 key 可以对应多个 value
private Multimap<String, AsyncTask> dataIdContext = Multimaps.synchronizedSetMultimap(HashMultimap.create());
private ThreadFactory threadFactory = new ThreadFactoryBuilder().setNameFormat("longPolling-timeout-checker-%d")
.build();
private ScheduledExecutorService timeoutChecker = new ScheduledThreadPoolExecutor(1, threadFactory);
// 配置监听接入点
@RequestMapping("/listener")
public void addListener(HttpServletRequest request, HttpServletResponse response) {
String dataId = request.getParameter("dataId");
// 开启异步!!!
AsyncContext asyncContext = request.startAsync(request, response);
AsyncTask asyncTask = new AsyncTask(asyncContext, true);
// 维护 dataId 和异步请求上下文的关联
dataIdContext.put(dataId, asyncTask);
// 启动定时器,30s 后写入 304 响应
timeoutChecker.schedule(() -> {
if (asyncTask.isTimeout()) {
dataIdContext.remove(dataId, asyncTask);
response.setStatus(HttpServletResponse.SC_NOT_MODIFIED);
// 标志此次异步线程完成结束!!!
asyncContext.complete();
}
}, 30000, TimeUnit.MILLISECONDS);
}
// 配置发布接入点
@RequestMapping("/publishConfig")
@SneakyThrows
public String publishConfig(String dataId, String configInfo) {
log.info("publish configInfo dataId: [{}], configInfo: {}", dataId, configInfo);
Collection<AsyncTask> asyncTasks = dataIdContext.removeAll(dataId);
for (AsyncTask asyncTask : asyncTasks) {
asyncTask.setTimeout(false);
HttpServletResponse response = (HttpServletResponse)asyncTask.getAsyncContext().getResponse();
response.setStatus(HttpServletResponse.SC_OK);
response.getWriter().println(configInfo);
asyncTask.getAsyncContext().complete();
}
return "success";
}
public static void main(String[] args) {
SpringApplication.run(ConfigServer.class, args);
}
}- 客户端请求过来,首先开启一个异步线程
request.startAsync(request, response);保证不占用Tomcat线程。此时Tomcat线程以及释放。配合asyncContext.complete()使用。 dataIdContext.put(dataId, asyncTask);会将 dataId 和异步请求上下文给关联起来,方便配置发布时,拿到对应的上下文Multimap<String, AsyncTask> dataIdContext它是一个多值 Map,一个 key 可以对应多个 value,你也可以理解为Map<String,List<AsyncTask>>timeoutChecker.schedule()启动定时器,30s 后写入 304 响应@RequestMapping("/publishConfig"),配置发布的入口。配置变更后,根据 dataId 一次拿出所有的长轮询,为之写入变更的响应。asyncTask.getAsyncContext().complete();表示这次异步请求结束了。
启动配置监听
先启动 ConfigServer,再启动 ConfigClient。30s之后控制台打印第一次超时之后收到服务端304的状态码
16:41:14.824 [client.worker.executor-%d] INFO cn.haoxiaoyong.poll.ConfigClientWorker - longPolling dataId: [user] once finished, configInfo is unchanged, longPolling again
请求一下配置发布,请求localhost:8080/publishConfig?dataId=user&configInfo=helloworld
服务端打印日志:
2022-08-25 16:45:56.663 INFO 90650 --- [nio-8080-exec-2] cn.haoxiaoyong.poll.ConfigServer : publish configInfo dataId: [user], configInfo: helloworld
加载全部内容