nodejs实现JSON文件转Excel 使用nodejs实现JSON文件自动转Excel的工具(推荐)
Dawei 人气:3这段时间做项目,需要把json格式的文档给到业务人员去翻译,每次手动翻译,很麻烦,于是就想着写一个高逼格的自动化工具来完成这件事情。
说实现,初步思路就是使用类似"json2excel start"这样的命令,然后它就自己跑。像vue,react运行命令一样。
首先,我们 npm init 新建一个项目工程,新建我们项目的核心文件json2excel.js ,并运行node json2exce.js,然后控制台就可以打印东西了。

把一个文件转化成另一个文件,我们要知道这个文件的路径,以及保存到的位置,所以命令设计为:
json2excel start inpath outpath
我们使用一个非常好用的命令行辅助包"commander",提示命令输入,json2excel.js如下,
const program = require('commander')

// 定义当前的版本
program
 .version(require('../package').version)

// 定义命令方法
program
 .usage('<command> [inPath] [toPath]')

program
 .command('start [paths...]')
 .description('Conversion from JSON to csv')
 .alias('-s')
 .action(paths => require('./command/j2c')(paths))

program.parse(process.argv)

if (!program.args.length) {
 program.help()
}
然后运行node json2excel.js会看到(现在还没安装bin命令,所以用node json2excel代替json2excel),
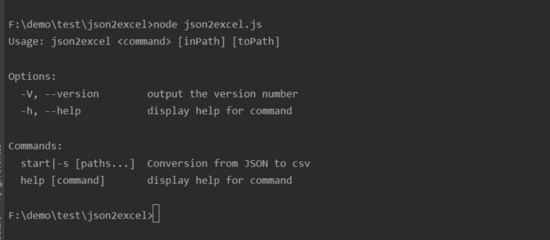
非常哇瑟的一个操作,就可以看到命令引导提示了。
.command() 是定义命令及其后面的参数,我们定义了paths
.description() 是描述
.alias() 是命令的别名
.action() 是运行命令时要执行的操作,paths是command里面传过来的参数
我们新建../command/j2c.js,.action()的时候我们有接受命令参数
module.exports = (paths) => {
 // 这样就得到了输入、输出的路径了
 let [inPath, outPath] = paths
}
如果命令参数没有附带怎么办?
如: node json2excel start 不带路径然后就回车
那我们就引导用户再次输入,使用"co","co-prompt"这两个工具
上代码:../command/j2c.js
const co = require('co')
const prompt = require('co-prompt')

module.exports = (paths) => {
 co(function* () {
 let [inPath, outPath] = paths
 // 处理用户输入
 inPath = inPath ? inPath : yield prompt('Input file directory: ')
 outPath = outPath ? outPath : (yield prompt('Output file directory: ')) || inPath
 })
}
co里面接受generator函数,主要是异步操作作同步处理的写法。
运行 node json2excel start

这样就可以保证拿到输入输出的路径了,用户体验满分,棒棒的。
下一步, 通过拿到的输入路径,获取json文件 ,使用"glob"这个工具,通过正则匹配拿到inpath路径下所有的json文件
站在巨人的肩膀上做事,事半功倍,代码如下:
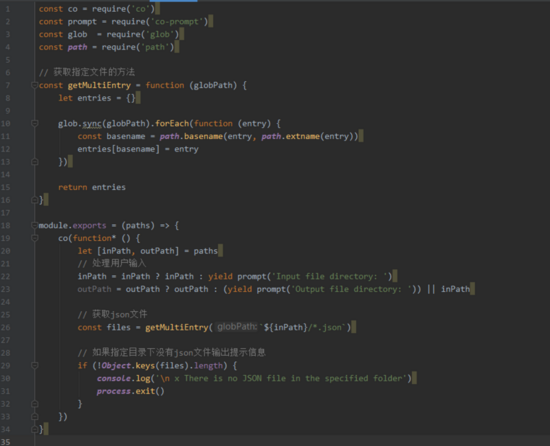
拿到json文件,我们就开始向Excel转换,csv是一种和json一样简单数据结构,我们把json转成csv的格式。
以下是json格式和csv格式的对比,这样去看,转换也不难。左边是json数据格式,右边是字符串,可以这么理解。
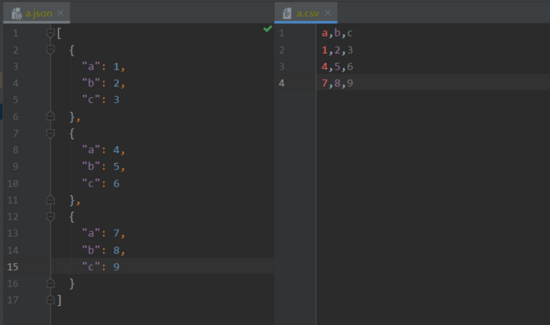
我们使用"json2csv"这个包,有时间的也可以自己转换拼接。
读取json文件并转换成scv:
const Json2csvParser = require('json2csv').Parser

for(let filename in files) {
 // 同步读取文件
 let jsonData = fs.readFileSync(files[filename])
 jsonData = JSON.parse(jsonData)

 // json2csv转换
 const fields = Object.keys(jsonData[0])
 const json2csvParser = new Json2csvParser({fields})
 const csvData = json2csvParser.parse(jsonData)

 // 写入的文件名
 const outputFileName = `${outPath}/${filename}.csv`

 // 写入文件
 const err = fs.writeFileSync(outputFileName, csvData)
 if(err) {
 return console.log(err)
 } else {
 console.log(`- ${filename}.json Conversion successful!`)
 }
}
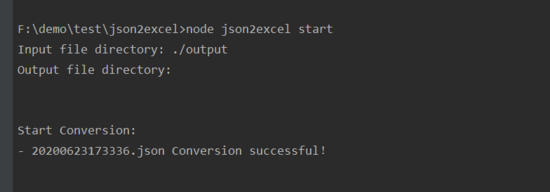
运行后可以得到一个.csv的文件,一个简单的实现完成。
细节优化,并实现:
在office下会显示乱码,所以要定义为UTF-8的格式存储。
// office Excel需要 BOM 头来定义 UTF-8编码格式
const BOM = Buffer.from('\uFEFF')
const csvData = Buffer.concat([BOM, Buffer.from(csvData)])
如果输出路径不存在,存储也不会成功
// 不存在文件夹就创建
if(!fs.existsSync(outPath)) {
 fs.mkdirSync(outPath)
}
json格式数据,有对象形式的,也有数组形式的,如果是对象就转化成数组
// 如果是对象,把对象的每一个键值对,转化成'key', 'value'的数组项
let jsonData, fields
if(Object.prototype.toString.call(jsonData) === '[object Object]') {
 jsonData = Object.keys(jsonData).map(key => ({
 key: key,
 value: jsonData[key]
 }))
 fields = ['key', 'value']
}
if(Object.prototype.toString.call(jsonData) === '[object Array]') {
 jsonData = jsonData
 fields = Object.keys(jsonData[0])
}
存储成功显示文件存储的路径,并退出进程
// 提示输出的文件目录,并退出
console.log(chalk.blue(`- Please go to check the file: ${chalk.underline(path.join(process.cwd(), outPath))}`))
process.exit()
操作加提示,并且输出的文字加颜色
// 使用一个非常方便的工具chalk
const chalk = require('chalk')

console.log(chalk.green('Start Conversion: '))
完整代码如下:
'use strict'
const fs = require('fs')
const path = require('path')
const chalk = require('chalk')
const glob = require('glob')
const co = require('co')
const prompt = require('co-prompt')
const Json2csvParser = require('json2csv').Parser

// 获取多文件的方法
const getMultiEntry = function (globPath) {
 let entries = {}

 glob.sync(globPath).forEach(function (entry) {
 const basename = path.basename(entry, path.extname(entry))
 entries[basename] = entry
 })

 return entries
}

module.exports = (paths) => {
 co(function* () {
 let [inPath, outPath] = paths
 // 处理用户输入
 inPath = inPath ? inPath : yield prompt('Input file directory: ')
 outPath = outPath ? outPath : (yield prompt('Output file directory: ')) || inPath

 // 遍历获取json文件
 const files = getMultiEntry(`${inPath}/*.json`)

 // 如果指定目录下没有json文件输出提示信息并退出进程
 if (!Object.keys(files).length) {
  console.log(chalk.red('\n x There is no JSON file in the specified folder'))
  process.exit()
 }

 // 开始转换文件
 console.log('\n ')
 console.log(chalk.green('Start Conversion: '))

 for(let filename in files) {
  // 同步读取文件
  let jsonData = fs.readFileSync(files[filename])
  jsonData = JSON.parse(jsonData)

  /*
  * 判断csv能接受的数据结构
  * 如果是json对象,则取key, value作为列
  * 如果是json数组,则读取第一行的所有key
  * */
  let jData, fields
  if(Object.prototype.toString.call(jsonData) === '[object Object]') {
  jData = Object.keys(jsonData).map(key => ({
   key: key,
   value: jsonData[key]
  }))
  fields = ['key', 'value']
  }
  if(Object.prototype.toString.call(jsonData) === '[object Array]') {
  jData = jsonData
  fields = Object.keys(jsonData[0])
  }

  // json格式 => csv格式
  const json2csvParser = new Json2csvParser({fields})
  const csvData = json2csvParser.parse(jData)

  // office Excel需要 BOM 头来定义 UTF-8编码格式
  const BOM = Buffer.from('\uFEFF')
  const bomCsv = Buffer.concat([BOM, Buffer.from(csvData)])

  // 写入的文件名
  const outputFileName = `${outPath}/${filename}.csv`

  // 不存在文件夹就创建
  if(!fs.existsSync(outPath)) {
  fs.mkdirSync(outPath)
  }

  // 写入文件
  const err = fs.writeFileSync(outputFileName, bomCsv)
  if(err) {
  return console.log(err)
  } else {
  console.log(chalk.green(`- ${filename}.json Conversion successful!`))
  }
 }

 // 提示输出的文件目录
 console.log('\n ')
 console.log(chalk.blue(`- Please go to check the file: ${chalk.underline(path.join(process.cwd(), outPath))}`))
 process.exit()
 })
}
之后就是使用命令了,如何安装使用命令?
package.json bin命令
实现,在项目根目录建一个bin目录,package.json定义个bin命令
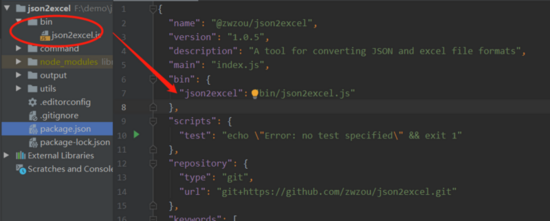
在bin/json2excel.js 文件的开头写上 #!/usr/bin/env node
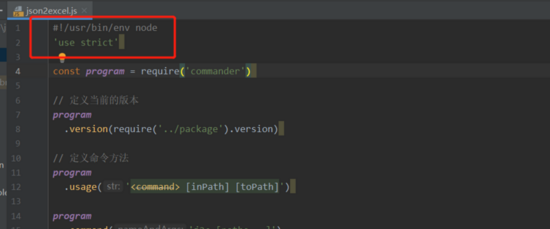
项目包安装的时候,npm就会在 /node_modules/.bin 里面安装一个bin命令,这样可以使用json2excel命令了,执行json2excel start *
如果是全局安装就可以在任何地方使用。
至此,一个json转csv的实现完美的完成。
从json转换csv,如果拿到csv如何还原成csv呢?
增加命令:
把json转csv更名为 json2excel j2c [paths]
csv转json取名为 json2excel c2j [paths]
csv转成json和前面的实现差不多,这里不再写了。
完整代码请看 https://github.com/zwzou/json2excel#readme
至此一个完整的json - excel格式转换完成。 期待以后扩展其它的格式
总结
加载全部内容