Linux oracle 9i图文安装教程六 完结篇
人气:0
版权声明:原创作品,允许转载,转载时请务必以超链接形式标明文章 原始出处 、作者信息和本声明。否则将追究法律责任。
前期工作:
前面已经讲到了安装Linux系统及加载相应的软件包,参考地址如下:
Linux oracle 9i图文安装教程一(https://www.qb5200.com/os/RedHat/9918.html),
Linux oracle 9i图文安装教程二(https://www.qb5200.com/os/RedHat/9919.html)
Linux oracle 9i图文安装教程三 (https://www.qb5200.com/os/RedHat/9920.html)
Linux oracle 9i图文安装教程四 (https://www.qb5200.com/os/RedHat/9921.html)
Linux oracle 9i图文安装教程五 (https://www.qb5200.com/os/RedHat/9922.html)
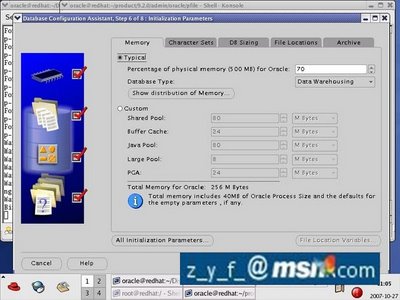
这一节将将完成Oracle的安装.其中包括重定向数据库的存放路径及打上安装完成后的几个必须的补丁;再加上在其它机器的客户端上远程联接Oracle. 本节中需在计算机中输入的数据将以蓝色字体标记.
一:继续安装Oracle


四:远程查看和登陆Oracle


至此,Oracle的安装已经圆满完成,谢谢大家支持
Linux oracle 9i图文安装教程一(https://www.qb5200.com/os/RedHat/9918.html),
Linux oracle 9i图文安装教程二(https://www.qb5200.com/os/RedHat/9919.html)
Linux oracle 9i图文安装教程三 (https://www.qb5200.com/os/RedHat/9920.html)
Linux oracle 9i图文安装教程四 (https://www.qb5200.com/os/RedHat/9921.html)
Linux oracle 9i图文安装教程五 (https://www.qb5200.com/os/RedHat/9922.html)
Linux oracle 9i图文安装教程六完结篇 (https://www.qb5200.com/os/RedHat/9923.html)
前期工作:
前面已经讲到了安装Linux系统及加载相应的软件包,参考地址如下:
Linux oracle 9i图文安装教程一(https://www.qb5200.com/os/RedHat/9918.html),
Linux oracle 9i图文安装教程二(https://www.qb5200.com/os/RedHat/9919.html)
Linux oracle 9i图文安装教程三 (https://www.qb5200.com/os/RedHat/9920.html)
Linux oracle 9i图文安装教程四 (https://www.qb5200.com/os/RedHat/9921.html)
Linux oracle 9i图文安装教程五 (https://www.qb5200.com/os/RedHat/9922.html)
这一节将将完成Oracle的安装.其中包括重定向数据库的存放路径及打上安装完成后的几个必须的补丁;再加上在其它机器的客户端上远程联接Oracle. 本节中需在计算机中输入的数据将以蓝色字体标记.
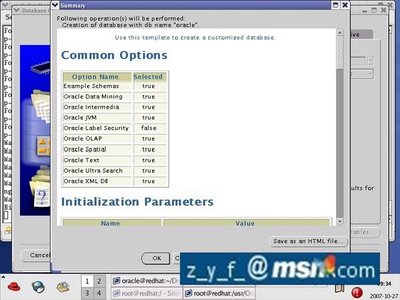
一:继续安装Oracle
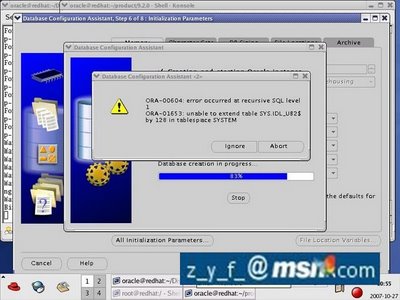
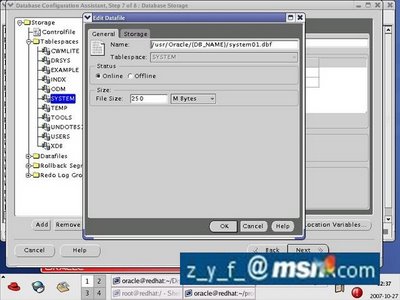
在安装中如果出现"ora-00604","ora-01653"的错误,是因为默认的SYSTEM表存放在"/oradata"下,空间不够的原因,本例中把它重新定位到"/usr/Oracle"下就没问题了.
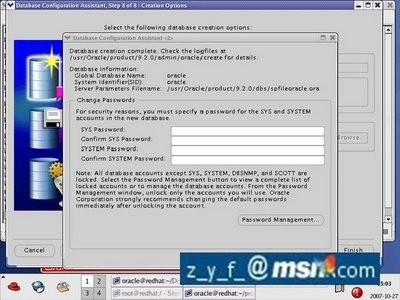
输入数据库管理员的密码.
完成安装
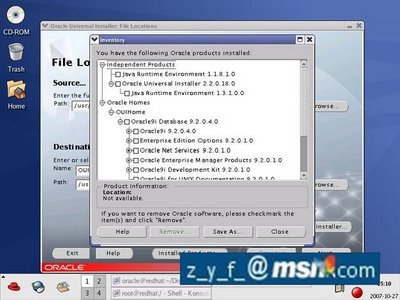
重新检测已安装的组件
二:为完成安装的系统打上补丁
在安装配置时agent会起不来,可以先忽略,打上补丁后就可以了
su oracle
cp p2617419_210_GENERIC.zip /tmp
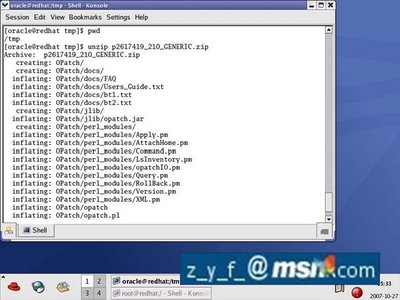
cd /tmp
unzip p2617419_210_GENERIC.zip
export PATH=$PATH:/tmp/OPatch
export PATH=$PATH:/sbin
cp p3238244_9204_LINUX.zip /usr/Oracle
unzip /usr/Oracel/p3238244_9204_LINUX.zip
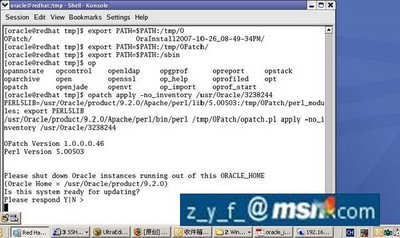
opatch apply -no_inventory /usr/Oracle/3238244
find $ORACLE_HOME -name "*.mk" | xargs grep -l dbsnmp
cd $ORACLE_HOME/network/lib
make -f ins_oemagent.mk install
cp p2617419_210_GENERIC.zip /tmp
cd /tmp
unzip p2617419_210_GENERIC.zip
export PATH=$PATH:/tmp/OPatch
export PATH=$PATH:/sbin
cp p3238244_9204_LINUX.zip /usr/Oracle
unzip /usr/Oracel/p3238244_9204_LINUX.zip
opatch apply -no_inventory /usr/Oracle/3238244
find $ORACLE_HOME -name "*.mk" | xargs grep -l dbsnmp
cd $ORACLE_HOME/network/lib
make -f ins_oemagent.mk install
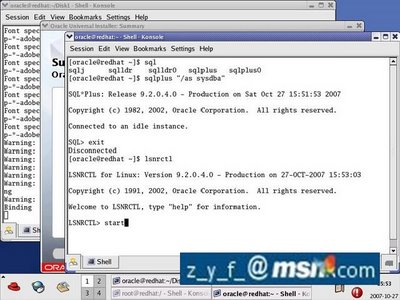
三:在本机测试数据库是否已启动
su oracle
sqlplus "as /sysdba"
exit
lsnrctl
stop
start
sqlplus "as /sysdba"
exit
lsnrctl
stop
start
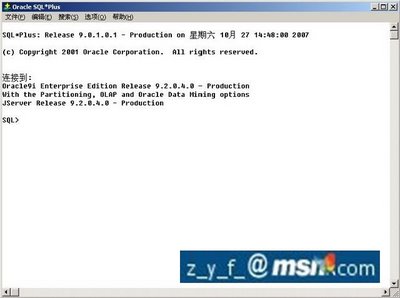
四:远程查看和登陆Oracle
至此,Oracle的安装已经圆满完成,谢谢大家支持
Linux oracle 9i图文安装教程一(https://www.qb5200.com/os/RedHat/9918.html),
Linux oracle 9i图文安装教程二(https://www.qb5200.com/os/RedHat/9919.html)
Linux oracle 9i图文安装教程三 (https://www.qb5200.com/os/RedHat/9920.html)
Linux oracle 9i图文安装教程四 (https://www.qb5200.com/os/RedHat/9921.html)
Linux oracle 9i图文安装教程五 (https://www.qb5200.com/os/RedHat/9922.html)
Linux oracle 9i图文安装教程六完结篇 (https://www.qb5200.com/os/RedHat/9923.html)
加载全部内容